ABSYNTH
1. Introduction
Absynth is a semi-modular synthesiser that brings together elements of everything we have looked at over the length of the course so far. It is capable of producing many different types of synthesis (and it’s a sampler too) and has an overwhelming number of waveforms at its disposal. It is an incredibly powerful device that is renowned for producing the atmospheric sounds that you hear in film soundtracks (it also helps that it’s capable of outputting up to 8 separate audio outputs!)
On the surface this is an intimidating synth to get your head around. Not only is each Oscillator a synth in it’s own right with a large number of parameter that can be modulated via envelopes that contain up to 68 sync-able break points, but you can even draw your own waveforms!
The learning curve of this synth means you will need to spend time with it but this week we intend to get you on that journey.
2. Absynth Interface and Global Controls
The Absynth interface is divided into separate windows each of which takes on a specific role. At the top of the display is the Navigation Bar which contains the window headers and other global options such as the CPU, Input and Output meters, the File and Edit menus and the Rec button (for audio recording, more of this later) You can access each window by clicking on the relevant window title at the top of the display and you can open multiple windows by holding down CMD and clicking on the title, although this only works in standalone mode.

The file and edit menus contain the standard options you find on most soft synths (New, open, save sounds etc in the File Menu and cut, copy, paste etc in the Edit Menu) The Panic button (!) is very useful as it kills any sound dead, handy if your sound has taken on a life of it’s own and it spiralling out of control!
On the lower part of the Navigation Bar there is the Sound Name/display from which you can choose different presets and the Mutate button, which can be used to randomise a patch to create new and interesting variations (More of this in the following chapter)
3. The Browser and Attribute Windows
The Absynth Browser window allows you to search for and load sounds. There are two alternative modes the Database and the File Tree Views that are toggled by pressing the Sounds button in the top left-hand corner of the window.
In Database View mode sounds are searchable by their attributes, that is descriptive metadata that can be added to sounds as they are created (via the Attributes Window) Each sound is grouped via a series of columns that enable you find sounds of a similar nature very quickly (e.g. Synth Pad/Deep Pad / Synthetic) To search, just click a category and the available sounds will appear in the right hand side of the display.

Alternatively, if you know the name of the sound you are after you can use the search form box above the groups, you can also search for sounds via their attributes this way too.
The File Tree View uses a more traditional folder browser structure as found in most modern OS’s, note that you cannot rename, copy, move or delete files from here. If you need to do this you can do it from the relevant folder in the Operating System as you would any other file type.
Contained within the Browser Control Bar is a button marked Programs. Programs are a way of bringing together a custom selection of sounds that can be set as a default and can be selected using MIDI Program Change messages and host automation from your DAW.

To create the Program List, you can drag and drop from the search results list and then the sounds can be re-ordered as you require.
Mutator
Remember the fun and games that could be had with Snapshot Morphing in Reaktor? Well Absynth has its very own system called Mutator.

The way that this works in Absynth is by mutating the currently loaded Sound with sounds that appear in the Search Result List. More specifically it allows you to select some parts of the loaded Sound and to ‘Mutate’ them towards the equivalent parts of other Sounds in the list. What’s cool about this is you can select sounds for mutation based on their attributes (you want deep distorted pads? You got it! You want percussive FM bass? You got it!).
To mutate a sound:
- Set the Mutation Amount slider
- Set the Random Amount slider (If required)
- Adjust the Global Sound Parameters ‘on the fly’ by using the
FInetuning controls
- Hit the Mutate button.
- Not what you wanted?
- Hit Retry or hit the Mutate button again.
- Rewind to previous Mutations via the Mutation History
Mini-Patch View
This shows the current state of the modules, as seen in the Patch Window, within the loaded patch. You can also select components to include in the Mutation process.
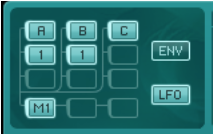 Each Module has three states:
- Totally dimmed: the module is deactivated in the Patch Window, it can’t be used in the mutation process.
- Highlighted border only: It’s active in the Patch Window but can’t be used in the mutation process
- Component lit: It’s active and can be included.
The modules in the Mini-Patch view are laid out in exactly the same way as they are in the Patch Window, this will all become a lot clearer as we explore the Patch Window in the next section.
Audio Recorder
 Akin to the Audio Recorder in Reaktor, this is a quick way of getting ideas down without having to fire up your sequencer. Pressing the ‘Rec’ button on the Navigation Bar brings up the Audio Recorder Window and here you can record your Sound to an audio file. To arm the recorder press the red record button and then to start recording you can do one of two things:
1. Click the Start/Pause button
2. Activate the wait for note switch where by the recording will start when you press a key on either your MIDI, virtual or computer keyboard.
The recording stops when you either click the stop button or the fixed length time is surpassed (make sure the Fixed Length switch is on for this.
The overdub switch lets you add additional layers of audio to the recorded file. With the overdub switch selected, levels are controlled by the Synth and Tape sliders.
Try combining different patches from the browser together to create wild new sounds!
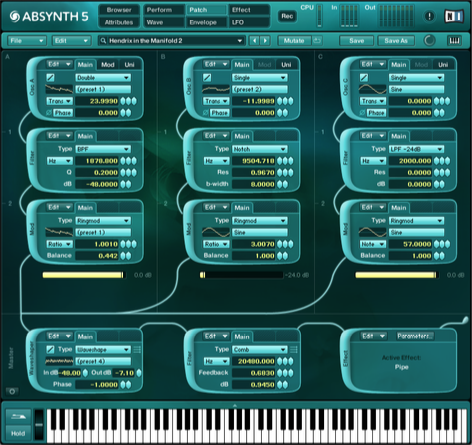
4. The Patch Window
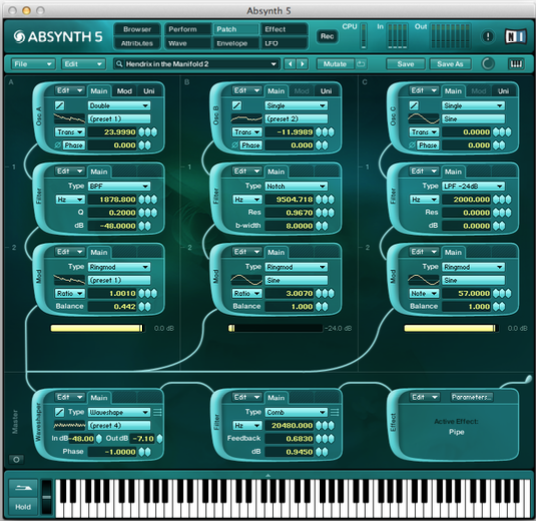
This is the heart of mothership, and the centre of the Absynth world. As mentioned before Absynth follows a semi modular design and, as such, it is important to understand the signal flow within the
patch.
 To start with there are 3 channels (A, B & C) which consist of 3 vertically arranged fields that can be activated by clicking on the thick bar on the left hand side of the module, that contains the module name. Absynth will not output any sound unless at least one channel is active even if it is being used as FX.
The top module in the channel is always an Oscillator, but the second and third fields can adapt depending on what the oscillator is doing. There are three additional modules available the Filter, Modulator and Waveshaper.
The signal passes through each activated
Channel (Oscillator!field 2!field 3!) and the
channel outputs are then mixed together, yellow
level faders control each Channel’s volume,
before being passed to the Master Section for additional processing.
The master section consists of three modules that run from left to right. The first two of these can be user selected (choosing from Waveshaper, Filter & Modulation Modules) but the third module in the chain is reserved for the Effect module.
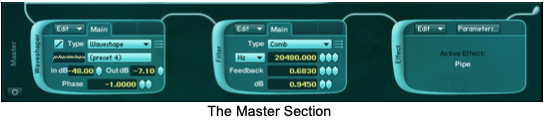
You’ll notice a little symbol in the top right hand corner of each Master Module that does the following:
• Mono Mode: The 3 modules work in series from left to right and the output from the three channels (A, B & C) is summed and routed into the first master module.
• Poly Mode: The master modules work in parallel and are independent of each other. Each module processes a separate channel.
You can switch between the two different modes by clicking on the symbol.
Common Module Features
Before we take a look at the individual modules in more detail I want to look briefly at features that are common to all. Each module has an edit menu in its top left hand corner that contains global options for that module such as the copying and pasting of settings. You can also mutate and re-mutate parameters for the particular module.
Most settings in Absynth can be saved individually as Templates into a Universal Library that you can think of as a kind of component store. You can save and load Templates for individual waveforms, Envelopes, Effects, complete modules (with appropriate envelopes) and even entire channels. In this respect Absynth starts looking more and more like a fully modular synth!
![]() One of the most important common features is that of the Frequency Menu and Frequency Control. This contains a number of different modes that set how the oscillators will react to incoming notes. You can choose from the following:
One of the most important common features is that of the Frequency Menu and Frequency Control. This contains a number of different modes that set how the oscillators will react to incoming notes. You can choose from the following:
- Trans: The oscillator follows the pitch of the note, with the frequency control determining the transposition in semitones.
- Ratio: Transpose the oscillator according to a frequency ratio. This is dead handy for frequency modulation and ring modulation.
- Hz: Fixed pitch in Hertz. This is also useful for frequency and ring modulation. It won’t respond to any note information from your keyboard or react to anything like pitch bend or LFO but it can be controlled by an envelope
- Note: Same as Hz mode but the pitch is fixed to a MIDI note. We’re now going to take a look at each of the modules in more detail
The Oscillator Module
The Oscillator is the first module in the signal chain for each Channel and is the only module that produces a sound. It is an insanely powerful module that is capable of producing a range of synthesis as well as acting as a sampler and allowing audio input.
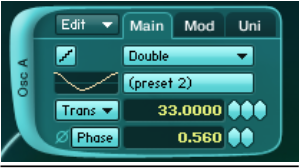
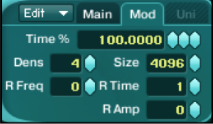
There are three tabs across the top of the module that access different parameters, with the Mod tab being active dependent on the synthesis method chosen in the Main tab.
The most important element in the Main tab is the Synthesis Menu (in Double mode in the diagram above), which defines the type of synthesis performed by the main oscillator. The following synthesis modes are available from this menu:
- Single: In this mode a single oscillator is active and its waveform can be selected from the wave menu (see below) Note that the Mod tab is not available in this mode.

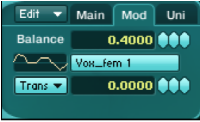
- Double: A pair of oscillators are active; waveforms can be selected from the Main and Mod tabs.

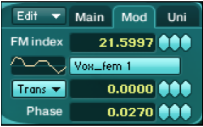
- FM: Yup, that’s right, an FM synth built right into the oscillator! The Main panel contains the carrier (with the same parameters as Single mode) The Mod tab acts as the modulator.
- Ringmod: Ring modulation occurs by multiplying the signals from the Main and Mod oscillators.
- Fractalize: Remember those fractal pictures that showed images that could be zoomed in to forever? Well, this does it with waveforms!
In reality this means that you can add copies of a waveform to itself (using the iterations parameter to determine how many copies) essentially adding overtones to the original waveform.

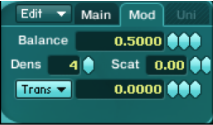
- Sync Granular: One of two granular synthesis modes in Absynth, this one uses waveforms (library or user created) as the source material, slicing it up into tiny ‘grains’ that you have control over before resynthesizing them back together.
- Sample: It’s a sampler! You can playback any AIFF or WAV file, although options are limited to controlling start time and simple looping.

- Granular: Works the same as Sync Granular mode except the source is now any audio file you wish to load.
• Audio In Mode: Turns Absynth into an effect but allowing the routing of audio signals in through the oscillator
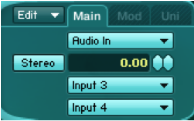
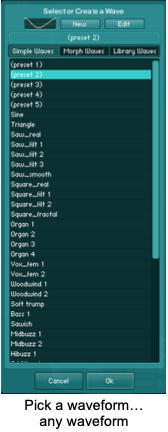 The synthesis menu broadly fits into 3 categories, Wavetable Synthesis, Sampling and audio input. The second dropdown menu changes context depending on which category is active. When a wavetable synthesis mode is active, clicking on this second menu brings up the Waveform selection dialog box. Here you can choose from an overwhelming large amount of waveforms that basically fall into 3 types:
- Simple Waves: Single cycle waveforms that are read from a wavetable.
- Morph Waves: These work in exactly the same way as the waves in Massive. Two waveforms are stored in the same amount of data and you can seamlessly morph between them,
- Library Waves: These are the waveforms that are stored in the Absynth’s Universal Library.
If that isn’t enough for you, there is also the option to either edit each waveform (you can’t edit factory ones) directly or to create brand new one using the Wave Window (more of this later!)
It’s also worth mentioning at this point that the waveform selection dialog is used in any module that requires some sort of waveform as a source, this also includes modulation such as the LFO. Consequently you will find this dialog box available in other modules such as the Mod and Waveshaper modules.
The Filter Module
This is as close as Absynth gets to a standard synthesiser module. In the Main tab you will find all the standard filter types (HP, LP & BP for example) as well as a couple that are unique to Absynth that are definitely worth a closer look.
- Supercomb: A comb filter on steroids equipped with a feedback loop and tonal controls.
 Cloud: A granular delay with multiple feedback and tone controls. This filter is capable of producing some incredible ‘vowel’ type sounds that can be morphed between each other (think low octave and you’re getting there!
The Feedback Panel appears with certain filter types and gives you parameters that allow you to feedback a portion of the filter’s
output into its input processing it along the way via Waveshape Freqshift and Ringmod modes. There’s a whole lot of sound mangling right there!
The Modulator Module
This module is an extra oscillator module that is used purely for modulating an incoming signal. What it can do (or whether it’s available) is entirely dependent on the synthesiser mode set in the oscillator module. Essentially you can use this module for Ring Modulation and Frequency Shifting
The Waveshaper Module
This module uses a waveform to shape the input signal, which is a similar idea to that used in guitar amplifiers and distortion effects. It’s the module to turn to for enriching the input signal by adding harmonics and you can go from subtle thickening through to cutting distortion.
5. The Wave Window
Not enough waveforms for you?? Need to create or edit one of your own or maybe morph a couple together to create something wild and exciting?? Well the Wave Window is for you.
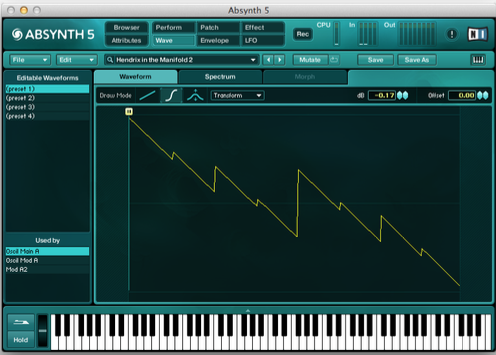
(The Wave Window showing the Waveform Page)
The Wave Window is the place to get creative with waveform design. As we’ve already seen you access waveforms from the Waveform Selection Dialog.
To select a waveform for editing highlight the relevant waveform and click ‘New’ at the top of the dialog box. You may be asking why not click ‘edit’? Well, remember that you can’t overwrite the factory library stuff.
Once you start creating your own, the edit option becomes available.
 This makes total sense as the factory waveforms are used in loads of different presets and the slightest alteration could have lots of unintended consequences!
Clicking ‘New’ on the dialog box loads the waveform into and opens the Wave Window ready for editing.
The Window is divided into two sections, with the left hand side giving a list of all the waveforms that are open for editing and also which module they’re used by.
Them main section gives you access to three pages: Waveform page,
Spectrum page and Morph page.
Waveform Page
Clicking the waveform tab brings up the Waveform page. The toolbar at the top contains all the controls you need for editing the actual waveform. With Draw Mode you can use straight or curved lines in exactly the same way as you would in a graphics editor like Paint, with the stretch tool compressing and stretching a selection of the waveform.
You’ll also notice a transform menu that has even more options from Normalizing and reversing to tools for radically changing the waveform shape, including Fractalize, Filtering and FM!
Spectrum Page
With this page you can edit the first 64 harmonics of the selected waveform. The yellow lines in the top half of the window represent the amplitude of each harmonic and the blue lines in the bottom half represent their phase.

The options available in both Draw Mode and the Transform menu change to reflect the different tools that are available in Spectrum Edit mode.
The Morph Page
Wave morphing is the blending of two waveforms together into a new shape. Both waveforms can be edited individually, as normal, in the Waveform page but the cool thing is that they can be morphed together dynamically creating lively, dynamic sounds that change subtly or even take on a completely new character.

To start, you need to load a morph wave from the waveform selection dialog.
 With the Morph wave loaded you’ll notice a new option in the Waveform Page that allows you to select each waveform in the Morph wave separately for editing.
Clicking the Morph tab will show the two waveforms and the corresponding output. The waveforms are divided into subsections by movable Anchor Points. The morphing occurs between relevant Anchor Points on each waveform (Wave 1 A-B, Wave 2 A-B for example).![]()
Blending between the two waveforms is handled by the Transition control with 0 being 100% Wave 1 and 100 being 100% Wave 2 and 50% being an equal blend of the two.

One final thing about Morphing and probably the coolest thing about it is that you can modulate the Transition control using Macro Controls. Yes, that’s right you can automate the morphing!
6. The Envelope Window
Every synth lives and dies by its modulation possibilities and in this regard Absynth is no different. As we’ve seen, the main modulator in most synths is the envelope and the one’s in Absynth are incredibly flexible and can be used to modulate an insane number of parameters.
Before we get stuck in, there are a few fundamentals that apply to their operation.
- Each oscillator has a standard amplitude envelope.
- The maximum value for each modulate-able parameter is set in the patch window. For example, if the filter has a maximum frequency of 5KHz this value cannot be exceeded (although it can be lower)
 Envelope templates can be loaded from and saved to the Universal Library.
- You can zoom on the x and y axis of each envelope by clicking and dragging in the search row and column (look for the magnifying glass)
The Envelope List sits on the left hand side of the display and contains all assigned envelopes. You can select an envelope by clicking on it in the list or alternatively shift-clicking to select multiple ones, or option-click to select non- consecutive ones.
New Envelope creates a new envelope from a list of parameters that are available for modulation. Only relevant parameters can be selected.
Show menu gives you a quick way of choosing which envelopes are visible in the main display. Options range from All through to envelopes for individual modules.
As with most other windows the Edit menu gives you the usual undo/ redo and copy/paste functions.
Breakpoints
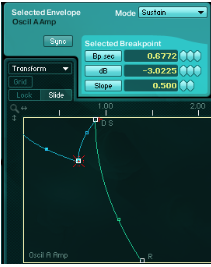 A Breakpoint is created by right-clicking in the envelope display and is deleted by right- clicking it again. For each Breakpoint there are three parameters that allow you to precisely position it. Positioning can be achieved by grabbing the Breakpoint and moving it or alternatively you can enter exact values in the selected Breakpoint area above.
Multiple Breakpoints can be moved at the same time by shift-clicking them or by clicking and ‘rubber band-ing’ around them.
The Grid Switch toggles a grid that can be set to standard tempo resolutions (1/16th etc) which is incredibly useful, as Breakpoints will snap to it when it’s switched on. Additionally, with the Sync switch activated the Envelope will sync to any Host-Software.
The Lock/Slide Switch dictates how Breakpoints react when moved by. If Lock is selected a Breakpoint will only move to the next Breakpoint. With Slide selected all subsequent Breakpoints will move together.
Envelope Modes
There are several different ways that an envelope can be triggered:
- Release Mode: The envelope will jump to the release stage of envelope if the key is released before the sustain/release point is reached. Advisable for percussive and Piano-like sounds.
- Sustain Mode: Works like a classical ADSR envelope
- Loop Mode: The envelope will loop from the selected Breakpoint to the Sustain/Release point. The Loop Start Marker will appear as a red sidewise-tilted U and the looped area will be blue.
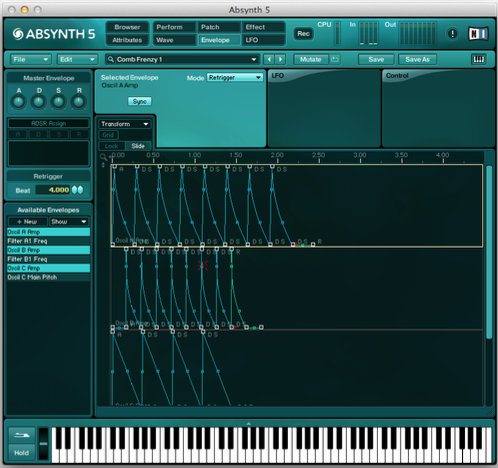
- Retrigger Mode: The envelope is retriggered according to a Retrigger value providing the note is held. This is awesome for creating rhythmic, looped paths
- Control Driven Envelopes: Radically different to any of the other envelopes here, these envelopes essentially allow for Macro control over the envelope! In reality this means being able to create Arpeggios by turning a controller or changing the speed of rhythms from the Mod wheel.
- Link Mode: Used for linking envelopes together, all changes made to one envelope have an immediate effect on another (linked) envelope. This is a great option for altering multiple envelopes at the same time.
- Sample Jump: Retriggers a sample in a synchronised tempo. You can set an individual Retrigger position in the sample for every Breakpoint. Only works when at least one oscillator is set to Sample Mode. Try loading a vocal phrase into the oscillator and setting breakpoints through out it for instant mashed up fun!
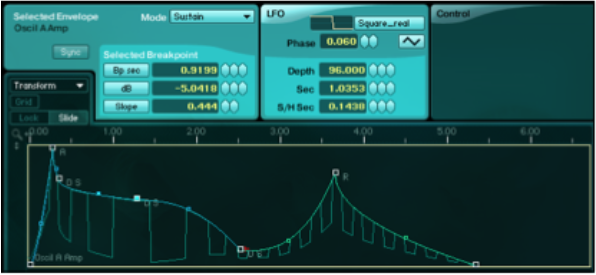
Envelope LFO
This is an LFO that can be applied directly to the envelope (literally- it can be drawn in!) The LFO wave influences the entire envelope but every Breakpoint can have different depth and speed settings.
The Transform menu contains a bunch of functions that you can use to quickly transform the selected Envelope. As well as functional options like scaling and duration, the option Expand to Rhythm allows you to adjust the steps of the Envelope to a rhythmic grid. You can think of this like a step sequencer or pattern programmer in that you can create insane sync-able rhythmic modulations or completely independent rhythms!
The Master Envelope is a fully assignable envelope that can have any Breakpoint in an envelope assigned to each of the controls. This is incredibly useful in a live situation where you might want some of the most common parameters assigned to a MIDI controller.
7. The LFO Window
Absynth has three LFOs that can be used for modulation and these are accessed from the LFO window. As with the oscillator module, LFO waveforms are chosen from the Waveform Selection Dialog and all waveforms including morph waves can be used.
Each LFO works the same; you select the waveform from the oscillator section at the top where you can also set Mono or Poly mode, determine the rate (in seconds or beats) change the phase and/or switch Sample&Hold on or off.

The middle part contains two sections: The Channel Parameters and the Master Parameters, where you can set the relevant LFO targets.
Finally, the lower part contains the Controller Section where you can assign MIDI control to certain LFO parameters like speed.
8. The Effects Window
The effect section in Absynth is full of the wild and the wonderful. Each effect is capable of producing a wide range of effects and we’re going to look at them each in turn.
It’s worth noting at this point that for this window to be visible the effect module must be switched on in the patch window- now to the effects!
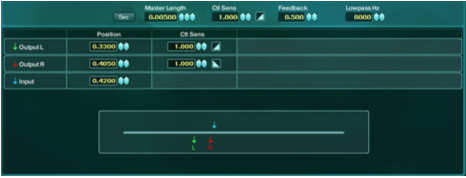
Pipe
Replicates the physical qualities of resonating bodies. The input position can be considered to be virtual loudspeaker that’s attached to a string. The outputs (L & R) are akin to pickups or microphones. This is a great effect for creating various flanging, pitching and rotary speaker effects. Try modulating these parameters with an LFO or MIDI controller.
Multicomb
Offers up to six independent delay lines, based on comb filters that use Lowpass filters in the feedback loop. Perfect for modulation effects, like chorus and flanging.

Multitap
A simple delay with three taps, the first tap can be fed back into itself to create dense delay clusters.

Echos
This is the one to go to for classic echo-type effects.
Resonators
This effect gives access to three ‘resonating bodies’ and can be used to create delay and hall effects, or to simulate the sound of specific objects such as metal bars, brake drums and bottles. The great thing about this is that you can combine them to produce out of this world effects like nearly infinite halls and the like.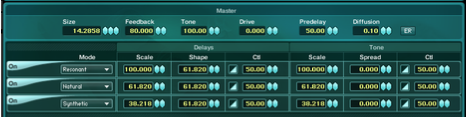
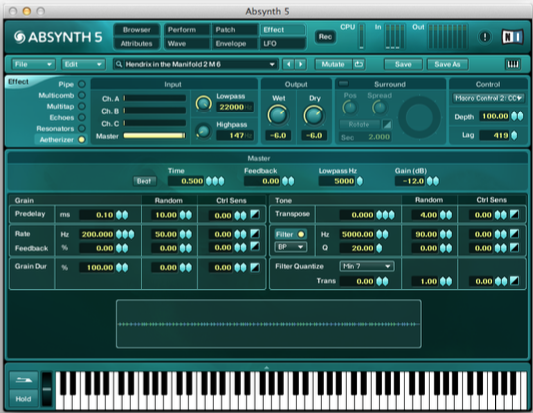
Aetherizer
An awesome effect that is unique to Absynth, the Aetherizer is based in a granular delay but it allows further processing at the grain level via transposition, a feedback loop and a bandpass or comb filter, before it’s passed to a post-delay section with it’s own feedback loop.
It’s essentially split into to two halves, the Grain section and the Tone section.
 The Grain section gives you control over the shape of the grain cloud, this includes parameters for change the length of each grain, the rate at which the input signal is chopped up and the position in the incoming signal at which the grains are taken.
The Tone section deals with the tonal colour of the grains. The Transposition control lets you adjust the transposition of the grains in semitones with the Filter switch enabling and disabling the grain level filter.
With the filter activated more controls come into play, firstly giving you a choice between a bandpass and a comb filter. Frequency and Resonance controls affect the filter at the grain level, and Filter Quantize enables you to quantize the cutoff frequency of the tone of each grain according to various modes (mainly scales).
So what does this all do? The key to using this effect is the interplay between the transposition and length of each grain. The best way to demonstrate this is to use the random parameters to add movement at each stage, especially with the Transpose and Grain Duration parameters. Try high feedback settings to get a shimmering mess of wonder!
Bear in mind that every parameter can be modulated using envelopes. For a simple example, try modulating the Wet Output with an envelope to have the effect fading in and out in a rhythmical way.
9. The Perform Window
Throughout the weeks of this course, you’ll have noticed that one common thread is that movement is the key to making interesting and varied sounds. We’ve already looked in depth at the various methods to automate movement through the use of Envelopes and LFOs. The Perform Windows opens up the possibility of assigning different types of controls to parameters to allow for the manual modulation of sounds via MIDI controllers and control in Host-Software.

This really comes into it’s own in a live situation where you might want to set up multiple controls to create incredibly expressive sounds ‘on-the-fly’
The Perform Window consists of a global section where you can set polyphony, global tuning and tempo and six different tabs giving deeper access to the various methods of control. The Master Envelope that we first saw on the Envelope page is also present here along with an Audio In section that establishes the level of the input signal which you can change by adjusting the threshold level (a bit like old school hardware samplers)
Controllers Page
This is an overview of the Macro Controls that can be assigned to any parameter (or number of parameters) As well as standard MIDI control the XY control can be set up for joysticks or trackpads giving control over two parameters at once.
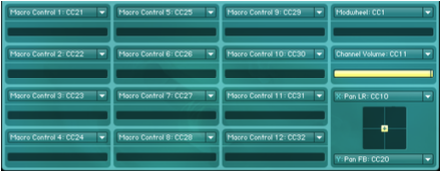
If you want to control a Macro Control from a MIDI controller you will need to assign a MIDI control source first by using the MIDI learn function (Right-click on the down arrow by each Macro Control to access)
Assignments
This page is used to assign individual parameters to the Macro Controls essentially fine-tuning every individual Macro Control. The left hand side shows the list of all Macro Controls with the centre section showing the assigned parameters for the selected Macro Control.
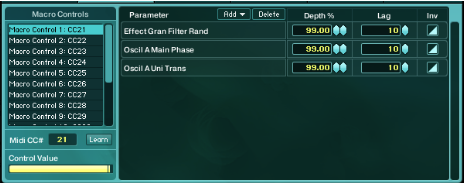
Adding parameters is as simple as clicking on the ‘add’ menu and there is no limit to the number of parameters that can be assigned to each control.
MIDI Page
Used for setting the remaining standard MIDI parameters like pitch bend, Volume and Velocity
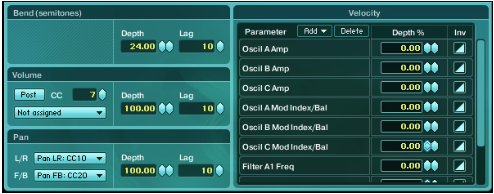
Note that any number of parameters can be set to velocity (for a simple one try setting the velocity to the filter cutoff)
Note Page
Establishes how much a parameter can be modulated depending on the played note, it also enables Glide. On a basic level this page can be used to set parameters for keyboard and filter scaling, but any parameter can be set up for note control (try assigning this to the Oscii FM Index, so that it changes every time a different note is pressed)

Tuning Page
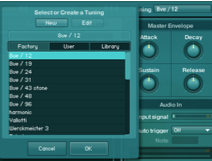
You didn’t think you’d get away with just using a bog standard tuning with Absynth did you?? Oh no, this page allows you to manipulate the tuning in insane detail if you so desire!

When a new sound is created Absynth will default to a standard 12 semitones per octave tuning. Clicking on the tuning selector brings up a dialog containing lots of different preset tunings from the Factory Library. Additionally click ‘New’ will allow you to define your own tunings that are then saved into the User Library.
Audio Mod
The Audio Mod function allows you to derive modulation signals from audio signals. This essentially works like an envelope follower, the input signal is analysed and the results of this analysis is made available when the Signal has its output as a Modulation Signal.
What this means in practice is that incoming audio signals can be used to do things like trigger envelopes and to directly control parameters. The Audio Mod groups (A through D) allow for the setting up different groups of (multiple if wanted) parameters that can be processed all at the same time from the same incoming audio signal!
