Mixing Vocals
Compression
Dynamic control is an essential part of recording vocals. The best dynamic control is achieved from someone who knows good mic technique, getting closer for more intimate sections and moving further away when singing more forcefully. Unfortunately, few vocalists are accomplished at mic technique, so you may need to use electronic dynamics control (compression) instead. Compression and limiting are used on vocal tracks to smooth out the transients in the performance, keep the level steady, and help the vocals sit comfortably within or slightly above the other instruments in a mix. Common compression techniques for vocals usually include peak limiting, light constant compression, and squashing.
Though most engineers will apply some compression at the recording stage, modern productions tend to require the ‘in your face’ type of vocal’, so that compression has become very much an effect on vocals at the mixing stage.

As a general rule, soft-knee compressors tend to be the least obtrusive, as they will have a gentler compression curve. If you want the compression to add warmth and excitement to your sound, try an opto-compressor, valves, or a hard-knee setting with a higher ratio setting than you’d normally use. Typically the LA2 is usually one of the favourites for vocals because the attack sounds very natural. Remember what we discussed about the sound of compressors, so if you have a few available, it is worth comparing them to hear which one works best. We discussed the techniques of using compression and limiting earlier in the course, so I won’t restate them here.
A common mistake is to try to compensate for all the level changes in a vocal performance with the compressor only. Levels may vary considerably in a vocal take between verses, choruses, bridges, etc. – so that even with compression you will have to ride the fader volume of the vocals so that it always sits nicely in (or slightly above) the mix.
Sometimes, when more control is needed, you may want to use two compressors, or a limiter and a compressor – one to control the transients and the other one to compress the overall dynamic range. Be aware that compression raises the background noise (for every 1dB of gain reduction, the background noise in quiet passages will come up by 1dB), and heavy compression can also exaggerate vocal sibilance.
EQ:
We discussed in Week 1 the common practice of carving EQ holes to make room for the primary frequencies in specific tracks in a mix. Vocal intelligibility is mainly found in the 1 kHz to 4 kHz frequency range. By notching some of these middle frequencies on your guitar and keyboard tracks, you can make room for the lead vocal to cut through. You can also go one step further by boosting the vocals in this range while attenuating the same frequencies in the rest of the instrumental tracks, to make the vocals stand out while maintaining a natural overall blend.
Because everyone has a different-sounding voice, vocals are one of the most challenging “instruments” to EQ. Vocal range and gender affect the recorded track the most, but some EQing of the frequencies in the following table can help improve the sound of a vocal performance.
When you’re working with EQ on vocal tracks, it helps to keep a few things in mind:
- Not many people can hear a boost or cut of 1 dB or less when altering the EQ on a sound. In fact, most people won’t even notice a 2 dB to 3 dB change (except people like us). However, subtle changes like these are often very effective. Large changes in EQ (boosts/cuts of 9 dB or more) should be avoided in most cases, unless an extreme effect is desired.
- Instead of automatically boosting a frequency to make it stand out, always consider attenuating
a different frequency to help the intended frequency stand out. That is, try “cutting” a frequency on another track rather than boosting the track you want to emphasize. - Be aware that any EQ settings you change on a particular instrument or voice will affect not only
its sound, but also how the sound of that instrument interacts with all the other tracks in the mix. When altering EQ, don’t listen to the track in solo for too long (if at all). You may make the track sound great by itself, but it might not work with the rest of the instruments.
Also, try these additional tweaks:
- To increase brightness and/or open up the vocal sound, apply a small boost above 6 kHz (as long as it doesn’t affect the sibilance of the track).
- Treat harsh vocals by cutting some frequencies either in the 1kHz – 2kHz range or the 2.5kHz – 4kHz range to smooth out the performance.
- Fatten up the sound by accentuating the bass frequencies between 200Hz and 600Hz.
- Roll off the frequencies below 60Hz on a vocal track using a high-pass filter. This range rarely contains any useful vocal information, and can increase the track’s noise if not eliminated.
De-esser
 A de-esser is a kind of fast-acting compressor on specific frequencies. De-essers are useful for controlling sibilance on vocals, wind instruments, piercing hi-hats, cymbals, and other instruments that sometimes produce annoying frequency boosts between 2 kHz and 10 kHz. Most often, sibilance refers to the hissing effect produced when a
vocalist speaks or sings an “ess” sound. With some vocalists this “ess” sound is very prominent (and irritating), and needs to be reduced to improve the overall vocal performance.
A de-esser is a kind of fast-acting compressor on specific frequencies. De-essers are useful for controlling sibilance on vocals, wind instruments, piercing hi-hats, cymbals, and other instruments that sometimes produce annoying frequency boosts between 2 kHz and 10 kHz. Most often, sibilance refers to the hissing effect produced when a
vocalist speaks or sings an “ess” sound. With some vocalists this “ess” sound is very prominent (and irritating), and needs to be reduced to improve the overall vocal performance.
The advantage of using the de-esser rather than an EQ to cut high frequencies is that it compresses the signal dynamically, rather than statically. This prevents the sound from becoming darker when no sibilance is present in the signal. The de-esser has extremely fast attack and release times.
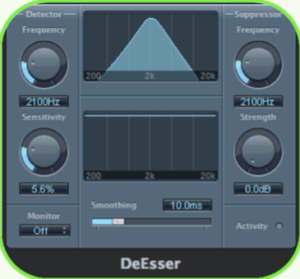
When using the de-esser, you can set the frequency range being compressed (the suppressor frequency) independently of the frequency range being analyzed (the detector frequency). The two ranges can be easily compared in the de-esser’s detector and suppressor frequency range displays
The suppressor frequency range is reduced in level for as long as the Detector frequency threshold is exceeded.
The de-esser does not use a frequency-dividing network (a crossover utilizing low-pass and high-pass filters). Rather, it isolates and subtracts the frequency band, resulting in no alteration of the phase curve.
The detector parameters are on the left side of the de-esser window, and the suppressor parameters are on the right. The center section includes the detector and suppressor displays, and the smoothing slider.
Vocal Treatments
Reverb
Although we’ve seen a recent trend in an overall ‘dryer’ sound (more about that later), the use of reverb on vocals (lead and backing) is still widely used. It’s important to understand the way reverb affects the listener’s perception of a vocal line. For example, adding a lot of reverberation tends to reduce intelligibility, especially with longer decay times, and it can fill up vital space that’s needed to create contrast. Bright reverbs can also emphasise sibilance. On the other hand, too little reverb can make the vocal sound disassociated from the backing track, a bit like a ‘Karaoke’ mix.
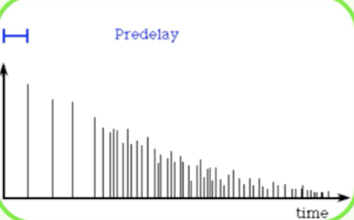
From a psychoacoustic point of view, reverb also affects the perceived position from which the vocals emanate. Adding a lot of reverb creates an impression of distance, which is directly at odds with the usual goal of placing the singer at the front of the band. To make a vocal sound up- front and intimate, you may need to use quite a short setting, but another popular trick when you need stronger and longer reverbs, is to add between 50 and 100ms of pre-delay to the reverb. In order to put a little space between the dry vocal and the reverb that follows, you might want to try inserting a delay unit before the reverb and set up the pre delay with the delay unit.
It is quite a common practice to use two reverb processors on different sends, one to provide an ambience setting to liven up the voice (ambience or room, without hearing an obvious reverb), and another one with a longer time decay (like a plate or hall). Plate reverbs are often used when longer decay times are needed.
As with instruments, long reverb decays work better in songs that leave space for them. One technique often used to prevent reverb from trampling everything is to use automation on the sends that feed the reverb(s), so you can control how much reverb is applied in different parts of the song. Typically you can have a ‘dryer’, more intimate sound for the verses and a ‘bigger’ sound in the chorus. And you can do the same with certain lines only, which you might want to emphasize. Some engineers might end up having 3 reverbs on the lead vocal, bringing them in and out in the mix.
Bright reverbs can flatter vocals but may exaggerate sibilance. If the vocal was fine before adding the reverb, an alternative to de- essing the vocals is to de-ess the feed to the reverb unit, so that sibilance is removed before the reverb is applied.
Delays
We have discussed in depth the use of delays previously, and some of its use when mixing vocals, from creating ADT (double track) to repetition of words. Shorter delays are great when you want to add a sense of space without using reverbs (try short delay times such as 1/8th or 1/16th). Multi tap delays can also be quite useful as they will avoid the obvious repetition of words.
Longer delay times c a n also compromise the comprehension, as words will overlap each other. You can use duck delays to attenuate the effect. A duck delay brings the level of delay down whilst the direct signal is playing, and brings the level of the delay up when the incoming signal stops, so that the delay is only heard in the gaps. If you don’t have a delay unit that offers this feature you can create it with a gate with a duck function such as the Drawmer DS201.
As with reverbs, engineers like to automate the delay feeds, especially with vocals. This is a very common technique so that you can select which lines or words have a delay applied. This is often used to repeat single words, to emphasize either the meaning or to fill a gap. Quite often the delay is EQ’d quite radically, filtered or processed furthered (distortion, modulations etc.)
As I have mentioned previously, it is also quite common practice to add a touch of reverb to the delay signal, so the delay blends with the rest of the track.
ADT
We also discussed this feature in previous weeks, but let us look at some more practical tips on how to create ADT:
- Use a short delay time of 10 to 35ms.
- Copy the original vocal track to another track, and move by the same amount as mentioned above.
- Harmonisers or pitch-shifters are also great to fatten up a vocal sound. If you want to double the vocal, use a mono pitch shifter, detune slightly down, around –8 cents. If you want a stereo effect, use either two mono or a stereo device and pitch one side down and the other up.
- With doubled vocals, panning both to centre, or panning one more left and one more right, gives a very different overall effect. For example, if background vocals are part of the picture, I almost always put the voice in the centre. If I want the voice to cede some of its prominence to the instruments, I’ll spread the two tracks out a little bit to decentralize the vocal.
- Use different panning for particular parts of the song. Typically the verse will feature more central and the chorus more open for a ‘bigger’ sound.
More and more software developers have released dedicated vocals effect processors that include ADT, such as Waves and Antares for example.
Check out the AVox product from Antares – it includes a plug-in for ADT called “DUO”, as well as other dedicated vocal processors.
“DUO” is an all-in-one ADT, with the possibility of altering voice timbre, pitch, time and vibrato.
Dry or Wet?
Vocal production techniques have been evolving quite rapidly over the last decade. Some engineers will tell you that, while there are now more effects on vocals, the net result has been a drier sound than vocals effected with traditional reverb, mainly because most new effects track the vocal, rather than tail it as reverb does.
“Artists say they want drier-sounding vocals,” says Michael Brauer, engineer for Coldplay, “but what they really mean is that they want something other than reverb.” When you hear the vocal truly dry, it loses its life and doesn’t quite blend with the rest of the track.
If you want a vocal really dry, try to pass the signal through different compressors, as each will have its own characteristics, to get an ‘in your face’ vocal sound. Also, adding a bit of distortion via a send and blending the signal back with the original can add some ‘urgency’ to the performance.
Everything we’ve discussed previously can apply here, including subtle pitch shifting, Leslie speaker simulation, other modulation, distortion, etc. Some engineers might use up to six harmonizers at a time on a lead vocal, blending them in lightly to give a lead vocal more emphasis.
The key to processing vocals, whatever the direction you’ll be taking, is to have the right balance. Don’t use effects just because you have them available, which is the danger nowadays with the vast range of plug-ins; they have to work musically for the track. Listening to a lot of records will help you to assess how many effects are applied, and quite often you will notice how subtle the effects on vocals are, although without them the vocal would sound “lost” in the mix.
Many o the general vocal processing rules also apply to backing vocals, except that you don’t have to strive to push the backing vocals to the front of the mix as you do with lead vocals. Indeed, backing vocals are usually designed to sit a little behind the lead vocalist. A patch with obvious early reflections will help thicken BVs, and if you need to use a longer reverb time you don’t have to worry about the backing vocals sitting too far back.
Nowadays, BVs are often associated with BIG stereo, particularly in the choruses, and that’s becoming the norm in pretty much every musical genre. It is now quite common to at least triple/quadruple, or have 5 parts for every harmony, so that if you have a four-harmony part on the bridge, for example, you’ll end up with 16 or 20 tracks of BVs. If you also have a counter melody or vocal pad (OOOOHs and AAAAHs) underneath, introducing further three-part harmonies, you have another 12 or 15 audio tracks, which is why you can end up with around 100 tracks to deal with in your final mix (a very common situation nowadays).
Submix
A technique is to create “slave reels” in your work-in-progress to help keep tracks down during the production process. The idea is that you start with your first session, which contains the music, which we’ll call “XYZ song – backing track”. Bounce all those tracks down to a stereo rough mix pair, import those two tracks into a new session named “XYZ Song Background Vocal Tracking” and leave that “master reel” untouched for the meantime. Make sure the new session has the same start time, tempo, and all pertinent session settings, and record the background vocals there.
You might end up with as many as 30 or 40 tracks of backing vocals, sometimes more if each part is tracked five times. The key here is to create stereo mixes for each harmony part, so that you can still control the level of each part in the final mix, while considerably reducing the amount of tracks to deal with. A five-part harmony, let’s say, at four tracks per note, will give you 20 tracks of vocals that you’ve now comped down to ten tracks (5 stereo pairs).
You can now import the comped BVs into the original session, and save it under another name. Now you can start mixing but can always come back to the BV tracking session if any changes need to be made.
You should do the ‘cleaning’ part at the submix stage, as once bounced into stereo pairs, it will be more difficult to clean in detail, or tune etc. (as we’ve previously discussed with lead vocals). Once you have “perfect” mixes of each part, it will be easier to bring them to sit nicely
Cleaning Tips
All the ‘cleaning’ techniques described earlier apply here too (pop, noise, tuning problems, etc.), but another important factor to consider is timing. Ideally each part should be exactly matched to each other, to get a nicely thick and slick BV effect, but sometimes you might have to adjust the timing of some of the individual parts to obtain a better blend.
One technique to tighten up the beginning and end of words is to group every desired track, inserting a gate triggered with one of the parts. Now the gate will respond to the signal of that track – very useful when some phrases ending with ‘S’ end later than others. With a DAW, you can do the same by cutting all desired audio regions and applying the same fade “IN and OUT” to all of them.
When some words are slightly out, you can cut out the word and move it slightly as needed. You might need to use crossfades between regions to avoid unpleasant clicks.
There are occasions when recorded double tracks and harmonies are just too out of time, and even moving them back and forth doesn’t solve the problem. There is software designed just for that: ‘Vocal Align’ by Synchro Arts. It’s quite widely used to tighten up any double-tracking vocals and instruments. It works well on vocals with a ‘loose’ setting (settings are 1 to 5, with 1 being very tight).

(VocALign® is an audio software solution for music and audio post that will adjust the timing of one audio signal to match the timing of another )
Panning
Panning is the one thing that can be totally different for the backing vocals than for the lead. Depending on the number of backing vocal parts, all sorts of interesting panning schemes abound. A lead vocal – the dominant element in the mix – is almost always panned to the centre, so I rarely if ever pan a backing vocal centre. Think of it as a stage – few lead singers would like their backing vocalists to breathe down their necks.
And in fact, both in terms of sonic intelligibility and interest, it makes sense to give each its own unique space. So, keeping in mind the rest of the sounds in the mix, I try to find a unique pan position for the backing vocal – one that isn’t distracting if the part shouldn’t call attention to itself, and that stands out if the part should call attention to itself.
We can’t cover every possible situation. For now, let’s go with a lead vocal, one backing vocal that harmonizes the lead vocal, and two different two-part sections, each of which harmonizes a unique contrapuntal part. First, I would almost certainly place the lead vocal dead centre. I’d find a unique, non-centre pan for the harmony vocal, then I’d experiment with how it sounds to group each of the two- part counterpoints where the “A” part is mostly to one side and the “B” part is mostly to the other. Then I’d try to put one “A” part on each side, and one ”B” part on each side.
In either of these two cases, I would always give each backing vocal track its own unique pan position. For instance, in the case where the two “A” parts are on the same side, I might begin with one of the two at 60% left and the other at 35% left. Conversely, I’d place the two “B” parts on the right, mirroring these settings— one at 35% right, the other at 60% right. Based on the sound of these possible configurations, I would then decide how to proceed. The exact pan of each of these parts would be subject to the taste of the mixer, producer and artist. I may set the backing vocals one way, live with it while working on other things, and change it up later.
Now that you have your submixes of BVs (for example: low, mid and high harmony chorus, in 3 stereo pairs), I would advise you to send them to a group, so you can control this part with one fader but still adjust the level for each harmony part, as well as the level of reverb or other effects you’ve applied. If you have other blocks of harmonies, do the same, so that you end up with stereo mixes for each part, such as BVs CHORUS, BVs BRIDGE, BVs OUTRO. What started with 50 tracks of backing vocals is now reduced to 3 stereo pairs.
A very important issue when dealing with a lot of harmonies is the balance. Spend some time trying different levels for each part, until it blends really nicely. Usually you should have one part dominating the others – normally the main melody – and the other harmonies slightly underneath.
I find that EQ and compression should sometimes only be used on the overall group (i.e. CHORUS BVs), rather than on individual parts. It’s quite common practice to add a bit of top end at this stage to add some air to the overall sound. Exciters used in moderation can work brilliantly in this situation.
