Pads and Strings
Filling in the Blanks Part Two: Pads
Of all the parts in your arrangement, the importance of a pad is often the one most overlooked. And what a shame, as the right pad part can bring a track alive, increase its poignancy and emotional impact, make the track feel a million Euros.
Conversely, the wrong pad part will ruin a track; make it feel dated, slow, self conscious and a bit naff. Cripes! Luckily, there are plenty of ways to make sure your pad part avoids these pitfalls.
What do we mean by Pad?
There is no standard term ‘pad’, at least not in music, but talk to most producers and arrangers and they’ll instantly know what you’re referring to. For our purposes we will define a pad thus:
“A supporting musical part consisting of sustained notes that closely follows the chord progression in a song, usually not being a feature or highlight of the arrangement”
As you can see, that’s a pretty general definition that gives us plenty of scope for writing our own pad parts.
Why should we use a pad part?
A pad part literally fills in the blanks in an arrangement; where an arrangement feels empty and cold a pad part can introduce a sense of completeness and warmth. By the sonic nature of many pad sounds, they tend to occupy a very large spread of frequencies, sometimes from right down in the bass to the top of the upper mid range. Therefore, we have to be careful when we use a pad part that we don’t swamp the other parts in our arrangements, only to complement what already exists.
We also have to be careful that we don’t actually reduce the impact of our track with a pad. Most modern pop arrangements (particularly American RnB) have quite sparse arrangements, often the closest part they have that can be called a pad can be simple electric piano chords or keyboard string parts. As you’ll hear in so much contemporary music, with pad parts less is definitely more.
Ok, but it sounds like you’re talking me out of using a pad!
Not really, just be extra careful. For some reason pad parts can sound very 80s, programmed and uninspired if you’re not careful. If you’re after that sound then good for you, otherwise tread carefully.
When should I use a pad part?
As always, it’s a matter of taste, style and ultimately your own judgment, but here are a few instances where a pad part might be appropriate:
- You’re making a laid back/chilled out arrangement and you want to give your audience a comfortable, gentle sound that they can relax into.
- You need to bring up the power of a chorus a little, maybe it’s using the same chords as your verse and your arrangement is feeling a little ‘samey’. Use a pad to increase the energy of the section; it could even high-light the chord sequence you’re using to great dramatic effect.
- Your arrangement feels like it has a ‘hole’ in it. You feel there’s too much space between the bass guitar and lead guitar, you think the track feels a little amateurish and you want to inject a little ‘class’ into it.
- You don’t want to distract any attention away from the vocal on your track, but need to retain a certain warmth and sense of harmonic progression in your arrangement.
- You want to create a dense arrangement, possibly more sonically interesting than strictly musically interesting.
- You want your track to sound like it’s from the 80s!
How do I make a pad part?
The easiest way to make a pad part is to play the chords that correspond to the chord sequence you are using. Couldn’t be simpler!
The thing is, most of the time that doesn’t sound very interesting, inspired or inspiring just playing the triads of the chord sequence. Here are a few ideas to help you spice up your pad part:
Use inversions!
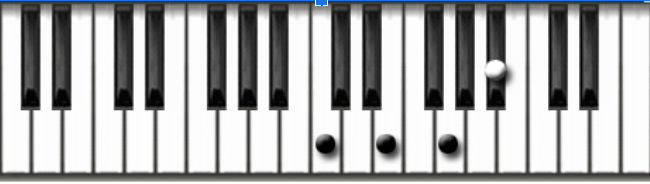
An inverted chord is a chord that has a note other than its root or fundamental note in the bass. For example, the root position of a triad of C major has the C in the bass: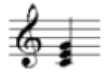
A triad in root position, therefore, is made up of the root note and a third and a fifth above it.
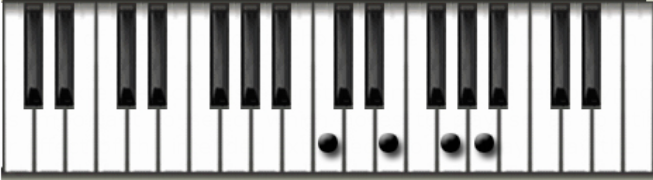
The first inversion of the same triad has the E, the third of the triad, in the bass: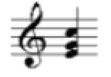
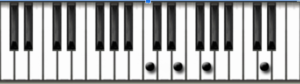
This means that a triad in first inversion is made up of the root plus a third and a sixth above it. The second inversion has the fifth, the G, in the bass: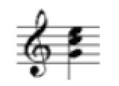
A triad in second inversion, therefore, is made up of the root plus a fourth and a sixth above it.
The third inversion of a triad does not really make much sense for us, since inverting the second version just leads to the tonic again, an octave higher. Chords of four notes or more, however, can be in their third inversion: the third inversion of the dominant seventh in C major, for example (made up of the notes G, B, D and F) has the seventh, F, in the bass. This gives a chord made up of the root plus a second, fourth and sixth above it.
The terms “root”, “first inversion”, and “second inversion” may also be applied to chords in which the notes are not closely spaced. For instance, C-G-E, where the E is a major sixth above G, is also said to be in root position, and more generally any C major chord in which C is the lowest note is considered to be in root position. Similarly, any C major chord with E on the bottom counts as a first inversion, any C major chord with G on the bottom counts as a second inversion; obviously this applies for all other chords too.
How to write that down
There are at least four different notations for the inversions of chords.
The letters a, b, c, etc., may be placed after any chord symbol to indicate the root, first and second inversion respectively. Hence the C chord below, in first inversion (i.e. with E in the bass) may be notated as Cb. If no letter is added, the chord is assumed to be in root inversion, having the same meaning as if ‘a’ had been added explicitly.
Just as common as notation for chord inversions is to place the number 1, 2 or 3 etc. after a chord to indicate that it is in first, second, or third inversion respectively. Hence the C chord above, in first inversion (i.e. with E in the bass) may be notated as C1. Note that no number is added in the case of a chord in root inversion. This notation should not be confused with a quite different meaning of the same notation, where a number is placed after a note name to indicate the octave in which a single note is to sound, e.g. C4 is often used simply to mean the single note middle C. This gets even more complicated once you realize that some people write middle C as C3.
A notation for chord inversions often used in guitar music is to write the name of a chord, followed by a forward slash, and then the name of the note that is to sound in the bass. For example, the C chord above, in first inversion (i.e. with E in the bass) may be notated as C/E. Interestingly, this notation works even when a note not present in a triad or other chord is to sound in the bass, e.g. F/G is a way of notating a particular approach to voicing a G13th chord.
Hold on a second, what’s G13?
This brings us onto a very important subject, an aspect of harmony and chord sequences specifically that can improve your pad parts (and in fact any part in your arrangement)…
Use extended chords! 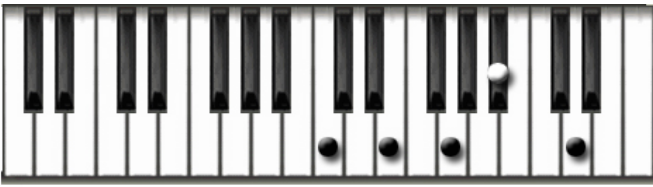
Extended chords are triads with notes extended or added beyond the seventh, including all the thirds between the seventh and the extended note. Since all extended chords are based on compound intervals, some of the chords are named according to the compound number, thus an “added thirteenth chord” is really an added sixth or sixth chord.
Clear? Ok, let’s try again. Let’s take our humble C chord again.
Here, by adding the note Bb, we make the chord C7:
And, by adding the note D, we have the chord C9. Notice that we include the Bb note in the chord of C9 too.
And finally, here is the chord C6:
Notice that each of these chords is shown here in the root position.
When playing extended chords on instruments with limited polyphony (like a guitar) it is important to select which notes to play so as to still give the sonority or effect of the intended extended chord. Always play the root, third and seventh and the most extended note if possible. The root is the central note of the chord, the third defines the chord’s quality as minor or major, the extended note is what makes the chord extended, and the seventh defines the chord as an extended chord and not an added note chord. Any notes, which happen to be altered, such as a flatted ninth, would also need to be included. Thus in a thirteenth chord one would play the root, third, seventh, and thirteenth, and be able to leave out the fifth, ninth, and eleventh.
Added note chord?
Similar to an extended chord, but without the seventh. It’s as simple as that! Here’s C9 no 7 as a simple example:

Or you could play it like this:
Minor Chords
As with major chords, there is a series of chord types formed by the harmonic extension of the minor triad. These are very similar to their major counterparts, except that they contain the flat third note instead of the major third.
As one simple example, take a look at Cmin7
So far so complicated.
Yep, and we’ve only just started! Before we move onto why and when we use these chords, let us consider another two subsets of exotic chords:
Diminished Chords
The diminished triad produces a series of additional chord types, two of which have common alternative names. Notice that the relationship between the 1st and 3rd note (a minor third) is the same as between the 3rd and 5th note.
The m7b5 chord is often known as half diminished because only the fifth degree is diminished compared to the minor seventh chord.
This is the chord Cdim7:
The dim7 chord is also called fully diminished because both the fifth and the flat seventh are diminished compared to the minor seventh chord. The degree notation for the dim7 chord is a little unusual, as it includes a bb7 (flat flat seventh). This is the same note as the 6th, but the naming here is important to the nature of the chord.
The dim7 chord also has the interesting property of being symmetric, being formed by a minor third interval between all of its adjacent. This means that dim7 chords whose root notes are a minor third apart contain the same notes, just in a different order. Fascinating stuff.
Augmented Chords
Augmented chords are similar to diminished chords but are made up of note formed from major intervals rather than minor intervals. The symbols “#5” and “+” in chord names both indicate the augmenting of the fifth note.
The augmented triad itself is another symmetric chord type, similar to the dim7 chord in the previous topic. Again these results in augmented chords based on root notes a major third apart containing the same notes in a different order.
Suspended Chords
These chords are very simple to understand. Here’s Csus4:
And now Csus9
Notice that there’s no 3rd in these chords. We will come onto why in a few minutes.
Enough!
The world of extended chords is huge; we haven’t even mentioned Major Flat Fifth Chords! But let’s not dwell here any longer. Lets talk about when to use these exotic chords…
Using Extended Chords
It’s easy to get confused with all these different variations on our straightforward chords. But there is a quite simple way to approach all of these exotic chord shapes when you’re composing and arranging:
The root note generally corresponds with the bass note, creating a strong harmonic bedrock for your song.
The third note tells us whether we are dealing with a major or minor chord, fundamentally important to the listener.
All the other notes will define the quality of the chord, telling the listener where the song and chord sequence is heading in terms of mood and shape.
When should I use these chords?
Its up to you, there’s no rules! However, there are some pretty strong general guidelines. Here’s some to get started, with an introduction to yet more chord types too.
Seventh Chords
One of the first things a guitar student learns is how to play the chord G7. The next thing we’re taught is that G7 naturally leads us back to the chord C, and it’s true. In fact, it works on a similar principle to suspended chords. So, use the dominant seventh chord when you want to lead the listener back to your root chord, or change key.
Alternatively, just throw in seventh chords whenever you like for an open, rootsy sound. Dig out your favourite blues record for examples of this on every track.
Major Seventh Chords
Chords where the seventh is not flattened, and therefore the relationship between the 5th and 7th is a major third. Here’s Cmaj7 (note the notation):
Major 7th chords sound open, wistful and relaxing. They are a strange combination of suspense and resolution, sounding almost questioning. They also can sound very confident in a modern RnB arrangement, so through them in!
Power Chords
Yep, that’s right. These are chords without a third in them, beloved by rock guitarists across the world. They can sound huge played on a distorted Gibson electric guitar, and can be just as effective played by string players or a keyboard player. Power chords have the great advantage of being neither major nor minor; so can be thrown into your arrangement wherever you feel it’s appropriate.
Suspended Diminished and Augmented chords
These are great for introducing suspense into your arrangement, funnily enough. You’ll notice that whenever you use a suspended 4th chord, it feels like you want to resolve the chord to its major state. Use them accordingly for a comfortable arrangement. The same applies to diminished chords. Notice that Ddim7 leads us naturally to C. Bb+5 also leads us naturally to C. Both these chord types are very handy for throwing in some simple variation to your chord sequences whilst adding interest and musical clues of where you’re going.
Sixths, Ninths and the rest
Each of these chord types has a distinctive sound all of its own; it really is down to you when you use them. Bare in mind that sometimes using these chords can interfere with the audience’s perception of the melody of the track. This can be a good thing or a bad thing depending on the effect you’re trying to achieve. Experimentation is the key here, so experiment!
Choice of pad sounds
So, after all that, what are we going to use to generate our pad parts? Generally speaking, we have more scope to experiment in our pad part sound than any other part in arrangement. The pad part doesn’t have to be rhythmic, so we don’t need a sound with a sharp attack. It doesn’t have to carry a bass line, so we don’t need a sound with a lot of low frequencies. In fact, all we really need for a pad is a sound that has a defined pitch and will sustain. Drum sounds are out then!
The most important thing is you must choose a sound that complements the other parts in your track. You must chose a sound that you can control easily; for example, a synth sound that takes twenty seconds to die away might be quite hard to control, especially when playing a fast chord sequence. Try to avoid pad sounds that have lots of activity within them i.e. almost all the sounds that manufacturers put in their synths and call pad sounds. They’re very impressive sounding, and maybe have convinced you to buy a couple of keyboards through the years. But trust me; these sounds are almost always useless in a track. They’re too big, too distracting, sound gimmicky and date very quickly. Avoid.
Through the years, many excellent keyboards have been favoured by players and producers to make pad sounds. Some of these are vintage machines now and quite hard to find but all are available to modern arrangers through sample libraries and software synths. Here are some of my favourites:
Roland VP330
This classic synthesizer from the late 1970s is a treasured possession of the few people who have managed to obtain a working example. Originally sold as a vocoder, the VP330 is actually much more. Although the most famous examples of its usage must be Laurie Anderson’s ‘O Superman’ and Eurythmic’s ‘1984’ album, the VP330 can be heard on countless records from the late seventies to the present day. Check out anything by Vangelis but particularly his ‘Chariots of Fire’ soundtrack, Underworld’s Beaucoup Fish album or Radiohead’s ‘OK Computer’ for examples of its beautiful, delicate sound. The VP330 is expert in giving choral sounds which bring an instant ‘atmosphere’ to a track without overwhelming it, often being described as a Mellotron’s delicate little sister. Speaking of which…
Gmedia Mtron/Mellotron
http://www.youtube.com/watch?v=yrXtmKGkSa4
Iphone mellotron
http://www.youtube.com/watch?v=0Ov7i7Hz5LI
The Mellotron has a long and distinguished history as an electronic musical instrument, stretching from way back in the 1960s to the present day. Even a small potted history of the Mellotron is beyond our scope for today, but know that it has been played on records as diverse as ‘Strawberry Fields Forever’ by the Beatles to ‘Absolution’ by Muse. For a period in the 1990s almost every workstation keyboard came with a selection of samples from a Mellotron. And today you can have your own Mellotron right inside your Mac by using Gmedia’s Mtron plug in.
The Mellotron was originally designed to enable studio musician’s access to the sound of string instruments (violins, violas, cellos etc) and choirs quickly and easily from a keyboard. Essentially, it used a collection of tape recordings of these instruments, one recording per key, which were activated by pressing the keys in the usual manner. Essentially it was the first sampler, albeit analogue and it didn’t record anything.
Why use a Mellotron? Quite simply, it’s sound. It will bring atmosphere to your track instantly. The male choir sounds give you the characteristic Mellotron “AAAHHH”, instantly recognizable. The boy’s choir gives you haunting, spooky 1970s horror film chords, priceless.
Not into choirs? Try the string sounds; the ensemble violin sounds have a piercing shrillness that can really cut through in an arrangement. Looking for a grungy cello sound? You got it! The Mellotron gives you a classic sound that is ideal for pad parts. Used with care it can bring an indescribable ‘classiness’ to your arrangement that can be as elusive as valve ‘warmth’ in a digital environment.
An original Mellotron. Not much of a looker sadly.
Solina String Ensemble
http://www.youtube.com/watch?v=u5OoDFD3ft4
The Solina String Ensemble is often thought of as THE String Machine of the late 1970’s disco era. You can hear it on countless tracks from Styx through to Edwin Starr and Donna Summer, and from current bands like Air and Zero 7. There were a few different ‘string machines’ in the late seventies that were cheaper alternatives to the massively expensive (and more complicated) Polysynthesizers such as the Roland Jupiter 8, Sequential Circuits Prophet 5 and Oberheim OB-X; the Solina is the most highly regarded of them.
Why use a Solina? It has a very distinctive sound that gives you instant vintage appeal sounds powerful but doesn’t dominate a track. Plug one into an old analogue phaser, attach a mirror ball to your ceiling and you are the Bee Gees in Saturday Night Fever.
Finding a working Solina in the 21st century is not easy, but there are plenty of sample libraries that include recordings of this machine. Well worth investing in if you can.
Korg Wavestation
http://www.youtube.com/watch?v=-A-DGFL_5bI
http://www.youtube.com/watch?v=S7stHskG1ok
If you watched any natural history programs on Channel 4 in the early 90s then you will be familiar with the sound of a Korg Wavestation. It was one of the first keyboards where you could press down one key and get what sounded like a whole track coming out of the speakers. This was achieved by a style of synthesis called Advanced Vector Synthesis and Wave Sequencing, which sequenced and blended together various disparate waveforms.
Basically, the Wavestation is an expert in producing evolving, moving pad sounds. Most of the time it can be a bit ‘overkill’ for modern music but with a little care you can create lush, dense pad parts that sound tremendous. Korg have released a software version of the Wavestation, which is part of their ‘Legacy Collection’ of vintage Korg synths. The new software version is easy to program, which is just as well as the original Wavestation was a pig!
Native Instrument’s Absynth
http://www.youtube.com/watch?v=3VTEUv-ands
Here’s a modern software synth with a sound all of its own. Many of the presets that come with Absynth have been described as sounding like a ‘Wavestation on Acid’, although I would describe its sound as a strange hybrid of digital clarity with an almost organic depth.
Anyway, it’s an ideal instrument for pad parts. Out of the box it has many pad sounds that imitate the sound of strings, Hammond organs and esoteric eastern instruments that could be ideal for your track.
Of course, if you’re into programming your own sounds then Absynth is a joy. It has the most well specified envelope generators that this sound designer has ever seen, and although Absynth is quite a complicated beast it is deceptively easy to program. As with most digital synthesizers, it’s a good thing to have at least some idea of the sound you’re aiming for before you start programming.
String Parts
Nothing brings a pop arrangement alive like a string arrangement. It can bring a flagging arrangement back to life, it can instantly bring a sense of ‘class’ to your song, and done right it can sound very expensive. Oasis knew this back in 1995, try listening to their song ‘Whatever’, the first song they recorded after becoming superstars. This started a whole wave of alternative bands throwing in string quartets and other impressive arrangement tricks into their records.
In a different corner, get your hands on Portishead’s ‘Roseland New York’ album, where the West Country innovators combined slowed down hip-hop style drumbeats with a live orchestra. Anyway, we all have a favourite song arrangement that incorporates a string part; its usage can be traced back through the twentieth century to opera and before that to central European choral music. It might be a good idea to know how to write one for our own songs.
Where do we start?
The first thing is to decide what your string part is attempting to achieve, then we’ll know how to proceed. Here are some examples of when you might want to include a string part in your track:
- You want to increase the drama in your track
- You want to increase the emotional content of your track, making it more expressive or plaintive in the process
- You want to make you track sound classy or expensive
- You need to increase the ‘density’ of your arrangement as it sounds quite lightweight.
- You want your track to sound ‘classic’, as if it was from an earlier era
- You just love the sound of strings!
How you achieve these musical effects is ultimately down to you, but here’s how most contemporary string parts are formed:
- Play the chord sequence. It’s as simple as that!
- Play the chord sequence but with the two higher parts (violin and viola) occasionally added some extra melodic interest, perhaps mirroring the vocal line or adding a harmony to the vocal line.
- Play the root notes of the chord sequence by a bass instrument like cello or double bass
- Play a high-sustained note through the chorus. This happens in so many house tracks it’s a cliché. Give it a go!
- Play a catchy motif/melody unique to the string players.
Some things to bear in mind
There are a few important things to remember when writing parts for string players or string samples:
- Remember that in most popular music string arrangements there are only four instrument parts; running from the highest to lowest they are the violin, viola, cello and bass parts.
- These days, most string arrangements fall into what string players sometimes refer to as ‘The Minim Master class’. What they mean by this is whilst they long to show off their technical prowess and play something quite challenging, every part they play is simply sustained notes (a minim is the name of a note which is two beats long).
- Having said that, it’s your arrangement so experiment! String parts can be played in many ways such pizzicato (plucked), marcato (heavily accented) or even spiccato (where the bow is bounced on the string) amongst many others.
- Make sure your part is within the range of the instrument! See below:
It could be argued that in this age of samplers we don’t have to be so concerned about sticking to instrument ranges, but nothing could be further from the truth! Every member of your audience has grown up subconsciously knowing what a string quartet sounds like; it does you no harm to stick to what is physically possible for a string quartet to play. If you start straying from what an instrument normally plays then you run the risk of your parts sounding artificial, which in itself may not matter but it can sound very amateur. So be careful.
So I just play chords. Is that it?
Well, you can do, but what a wasted opportunity. Playing simple triads can give you instant gratification when writing string parts but they always sound cold, studied, and like what they are; a keyboard player playing strings!
I find that a great help in writing string parts is to use the rules that some of us had to learn for Music GCSE/’O’ Level when writing Chorales in the style of J.S.Bach.
Bach? You’re kidding me!
Absolutely not. Bach had an uncanny knack of writing striking, emotionally stirring music that has beguiled music fans for centuries. Whether he was aware of the rules he was using when he wrote these Chorales can keep music historians debating for hours, and who cares? They sound superb. Students learn these rules when ‘filling in the blanks’ of arrangements when extending simple melodies over several bars in the style of a Bach Chorale. These rules can be used as a simple shortcut to making convincing sounding string parts.
Bach Chorale Rules updated for modern music
Avoid consecutive fifths and octaves. Make sure that the shape of your chord changes for each new chord. If the bass and cello parts are both playing C an octave apart in one chord make sure they play different notes on the next one.
Never double the seventh note in the scale. The seventh note should rise to the tonic or come from the tonic. Sometimes it can fall a third to the fifth note of chord I. e.g. in C major – B falls to G. (G being the fifth note of chord I).
Inner parts move by step as much as possible. Try to make sure that your cello and viola parts move by consecutive notes. This makes your whole string arrangement feel fluid and real. Bigger jumps can sound clumsy, not usually an effect you’re after.
If one note is the same in two consecutive chords, keep it in the same part. This can sound quite beautiful, so do it! It can often create a sense of majesty or poignancy especially in songs in a minor key.
Never use a DOUBLED THIRD in a major chord. By that we mean two instruments playing the third note of the chord. It just doesn’t sound that great, unless the doubled third is approached by step in both parts, or in the chord progression V – VI. It’s not cool either; you often find in modern music (especially electronica) that the third of the chord is left out all together, making the track feel open and melancholy.
No Overlapping of Parts. Both the violin and viola notes must not be lower than the previous viola note or higher than the previous violin note. Again, this just doesn’t sound right.
Never have more than an octave between the violin and viola and the viola and cello parts. An octave between the cello and bass part can sound fine though.
Of course, there is a rather obvious implication of following these rules, which is that unless you’re a fantastic keyboard player with a gift for improvising Bach Chorales, you’ll have to write your string parts line by line in your DAW. This is a good thing! It can help to keep your arrangements nice and fresh, provoking you into working slightly differently than normal. Remember these are only guidelines, a starting point for your string arrangements. A lot of this kind of approach to music can feel a bit cold or mechanical but it’s only a technique, a means to an end that is great sounding strings. It’s a very good idea to listen to and study the string parts in some of your favourite songs too; you’ll find loads of great ideas that you can use in your own parts.
A few other thoughts…
- Why not let the string part take the lead in your song? You could always let the string part play the melody that the singer has just sung for an instrumental chorus or verse. This can sound amazingly catchy and is a trick used in many big hits through the ages
- How about letting the string arrangement be the main feature in your song, like “Unfinished Sympathy’ by Massive Attack?
Love them or hate them, they’re all still alive except Frank. He never played piano by the way.
- …or maybe be the only thing in your song other than the vocal, like Frank Sinatra or Morrissey?
- Why not let the cello part be the main bass line in your arrangement? Sometimes works out well for Coldplay.
- Don’t forget to use all your newly discovered extended chord tricks on your string parts. They’ll sound great, and people will think you’re a genius.
- How about the old filter sweep trick that was so popular in the late nineties? Put your whole string arrangement through a low pass filter and increase and decrease the cut-off setting of the filter to give a sense of growing and diminishing power in your part. Ok, it won’t sound particularly natural but so what! It’s an effective technique to build in movement to your parts.
- Bored of strings? Try swapping them for choir parts but following the same principles for the individual parts as we used for the strings.
- You don’t have to follow the chord sequence in your song for your string part, although you will do most of the time. Try playing just one chord throughout the verse or chorus for an anxious, suspenseful effect.
A few tips!
- Pizzicato string parts can do wonders in bringing your arrangement alive, just ask Sister Bliss from Faithless! If your track won’t suit having a languid string part but you still fancy a little sophistication in your song, try some pizzicato string sounds with a long hall reverb (2s long will about right). That way you can keep the dynamics of the song alive but still introduce a classy part.
- Sometimes when writing your string parts in a DAW such as Logic you can get overlapping identical notes which result in string parts being accidentally ‘choked’ off. Most major DAWs have a facility to ‘remove note overlaps’ which will remedy this situation quickly. If yours doesn’t then you can always do this manually.
- If your string part is playing simple chords, make sure that each part plays ‘tightly’ with all the others.
In this case you can see that in the first and second chords all of the notes are of different lengths. In the second chord they don’t even start together! Make sure that all the notes sound together if they’re supposed to, like this:
- Ensure the ‘release’ setting on your sampler is not too long. Anything more than around 500ms will sound artificial and will be difficult to control too.
- Reverb sounds good on strings, as does a small amount of delay. But don’t overdo it! You can easily swamp the grace of your string part by drowning it in a long reverb sound. If you want a very ambient or chilled sound then maybe you should use a pad sound instead.
- Invest in a decent string sample library. There are many to choose from these days, some can stretch in size to many gigabytes so make sure you have a lot of empty disk space. Favourites of mine include Roland’s Orchestral Collection and the Miroslav string collection.
- Hire string players! No sample library is a replacement for live strings played and recorded well and you may find that they’re not quite as expensive as you might think. Also, the section leader will often offer to help in writing the string parts. That can be a big time saver.
- Use the envelope generators to ‘swell’ (increase in volume) the sound of your string parts. Get the setting right and the effect can be dramatic, great for up-tempo dance tunes.
- Listen to classical music. It’s educational and some of it is really good. Plus it will help you to unwind after a long days programming. And you can steal bits too!
One last thing…
If you find that you’re putting pad parts into every track you make as a simple matter of course, step back from your computer screen for a second and ask yourself why? Are you trying to make up for deficiencies in your arranging skills? Are you justifying the money you paid for that new soft synth plug-in by using it on everything? Or are you doing this just by unthinking force of habit?
With the amount of sheer computing power available to us these days its quite easy just to fill up our tracks with layer after layer of chords, pads etc but consider this:
Back in 1980, Depeche Mode were making their first album with nothing more than a couple of tiny Yamaha and Kawai synths and a Korg drum machine. They decided that they wouldn’t use any chord parts at all as they thought that was cheating, and made their arrangements up from simple monophonic (one note at a time) parts played one finger at a time (amazingly, no-one in Depeche Mode played keyboards). They didn’t have a chord part in any of their records until 1987.
That first album was called ‘Speak and Spell’ and gave us the classic single “just Can’t Get Enough’. Listen to it now and you’ll notice how fresh and vibrant it sounds nearly 25 years later. A great case of creativity born of limitation.
