L5_Working with Tracks
Create tracks in a project
You add tracks to a project to hold your recordings, loops, and other material. When you add a track, you can choose the track type, format, input source (for audio tracks), and output, and create multiple tracks. The options in the New Tracks dialog vary, depending on the type of track you are creating.
When you create a new track, a corresponding new channel strip is also created. The new track appears in the Tracks area, and the new channel strip appears in the Mixer. You can choose a patch, which controls the sound of the track.
Creating one or more new tracks
- Click the Add Tracks button , located above the track headers.
- Select the track type in the upper part of the New Tracks dialog.
- If the Details area at the bottom is closed, click the Details disclosure triangle to open it.
- Choose the input source from the Input pop-up menu.
- For audio tracks: Choose the input channel or channels.
- For software instrument tracks: Choose An Instrument Plug-in.When Show Advanced Tools is selected in the Advanced preferences pane, the Input pop-up menu is not available for software instrument tracks.
- For external MIDI tracks: Choose An external MIDI or USB device, then choose the input channel or channels from the lower Input pop-up menu.
- For Drummer tracks: The Input pop-up menu is not available.Tip: Below the Input pop-up menu, a line of text shows the current input device. To change the input device, click the arrow next to the text, then change the device in the Audio preferences pane.
Choose the audio output and output channel (or channels) from the Output pop-up menus.
Tip: Below the Output pop-up menu, a line of text shows the current output device. To change the output device, click the arrow next to the text, then change the device in the Audio preferences pane.
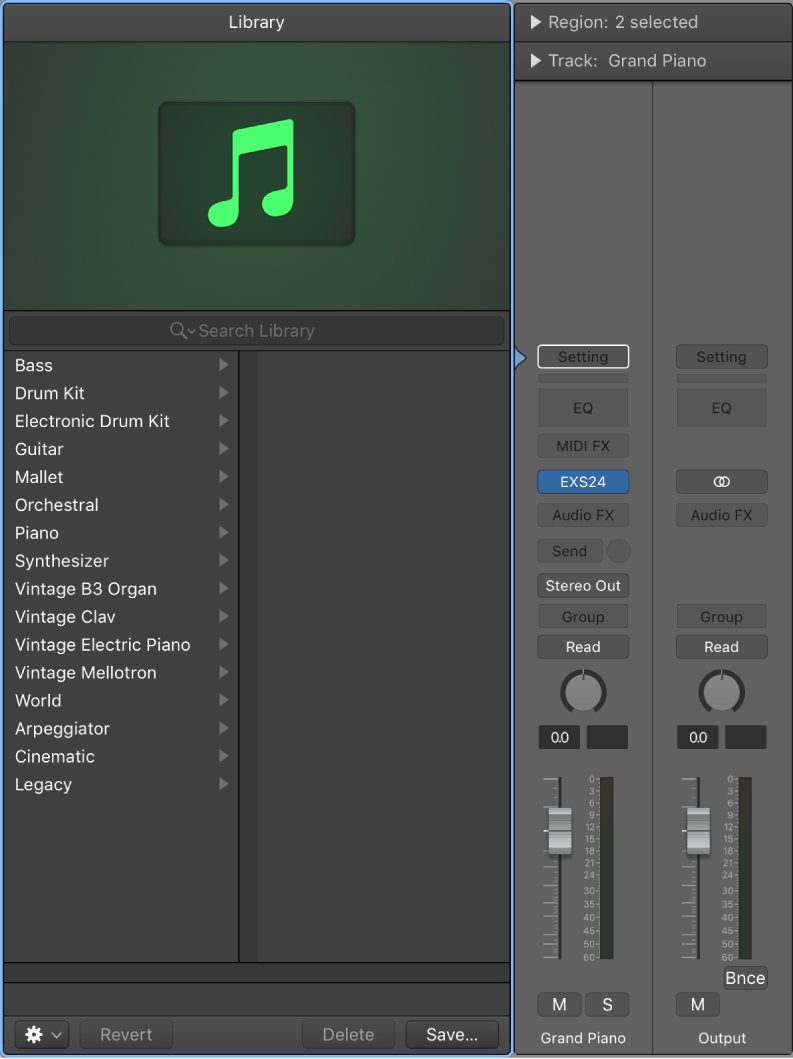
- To have the Library open automatically so you can choose a patch for the track: Select the Open Library checkbox.Tip: Deselect the Open Library checkbox if you want to add an empty track containing no plug-ins.
- To include the default patch for audio tracks: Select the Load Default Patch checkbox.
- To choose an instrument plug-in for software instrument tracks: Choose the instrument plug-in from the pop-up menu below the Load Patch or Instrument Plug- in checkbox.
- To turn on monitoring for audio tracks: Select the “I want to hear my instrument as I play and record” checkbox.When Show Advanced Tools is selected in the Advanced preferences pane, the checkbox is titled Input Monitoring.
- To record-enable audio tracks: Select the “Prepare new audio tracks for immediate recording” checkbox.When Show Advanced Tools is selected in the Advanced preferences pane, the checkbox is titled Record Enable.
- To create multiple tracks: Select the number in the “Number of tracks to create” field, and enter a new number.Click Create.The new track appears in the Tracks area. If the Open Library checkbox is selected, the Library opens so you can choose a patch for the track.
Creating a track below the selected track
- Control-click the track header.
- Choose a track type from the shortcut menu.
A new track of the chosen type, with default settings, is created below the selected track.
To create a track below all existing tracks, select a track of the same type as the one you want to create. Double-click the empty area below the track headers.
Creating tracks using drag and drop
You can quickly create a new track by dragging one or more audio files, regions, or Apple Loops to the area below all existing tracks in the Tracks area. When you drag an audio file to the area below existing tracks, an audio track is created; when you drag a region or an Apple Loop, a track of the corresponding type (audio, software instrument, or Drummer) is created.
You can create a new software instrument track by dragging an audio file, audio or software instrument region, or Apple Loop to the area below the track headers in the Tracks area, or between two existing tracks. When you create a track by dragging content, you can choose whether the track uses a Quick Sampler, Alchemy, Drum Machine Designer, or Sampler instrument plug-in. For Quick Sampler, Alchemy, and Sampler, there are additional choices for how the plug-in processes the material. After the new track is created, the selected instrument plug-in opens for viewing and editing.
When you create a new track by dragging a software instrument region, either below the track headers or between tracks, the region is bounced to an audio file, which is then used by the chosen instrument plug-in on the track.
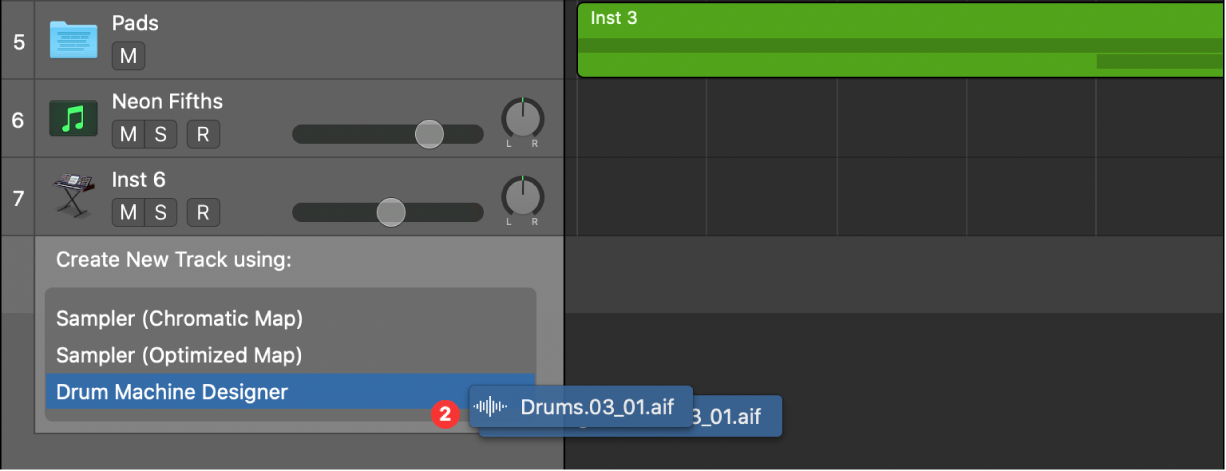
Note: To quickly create a track with predetermined slices and mapping, drag the content to the Drum Machine Designer zone. If you want to be able to edit individual slices, drag the item to one of the Quick Sampler zones. With Quick Sampler set to Slice mode, you can edit individual slices. After you finish editing slices in Quick Sampler, you can create a Drum Machine Designer instrument using the command “Create Drum Machine Designer Track” in the Action pop-up menu.
Add a track by dragging an audio file, region, or loop to the Tracks area
Drag one or more audio files, regions, or Apple Loops to the area below all existing tracks in the Tracks area. A track of the corresponding type is added below the existing tracks. When you drag multiple audio files, regions, or loops, an Add Files to Tracks dialog appears.For multiple audio files, select whether to create new tracks, use existing tracks, or place all files one one track.
Do one of the following:
Drag an audio file, region, or Apple Loop to the area below the track headers.
or
Hold down the Command key and drag an audio file, region, or Apple Loop between two existing track headers.
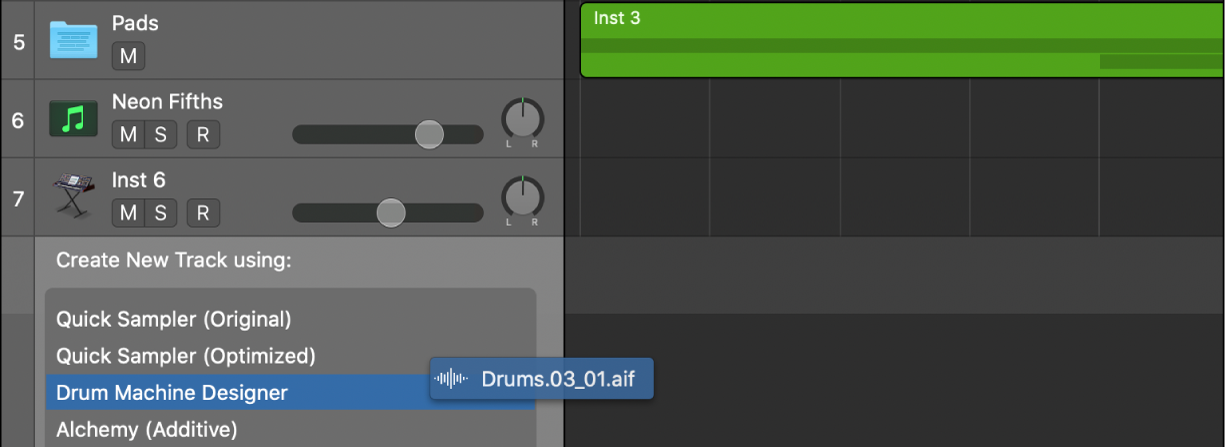
When the “Create New Track using” dialog appears, drag the item to one of the available zones to choose the type of instrument plug-in used on the track.
The behaviour is the same when dragging multiple audio files, regions, or Apple Loops.
Creating tracks using existing channel strips
When you create a new track using the New Tracks dialog, a new channel strip for the track is also created. In some situations, however, you may want to create tracks that use existing channel strips.
For example, when using a Sampler instrument with a drum kit loaded, you may want to send multiple tracks, with MIDI regions that trigger individual drum sounds, to the channel strip on which the Sampler instrument is inserted. Having a separate track for each sound allows you to independently mute or solo sounds in the kit. If you use a multi-output version of the Sampler instrument, you can process each sound in the drum kit with different effects.
You can also copy tracks in the Tracks area. The copied track uses the same channel strip as the original track, and all selected regions are moved from the original track to the copy. This allows you to double-track or “thicken” parts, and makes it easier to create unison voicings (an octave apart) software instrument (or external MIDI instrument) tracks. After copying the track, you can replicate or restore the copied regions on the original track.
Create a track with the same channel strip or instrument assignment
- Select a track in the Tracks area.
- Do one of the following:
- Choose Track > Other > New Track With Same Channel (or use the corresponding key command).
- Option-click the Duplicate Track button above the track headers.
A new track is created below the selected track.
Create a track with the next channel strip or instrument assignment
- Select a track in the Tracks area, then choose Track > Other > New Track With Next Channel (or use the corresponding key command).
This command creates a new track below the selected track, and assigns the next channel strip to it. If no next channel strip exists, one is created automatically.
If the selected track is a part or sub-channel track of a multi-timbral software instrument or external instrument, the command is New Track with Next MIDI Channel. A new track is created, with the next MIDI channel assigned to the same multi-timbral software instrument or external MIDI device.
To copy a track in the Tracks area option-drag the track header up or down.
All selected regions and any automation data on the original track are copied to the new track. The new track has the same channel strip as the original track.
To replicate or restore regions on the original track option-drag the regions on the destination track.
Selecting tracks
Some track operations, such as duplicating tracks or assigning tracks to a different channel strip, require that you first select the track or tracks.
You can select multiple tracks. When multiple tracks are selected, the first selected track is the focused track. Some operations, such as choosing a patch in the Library, only affect the focused track when multiple tracks are selected.
When multiple tracks are selected, the track number of the focused track also appears selected (lighter gray color) on the left edge of the track header, unlike the other selected tracks.
To select a track, click any empty part of the track header. When you select a track, all regions on the track (or those that fall within the cycle, if Cycle mode is on) are selected. To select a track without changing the current region selection, Option-click the track.
To select multiple tracks:
To select adjacent tracks: Press and hold Shift as you click the track headers.
To select nonadjacent tracks: Press and hold Command as you click the track headers.
You can duplicate a track, creating a new track below the original track with the same instrument and effects settings. The duplicate track is empty, and does not contain any regions.
To duplicate a track select the track, then do one of the following:
- Click the Duplicate Track button , located above the track headers.
- Choose Track > Other > New Track With Duplicate Settings.
To copy regions from the original to the duplicate track, Option-drag them.
