A09_Clip_Editing_The_Basics
Clip Editing: The Basics [clip-editing-the-basics]
So you’ve made some recordings. Live is playing it all back. You are looping, overdubbing, punching: Life is good.
Does everything sound perfect? No? Don’t panic.
You are in luck. Live has a plethora of tools to fix everything from the smallest details within a clip or to radically change it — even make it unrecognizable — changing notes, moving beats, flipping things upside-down, backwards, you name it.
Before we qualify for entry in the Clip Olympics, we’ll also need to expand upon our navigational abilities. Therefore, this is a chapter where you are also going to learn more about selecting, moving, copying, and adjusting all sorts of things. Clips, notes, even entire tracks are going to be under the microscope as we roll up our sleeves and start getting our hands dirty. Luckily, Live tends to be consistent in its conventions. The various methods and techniques you have learned thus far will continue to support you in this chapter. And the methods you learn in this chapter will work elsewhere.
Are you ready? Great! Let’s dive in!
The Clip Viewer
In the universe of Ableton Live, if tracks are galaxies, and if clips are the planet and solar systems, the clip viewer is where we get down to the atomic level. It is here where we can resolve the smallest details, notes, and expressions.

The clip viewer is opened/revealed by clicking in the clip view selector or by double-clicking a clip in either Arrangement or Session Views. Once open, there are various areas that can be expanded or collapsed (see the image below).

In this example, the clip viewer is showing the atomic-level elements of the MIDI clip selected in the Session View. Clip data for audio clips is shown here as well. In addition to the main sample/MIDI editor, in each instance, the three buttons on the left open the clip viewer’s Launch, Notes (or Sample in the case of audio clips), and Envelope Box. Each of these is used to target specific functions for the selected clip.
The Editor Window
Let’s jump straight to the heart of it. The MIDI Note/Sample Editor is where the action is. This window follows the same principals as the Arrangement View, but on a smaller, more granular scale. The editor boasts its own, independent grid, insert marker, loop and navigation areas. The same procedures for moving and selecting in the Arrangement View work here too.

The MIDI Clip Editor
There will be a few key differences between MIDI and audio in this section. We will start with MIDI which is both more straightforward but also includes more navigational goodies that we can learn right off the bat. So while this section is primarily about MIDI, rest assured that it will be useful when you get to the end of this chapter.
If you’ve had experience with other DAWs, Live’s MIDI editor will look familiar. Its horizontal axis represents time. The ruler along the top shows a note’s measure and beat position. The vertical axis represents MIDI pitches. This is often referred to as a piano roll editor.
Grid and Insert Marker
The ‘ticks’ along the timeline will ‘magnetically snap’ elements to uniformly rhythmic subdivisions. In Live, these ‘ticks’ are referred to as the grid spacing. The current position along the timeline is indicated by a vertical line called the insert marker.
Loop Brace/Start and End Marker
If you find your clip is a bit too long and is not looping correctly, adjust the start/end markers and/or the loop brace.
Grid Spacing
The grid can be changed using the command ⌘ key plus 1, 2, 3, and 4 keys.
-  `⌘+1` and `⌘+2` increment/decrement the **grid spacing** value.
-  `⌘+3` sets the **grid** to a triplet resolution.
-  `⌘+4` bypasses the grid altogether.
- Hold `⌘`  while dragging a note to temporarily release it from the grid.
Arrow Keys/Moving
- `⇦` and `⇨`  arrow keys move the **insert marker** backward and forward along the **grid**.
- `⇪ ⇦` and `⇪ ⇨`  (`left/right arrow+shift`) keys select notes within whatever range is enclosed by the **insert marker** as it moves.
- The option key  `⌥ ⇦` and `⌥ ⇨` moves the **insert marker** to subsequent notes instead of moving it to the next **grid** location. Combined with option (`⌥`), this method is useful for including a range of adjacent notes within a selection.
Zooming In and Out
Along the top and left side of the MIDI Clip Editor there are zooming areas. Dragging horizontally in the top area zooms the timeline; dragging horizontally along the left side zooms the range of keys that are displayed. Double-clicking in either of these areas will zoom to display everything currently selected.
Selecting
- With your mouse *not* directly over a note, click and drag to enclose (rubber-band) a selection of notes.
- `⌘` select multiple (non-contiguous notes)
- `⇧` select multiple contiguous (include all assets between beginning and end selection)
- `⌥ + ⇧ ⇩`  (option + up/down arrows) selects previous/subsequent notes. Note that these arrows first select horizontally and *then* vertically.
Moving/Copying Notes
- drag center of note to move
- ⌥ drag center of note to copy
Changing notes
Selecting one or more notes allows you to adjust at will. The note’s horizontal (time) position will snap to the grid unless the ⌘ key is pressed.
- With sufficient zoom, you can change note lengths by dragging the right side of a note (or group of notes).
- The length of selected notes may also be changed using `⇪ + ⇦` and `⇪ + ⇨` keys.
- **Transpose** notes with `⇧ ⇩` arrow keys. Add `⇪` (shift) to transpose by octaves.
- Click a key on the piano roll to select *all* notes of that key
- Press the `0` key to mute selected notes.
Velocity
MIDI notes benefit from both the ability to be moved about, lengthened, shortened, and transposed, as well as the ability to have their velocity adjusted. Velocity is the term used to describe how much force was applied to a key when a note was played. Typically, it makes notes louder or softer, but that is ultimately up to whoever designed the sound that is being played. Note velocity can be manipulated within its own section along the bottom of the note editor, but it can also be adjusted by selecting a note and dragging up or down while holding the ⌘ key.
Folding
MIDI notes, displayed on a piano roll-type interface can be folded to conserve screen real-estate. When activated, only the keys in use are displayed on the vertical axis.
The Audio Clip Editor
You’ve been waiting for this, haven’t you? We know. But before you get too worked up, you should know that this is not where we are going to be talking about warping. We have an entire chapter for this. [+Warping][warping]. And before any of the cool audio-warp-related stuff happens in the audio clip editor, we are going to have to warp. So, it is with great reluctance that we inform you that you will have to wait — just a bit.
But it’s not all bad news. As we said before, most of the little procedures outlined above will transfer directly to audio… once warping is underway. Which it’s not.
But for crying out loud, you can wait like one chapter, can’t you?
Boxes
In the meantime, let’s talk about some of the other things that clip editing, be it MIDI or audio, have in common.
Launch Box
The Launch Box contains settings that determine what happens when clips are… well, launched. It is particularly relevant to Session View. You may recall the magical way in which different clips all started and stopped together in the chapter: [+Playback: Session, Scenes, and Arrangement][playback-session-scenes-and-arrangement]. Back then, it was the global launch quantization menu that was responsible for this goodness. And that’s all well and good as long as one size fits all, but what about when you need some clips to behave differently. Hopefully it’s all starting to make sense!

The Launch Box controls some additional settings that become important as you begin to take on more complex tasks.
- Follow actions determine what happens to other clips on the same track after having been launched. This feature allows the user to assign automated tasks to a clip, **such as playing in predefined succession or even randomly. You can try this out as follows:
1. Select multiple adjacent **clips** and open the **clip** view. 2. Open the *Launch Box* and select a *follow action* from the pull down menu. 3. Set the *follow action* time in bars, beats, or multiples of 1/16th note. 4. Choose an available *follow action.* There are two available for each **clip.** You can define a probability for each. - Try the setting, “*Other”* with varying short *follow action time* settings combined with *Legato* mode. - Try giving each clip its own setting. - Try recording the results into the **Arrangement View**! - Legato mode allows clips on the same track to smoothly transition from one to the next, allowing the second clip begin where the last one left off instead of starting from the beginning.
- Quantization determines on which beat a given clip will launch and stop.
- Velocity sets the velocity sensitivity for clips launched via a MIDI controller (Yes, you can do that!).
Note/Sample Box
Further adjustments can be made to the contents of a clip using the Sample/Note Box.

Many handy settings may be adjusted here. Some highlights:
:2and*2buttons halve or double the playback speed (and therefore the length) of a clip. This is particularly useful when double-clicking to create an empty clip, as these clips default to a length of one bar. In this way, you may quickly create a blank clip of any length.- Looping can be turned off altogether here.
- Warping (see [+Warping][warping]) is enabled and disabled here.
- Audio can be transposed and detuned.
- Likewise, the range of selected MIDI notes can be transposed by dragging in the note range field (or by typing numerically).
- Audio can set to play backwards! Backwards!
- So can MIDI. It can also be inverted (low to high)
- MIDI can be set to play legato, meaning that each note length extends to the beginning of the following note.
- Audio clips have a gain slider which changes the volume of the clip **and the display size of the waveform.
- Audio clips are generally analyzed for tempo. This tempo is reflected in the Seg BPM field, where it can be corrected/adjusted.
- By default, Live applies a 0-4 millisecond fade to the beginning and end of audio clips. This is intended to hide any pops or clicks at the beginning or end of the clip. It can be turned off on a per-clip basis.
Envelope Box
Psych! We’re not even going there.
The envelope box is closely related to the concept of automation. It gets covered here: [+Automation and Advanced Arrangement Concepts][automation-and-advanced-arrangement-concepts] and [Advanced Session][advanced-session]. So why don’t you just close that sucker down and pretend we never mentioned it. But if you wondered if you could adjust that audio transpose setting and have it change over time, the answer is… wait.
MIDI Step Recording
Not only is the editing of MIDI events a straightforward endeavor in the clip editor, it’s not a bad place to create them! With an empty clip (created by double-clicking an empty clip slot), the MIDI Editor even allows us to draw new MIDI data from scratch.
This process is also known as step recording. Step recording can be a faster way to enter notes than ‘penciling’ them with a mouse. Step recording leverages your MIDI keyboard to identify desired notes, makes use of the grid and arrow keys to create notes quickly. Do the following to enable MIDI step recording:
- Start by activating the *preview* switch (blue headphones) at the top of the piano roll. This will allow you to 'listen' to the results of your piano roll ‘playing’.
- Enable the **preview** button (blue headphone icon) to monitor your work.
- Arm the **track.**
- Adjust the **grid** for the desired note duration.
- Use `⇨` (right arrow) while holding down one or multiple keys to create notes.
Conclusion
This chapter is littered with keyboard shortcuts and procedures for moving and manipulating the atoms that make up a Live Set. How we put that to use will come next. Warping, finessing recordings, and the rest of the gymnastics that surround the clip Olympics will begin to unfold from here.
Extra Goodies!
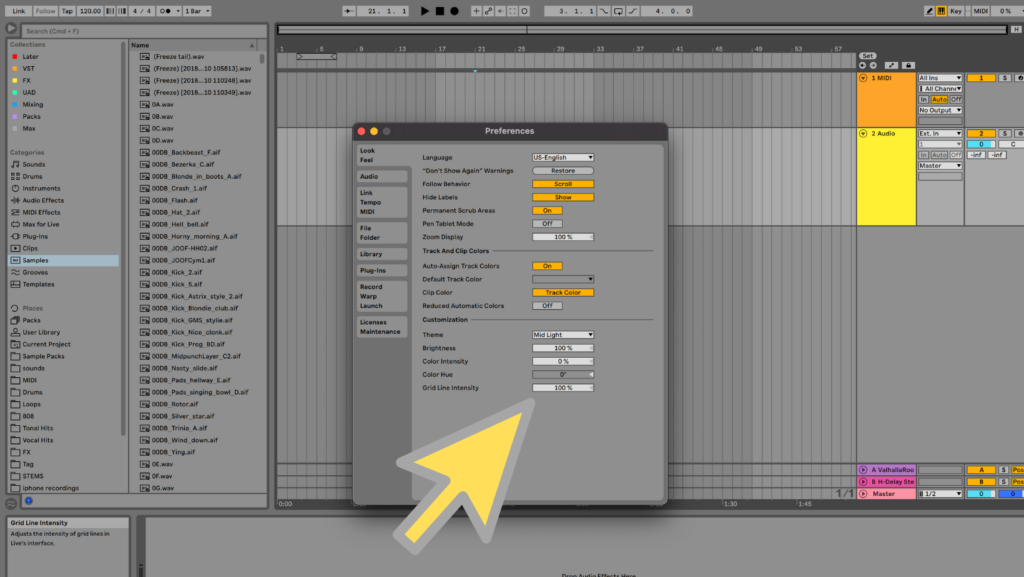
We know that the grid lines are important to display in your arrangement clips and tracks. They help you determine which rhythmic division you are currently on. Depending on your display preferences, this can be either underwhelming or overwhelming. To adjust the brightness of these lines go to: preferences, select the Look/Feel tab and use the Grid Line Intensity slider to adjust to your liking.