SUBTRACTIVE SYNTHESIS
Intro
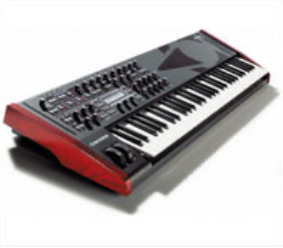
Before software instruments, a musician would save up a lot of cash to buy a particular synth/sound module (old classics like the Moog, TB303 or more recently Virus, Nord Lead, etc.). This meant that they would spend a lot of time exploring every single fader and function on that particular keyboard, tweaking every single sound on this one unit until it became a very personalized piece of equipment i.e. you designed and created sounds that you like and replaced nearly all the sounds that the manufacturers had given you.
Nowadays the abundance of Virtual Instruments means that a lot of people spend their time collecting synthesiser plug-ins without really knowing what they contain. They end up using a couple of presets and that’s it. Keeping your set up simple at first and knowing how all the individual elements work will lead to you being far more creative.
A basic knowledge of synthesis can really help you shape your own sounds from simply modifying an existing preset to creating your own sounds from scratch. It is an essential tool for making electronic music.
In this lesson we will discuss the concept of subtractive synthesis, which is the most widely used method when producing music. After this lesson you will understand the basic concept of subtractive synthesis including the main three components of andanalog’ synth (oscillator, filter, envelope). You will be able to personalise existing sounds to your needs, as well as creating new basic sounds from scratch.
2. What Is A Synthesiser?
A synthesiser is an electronic musical instrument. We can illustrate the difference between electronic instruments and acoustic instruments with a few examples:
Acoustic instruments are all mechanical – something must be moving or resonating for sounds to be created.
- A snare drum creates a sound when hitting the skin, the drum shell amplifying the sound
- An acoustic guitar makes a sound as the player ‘strums’ or ‘picks’ the strings, the large hollow body resonates the sounds.
Synthesiser as used in music, is a term used to describe a device capable of generating and/or manipulating electronic signals for use in music creation.
Synthesisers as opposed to acoustic instruments don’t create ‘direct’ sounds, but only electric signals. Without speakers or headphones attached to the synthesiser, it will not produce any sound. This is pretty much how your CD or Mp3 player works, they don’t make direct sounds either, only electric signals that are turned into sounds by your speakers or your headphones.
Synthesisers are usually equipped with a piano style keyboard which is by far the most popular input devices, but the user can also choose to use other input devices such as mouthpieces, guitar-like devices, drum pads, and of course, sequencers.
Modern synthesizers are great ‘all round’ instruments as they can be made to imitate any other instrument – from wind instruments to drums.
 However, another aspect of the synthesiser that we tend to maybe forget nowadays, is its possibility to create completely new and original
sounds, whether you want to create ‘phat’ bass sounds, lead and pads sounds or ‘weird’ abstract noises. But in order to do that, you will need some basic knowledge in audio synthesis.
The complete study of audio synthesis is a science that involves electronic, physics, acoustic knowledge and more. However we will only look at synthesis from the musician point of view. The aim of the next two lessons is to give you a basic knowledge in ‘analog’ synthesis, to help you manipulate and create sounds with some of the virtual sound modules available in Logic
But before jumping onto our synths, let’s go back in time to help us understand some fundamental rules about synthesis and how a synthesizer works.
3. A Brief History Of Analog Synths
The analogue era
The history of the synthesiser is one that goes back long before electricity, but could never be put into practice back then.
From the mid 30s to late 50s, synthesisers were pretty much experimental devices, using technology derived from electronic laboratory test equipment. These first synthesisers were not triggered by a keyboard like most are today, and were rather abstract in their uses.
By the 60s, synthesisers were developed that could be played in real time, thus becoming instruments in their own rights. However, the first generation of analog synthesisers was extremely difficult to handle. They were often huge devices, costing hundreds of thousands of pounds, and could only be found in the most advanced recording studios. These synthesisers were usually configured using a modular design, with separate devices such as signal sources and other processors, inter-connected with patch cords, and all controlled by a common controlling device, typically a keyboard.
Programming these early synthesisers was a very complicated and tedious process. If you wanted to switch from one sound to another, you needed to rewire the patch cords and change the desired parameters. Furthermore, if you created a good sound, you had to write down how all the cords were connected and how all the parameters were set if you wanted to be able to recreate the same sound at a later stage.
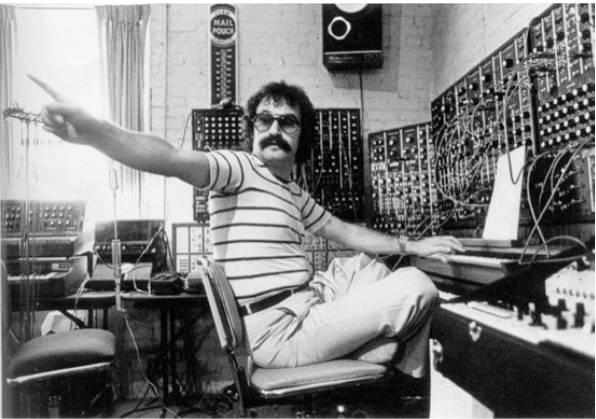
(Pictured above is Giorgio Moroder, sitting at a Moog Modular.)
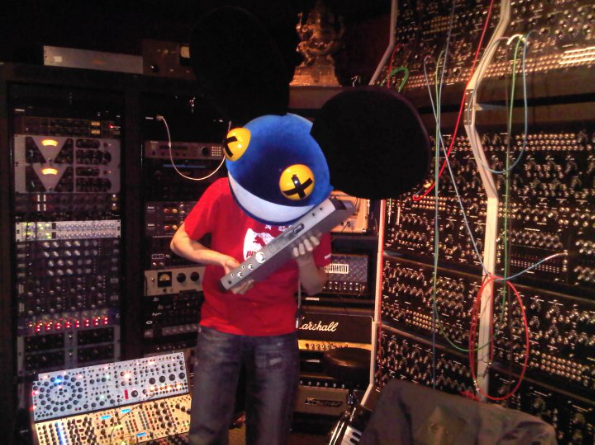
(Pictured above: more modulars than you can shake a stick with DeadMau5)
It is generally acknowledged that it was Robert Moog who popularized the synthesiser in the 1960s, when he introduced in 1964, a revolutionary instrument that could actually be used by musicians. The first album to top the charts and featuring a Moog synthesiser was by the Monkees, in 67.
Many other manufacturers such as Sequential Circuits, Buchla, ARP, Oberheim and EMS started to release their own products.
Because of their size, modular synthesisers were more often used in recording studios than for live performances. In 1970, Moog released one of the first portable synthesisers, the Minimoog.
Historically, the Minimoog is considered the very first synthesiser for musicians! Compact, far more affordable, simplified and based on the modular Moog synths, the Minimoog became the most popular synthesiser of all time, even still to this day!
Famous for its warm fat analog sound, and great sounding filters. It also has a very clearly laid-out front panel, which makes it a great tool to easily create and manipulate sounds.
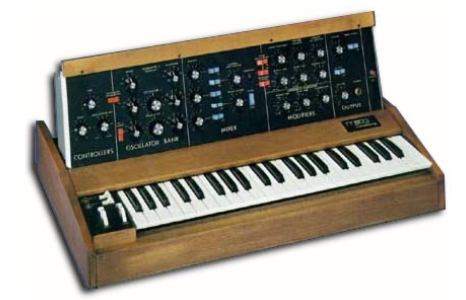
(The Minimoog, one of the most famous analog synths.)
Like most of the synthesisers from that age, the Minimoog could only produce one note at a time (monophonic). The first polyphonic synthesisers (allowing to play more than one note at a time) appeared in mid 70s, but were still bulky devices, quite limited by today’s standard, and very expensive.
At the end of the 70’s the first true polyphonic programmable synthesisers appeared, like the famous Prophet 5 (1978) from the company Sequential Circuits.
For the first time, musicians had a practical polyphonic synthesiser that allowed all knob settings to be saved in memory and recalled by pushing a button. The Prophet-5 was also physically compact and lightweight, unlike its predecessors, although still three times the price of the Minimoog.
This basic design became a standard among synthesiser manufacturers, slowly pushing out the more complex (and more difficult to use) modular design.
Many more analog synthesisers followed shortly, and several Japanese companies started developing their own synthesisers, among others Korg, Roland and Yamaha.
In the early 80s, synthesisers became more user friendly and more affordable and soon, had become a standard part of the popular-music repertoire.

(The Jupiter 8 by Roland was quite a beast.)
It is important to note that although each of these synths had its own distinctive sound and features, they all shared one aspect; they were typically analog in their design and used subtractive synthesis to generate their sounds.
4. Analog VS Digital
Because of the technology they used to generate sounds (Voltage controlled), one of the characteristics of analog synths was that they were not very reliable as their tuning was quite unstable (especially on earlier model), they often needed a long warm-up period and they could quickly drift slightly out of tune.
As technology advanced into the digital domain, synthesiser manufacturers began to use the new digital technology in their new designs. Pretty soon microprocessor controlled digital circuits replaced the “voltage controlled” analog circuits. The Juno 106 by Roland was an analog synth, but the oscillator was controlled digitally, making the tuning far more stable while retaining the warm sound of analog filters.
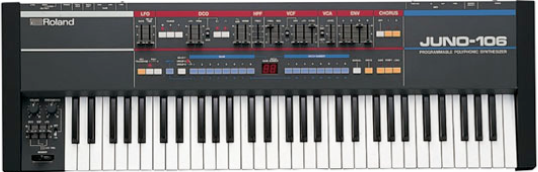
The Juno 106 by Roland, one of the last synthesisers to have sliders or knobs on its front panel, it is one of the simplest and intuitive synths to program. It also features a good MIDI implementation.
One of the most popular digital synths of the 80s was the DX7 from Yamaha, released in 1983. It featured a whole new type of synthesis called FM (Frequency Modulation). The DX-7 was entirely digital and was known for generating unique sounds, still popular to this day. The DX7 also came with MIDI, which was brand new at the time. Almost every keyboardist of the 80s bought one, making the DX-7 one of the best selling synths of all time!
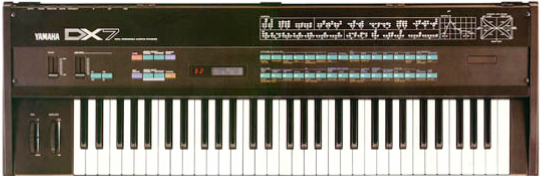
(DX7 by Yamaha, a digital ‘classic’)
Since the late 1980s most new synthesisers have been completely digital, introducing different types of synthesis and designs such as samplers for example. With the integration of MIDI and digital technology, the role of the synthesiser changed, becoming more prominent in the studio and on stage. By the late 80s, it was possible to play a full orchestration using only a few digital synths and a sequencer.
Analog revival
Digital synths offered many advantages over their analog counterparts, more versatile, more stable, instant storage and recall of sounds, size, price, etc. However, in the 90s, musicians started to realize that they were missing some of the features present in the old analog synths.
One of them was that most analog synthesisers usually had all their parameters, instantly accessible from the front panel via good old-fashioned “buttons” and “sliders”. These parameters were mainly designed to program the synthesiser, but this design also allowed the player to tweak the sounds in real time while playing, thus creating special effects and evolving sounds.
If it is true that the first breed of digital synthesisers offered a whole new set of parameters to shape the sounds, thus enabling the user to create original and more complex sounds; it is also true that most early digital synths had a far less intuitive interface than their analog counterparts. The parameters were often only accessible via a menu driven operating system, and programming had to be accomplished by navigating through the various menus via buttons, a data slider and a small LCD screen. This design was not only much less user-friendly, but it also restricted the instrument’s usability in ‘live’ performance situations.
Many musicians also found that they preferred the warm, abstract timbres of the analog synthesisers before the sizzling, ultra precise and realistic instrument sounds of the more modern digital synthesisers. Additionally there was another factor that saw younger generation musicians turning back to analog: cost.
In embracing the digital revolution of the 80’s a lot of musicians at the time dumped their old analog gear in favour of the new breed. This meant that old-fashioned analog gear was available at a knock down price and a new generation of musicians (being a skint but resourceful bunch) started buying analog synths from pawnshops and the like.

(The Novation Drumstation, an affordable 909 & 808 box)
This generation were integral in creating the electronic sounds that gave birth to House and Techno and by the beginning of the 90’s the popularity of electronic music saw the first analog revival in full effect. Companies like Novation, Access and Nord brought new Synths to market that made use of the increase in computing power to create what become known as ‘Virtual Analog’ synthesisers.
By the Noughties, a lot of these synths started to be superseded by the ultimate in ‘Virtual Analog’ the VST plugin. For the first time you could use a computer to produce entirely in the box creating entire tracks without leaving the computer. The convenience and the lower cost of these plugins, coupled with the exorbitant prices that old analog gear had reached, meant that there was a real danger of analog fading into the background and become nothing more than a rich mans toy.
And there was an additional problem: VST Synths were often accused of lacking character, of being ‘Soulless’ The joy of creating sounds by tweaking knobs was being lost in a sea of mouse clicks. With the possibility of 1000’s of plugins on a computer the process of making electronic music had the potential to become laborious and preset filled, but then something has happened.
(Korg MS20)
(Novation’s Bass Station 2)
In the last couple of years there has been an explosion of new and affordable analog synthesisers that have come to market. It seems like not a week goes by without a new announcement of a shiny brand new synth. Big players like Korg seem to be driving this new revolution but there many companies including Novation & Arturia piling into the sector.
(Arturia Minibrute)
Not only that, there is a renaissance happening in the modular & DIY synth worlds where boutique companies are bring out an endless wave of the wild and the wacky and you can even by your synth in bits if that’s what you’re after. It truly is a golden age!
5. The concept of ‘analog’ synthesis
As discussed earlier, synthesis is about the creation of sound, and the way that a sound is put together. Subtractive synthesis is essentially a three-stage process involving the same three properties, which define a ‘sound’: Pitch, Tone (or timbre) and loudness (volume).
In it’s most basic form, subtractive synthesis is a very simple process as follows:

Oscillator: Used to generate a basic tone, the pitch (notes) is usually controlled with a keyboard. The basic tone is fed to a filter.
Filter: is used to shape the tonal ‘colour’ of the sound i.e making the sound brighter or duller. This resultant sound is fed to an amplifier.
Amplifier: Is controlled by an envelope generator (don’t worry this will be explained!) to control the volume of the sound. i.e how quickly the sound starts when a key is pressed, how loud it stays when the key is held down, and how quickly it dies away when the key is released.
This is the essence is subtractive synthesis. You start with a raw sound (oscillator), subtract out the unwanted bits (Tone shaping) and control its loudness over time, hence the name subtractive synthesis.
The reason why Subtractive synthesis is often referred to as analog synthesis is because most analog synthesisers use this method of generating sounds.
Although most new synths and virtual instruments use digital technology, the concept stays the same, which is why we still tend to call it analog synthesis.
6. The Oscillator Section
What does the oscillator do?
As already mentioned in the previous section, the oscillator is the part of the synth that generates the basic raw sound.
The main oscillator usually refers to a “keyboard-controlled oscillator”, that may sound technical but it basically means is that, when you play a note on the keyboard, the oscillator will generate a cyclic waveform at that intended pitch (for as long as you hold down that note on the keyboard). If you press A3, the waveform will be generated at a rate of 440Hz (440 cycles per second).
In short, the keyboard controls the pitch of the oscillator (hence, keyboard controlled oscillator).
On a synthesiser, the oscillator is often labeled Oscillator or simply ‘OSC’, ‘VCO’, ‘DCO’, ‘Waveform’ or ‘Waveshape’.
Oscillators on early analog synths were controlled by analog voltage – VCO, which tended to make their pitch rather unstable, and sometimes drifting out of tune.
Later, analog and digital synthesisers started to use digital controlled oscillators – DCO, Digital Controlled Oscillator, which are far more stable in pitch.
Waveforms and their Spectrum
The waveform is the ‘shape’ of the output produced by the oscillator. It determines how the oscillator will sound – in particular how ‘bright’ it sounds. The brightness is actually determined by the number and type of harmonics present in the waveform. You can hear the difference between waveforms because they each have a distinct sound, which is determined by their harmonic content.
There are a number of standard waveforms such as SINE, TRIANGLE, SQUARE, SAW TOOTH & NOISE, but computer-based oscillators can generate all sorts of weird and wonderful wave shapes.
Below is a list and description of the most common sound waves found in nearly every ‘analog’ synth:
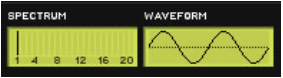
Sine Wave: A Sine wave is the most basic waveform, it has no harmonics (overtones) at all. It only has the tone of the fundamental frequency and no timbre.
The Fundamental frequency is the base or root frequency, which we identify as pitch (eg “A3” would be at 440Hz). The sine wave has a very pure tone, almost flute like, this is often the waveform loaded as default in most synth when you want to create a sound from scratch. This is a great waveform for subbass & low
kicks (808 like).
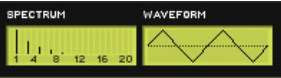 Triangle Wave: Sounds (and looks) a bit like the
sine wave but has some hollow-sounding quiet
overtones. The filter will have little effect on these
waveforms (sine & triangle) as there are no harmonics to be acted upon.
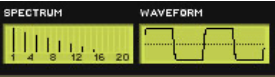 Square or pulse Wave: A Square wave has very sharp corners. It has a hollow sound with quite strong overtones. It is made up of only odd numbered harmonics.
On many synths, you can vary the pulse width of the wave, this is the ratio of the on part to the off part. Technically, when the ratio is 50-50, this
is a square wave, but if the ratio of
 on / off differs, this is called a pulse wave, also known
as rectangle. However most synths tend to label it
either square or pulse. By increasing the pulse width,
the sounds becomes brighter and richer; but as the
Pulse Width becomes very narrow, it becomes more thin and nasal.
 Sawtooth wave: This is a very ‘bright’ ‘fizzy’ sounding waveform (it actually contains all the odd and even harmonics of the original frequency). It is very good for trebly sounds & dramatic filter sweeps (because it is so bright, the filter has something to work on).
 Noise Wave: This is isn’t a ‘tone’ at all, but a random mixture of all frequencies. It sounds like the sort of hiss you get on a radio when you’re not tuned into a station.
There are two types of noise – white noise, which is truly random and pink noise, in which the lower frequencies get more emphasis (this produces a ‘heavier’ hiss). Noise is good for generating percussive sounds like snares & hi-hats, for simulating wind or sea sounds (when put through a filter modulated by an LFO).
How many oscillators?
Some synths have only one oscillator, but many synths have two or three (some have more). You can generally get a much ‘fatter’ sound with two or more oscillators and create more interesting texture. For example, you can set them an octave apart to thicken the sound, or you can detune them very slightly to produce a chorus effect. Single oscillator synths often use pulse width modulation on the square wave to produce a similar result.
Synths with one only oscillator are usually better suited for bass sounds or lead and riffs, like the classic Roland TB303 for example.
For more atmospheric sounds and pads, synths with several oscillators are usually more appropriate for the job.
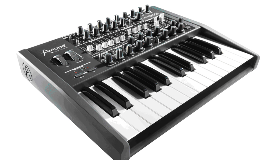
ES 1 is a two-oscillator synth, whereas ES 2 provides three oscillators (in fact it gives you 4, but more on that later!).

(ES 1 Oscillator Section)
Oscillator pitch
We have already discussed how oscillators are controlled by the keyboard, so that when you press the note A3, the oscillator plays an A. However, most oscillators also have a pitch/ range control, which lets you set the basic pitch of the output.
It usually works like an octave up/down control, and can vary from 16-8-4. A range set to 16 will be a lower pitch, while a range set to 4 will create a higher pitched sound. Therefore if you want a sub bass sound set your oscillator to a Sine wave and a range of 16, or for a higher pitched sound, such as a flute type sound, set your oscillator to a Sine wave with range of 4.

(Oscillator Pitch Section of the ES1)
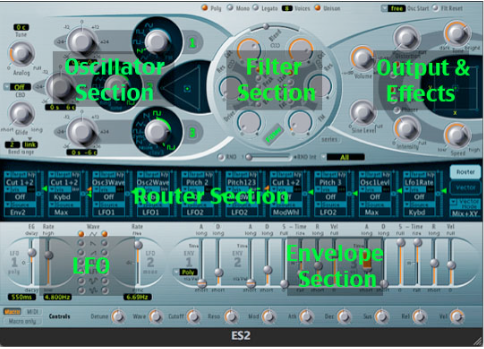
ES2 Oscillators
Let’s take a look at the ES2. You’ll find it has a higher quality sound than the ES1, although that doesn’t necessarily mean its always going to be the best synth for the job in hand. You’ll also notice it looks a bit more complicated than the ES1, but over the next couple of weeks you’ll become much more familiar with it and discover its creative potential!
7. The Filter Section
‘Bassy or trebly’- what does it mean?
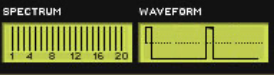
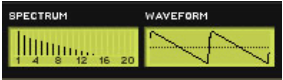
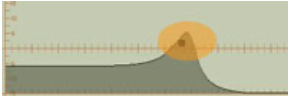
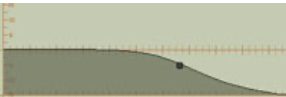
In order to understand how a filter works, let’s go back to the concept of frequency content. We have learned previously how a human with ‘normal’ hearing capacities can hear sound ranging from 20Hz to 20kHz. The frequency content of a sound is defined by how loud the frequencies are across that range. So a ‘bassy’ sound is a sound that has loud low frequencies, whereas a ‘trebly’ sound is a sound that has loud high frequencies. Frequencies are usually categorised and represented as follow:
 To illustrate, let’s take a look at a couple of examples.
In the picture above, the sound has loud frequencies in the lower range and nothing above 2kHz. This is a ‘bassy’ sound.
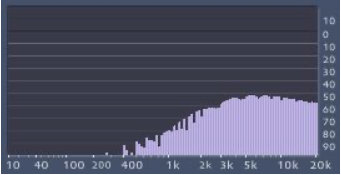
Here frequencies are louder in the higher range and nothing below 400Hz. This is a ‘trebly’ sound.
What does the filter do?
Ok so far we have our basic raw tone, and the ES2 has quite a varied selection. But we often find, we want to be able to shape the sound further, so this is where we often use a filter to change it. We have discussed how the frequency content of a sound tells us whether a sound is high or low, or if it sounds bassy or trebly.
The filter section of a synthesiser usually labelled, VCF (voltage control filter), DCF (Digital control filter) or simply Filter, is used to remove or reduce frequencies from the waveform so as to alter the tone (brighter or duller). A bit like the equalizer on your Hi-fi or TV set and quite a lot more.
The filter is a very important element in the final quality of the sound. Many ‘classic’ synths have achieved their status because of the quality, colour and warmth of their filter(s). The filter is not only a tool to shape the tonal aspect of a sound but also a creative tool for unique effects.
Filter types
There are various types of filters, which will of course alter the sound in different ways. We will look at some of them.
 LPF- low pass filter: As its name suggests, this passes the lower frequencies while filtering out the higher ones. The point at which it starts filtering is the cutoff point determined by the cutoff control. Its general result is to reduce the high frequency content, making the sound more ‘bassy’. This is by far the most common type of filter.
HPF- high pass filter: Here again as its name suggests, this passes the higher frequencies while filtering out the lower ones. Its general result is to reduce the low frequency content, making the sound thinner.

BPF – band pass filter: The band pass filter passes a band of central frequencies while filtering/attenuating those above and below the cut off point. This filter is great to isolate a narrower frequency range.

Notch filter: The notch filter works the opposite way as the band-pass filter, it filters out the frequencies in a central band, leaving only those above and below.
Filter parameters
There are two settings, which apply to all types of filters – cut off frequency and resonance.
 Cut off: It determines the frequency at which the filter starts to take effect. There is normally a knob on an analogue synthesiser to set the base cut off frequency for the filter. This base frequency can then be changed (i.e. modulated) by various controls (envelope generator, LFO, etc.) to give filter sweep effects. Sweeping the filter cut off frequency can give very dramatic effects (i.e. the constantly changing sound of an acid bassline, with the filter being slowly swept slowly up & down by an LFO).
 Resonance: also known as Peak or Q: It is actually the amount of the output of the filter that is fed back into the input. Its effect is to emphasize the frequencies just around the cut off frequency. Increasing the resonance makes the filter effect more ‘dramatic’ – particularly with filter sweeps. On many synths, if you turn the resonance right up it feeds back on itself & turns into another oscillator.
How much filter do you need?
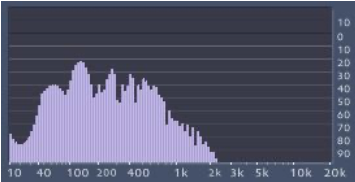
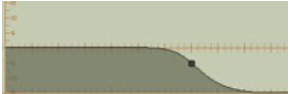
 dB/octave: The ‘strength’ of a filter is measured in db/octave, dB being the volume and octave the frequencies. It represents the slope of the filter effect, how steep is the curve. In some synths this is sometimes also expressed using ‘pole’. 1 pole is 6dB reduction by octave, 2 poles 12dB/Oct, etc. The picture shows a 1 pole (6dB/Oct) low pass filter with a cut off at 1.5kHz, as you can see it has a fairly gentle slope. There are still some high frequencies passing through.

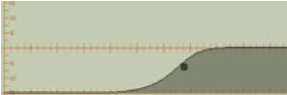
This picture shows a 4 pole (24dB/Oct) low pass filter set up as before. This time the slope is much steeper, effectively reducing all frequencies after the cut off point.
8. The Volume Envelope
The amplifier is the latest stage in the process and is often labelled, VCA, DCA, AMP, EG, ENV / ENVELOPE or ADSR. The amplifier section controls the volume of the sound, but it is more than just a straight volume control. The Amplifier uses an ‘Envelope Generator’ to control the overall loudness (or amplitude) of the sound over time.
To understand how an envelope works, we need to go back to how we perceive the volume of sound. For example the sound of a piano has a strong emphasis at the start of the sound but then doesn’t sustain for very long, whereas the sound of a car engine passing by will gradually sound louder and louder as the car approaches and then slowly disappear in volume.
A Volume envelope in a synth is designed to help us shape the volume of the sound from the moment you press a key until you release it.
Envelope generators
Envelope generators are used to help the synthesiser produce expressive sounds. A most basic synth has at least one envelope generator that controls the volume of the sound, but envelope generators do not only control the volume, in some devices, they can also control other parameters.
It is quite common to find two envelope generators in many devices, one to control the volume and the other to control the filter cut off for example. Today we will look at how to use the envelope to shape the volume of a sound.
Envelope generators are triggered by the keyboard; when you press a key, it sends a ‘trigger’ message to the envelope generator; it begins the generator’s process of creating an envelope. As long as the key on the keyboard is held down, another message is sent to the envelope generators. The message tells the generators that the note is still being played and the envelope being generated will stay open until this message ceases. When the message stops (you release the key), the envelope will go into its final stage.
ADSR
Nowadays, there are many variations of envelopes available. However, the most common envelope generator has four parameters: Attack time, Decay time, Sustain level, and Release time, usually called ADSR envelope.
The diagram below shows how an ADSR envelope is used to control the volume of the sound, from when you hit a key until you release it.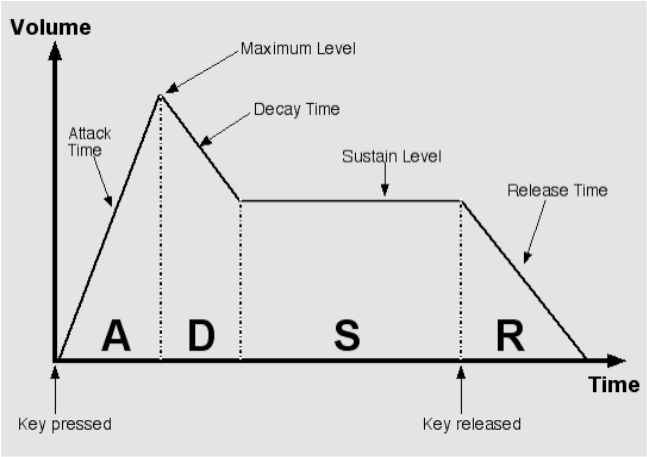
(ADSR: The four phases of an ADSR envelope. Notice how they relate to a key being pressed.)
Attack: This is the length of time required for the sound to reach its initial maximum volume. Obviously it will be very short for a percussive sound.
Decay: This is what happens immediately after a sound hits its maximum volume level in the attack phase. It’s the time taken for the volume to reach a second volume level known as the sustain level.
Sustain: This is not a length of time but a volume level at which the sound sustains after the decay phase. In most sounds is it lower than the attack volume, but it could be the same or even higher. Usually, it’s the volume at which a sound plays while a key is being held down. This phase can, theoretically, last forever, or at least until you get tired of holding down the key.
Release: This is the final phase, again measured in time, and is the time it takes the volume to reach zero after you release the key.
Saving Presets
Don’t forget to save any sounds which you create. Obviously you may have spent a lot of time creating a great bass or synth sound, and ultimately you want now to be able to reload it when you need it. This is part of building your own sound library.
First, click on the settings drop down menu and select Save Settings As

