Basic panning techniques

The Stereo Field
The term stereo, short for stereophonic, involves the reproduction of sound using two separate audio channels that are then presented to a pair of speakers far apart to recreate a natural panorama of sound that is analogous to how we perceive sound through our ears. Although what we are doing in the mixing process is an artificial representation of this, the idea is to create a three- dimensional soundscape that the listener can immerse himself or herself into. It is worth noting that in the advent of recording technology the goal was to try and re-represent the soundscape exactly as it was being played and experienced, but now with the various technology at our disposal, engineers often want to present an impossible larger-than-life recording which sounds far bigger then was ever played originally. We can add huge amounts of reverb to a bass kick to make it sound booming in a way that little environments could offer, and also do this without having the same effect applied to the rest of the instruments. This is something that would be unachievable in a real-life performance without the aid of technology.
Why Do We Use Stereo?
The human ear is actually able to listen in surround sound – a facet that new trends are exploiting in productions recorded in 5.1, 7.1 and even 11.1 surround sound. However, having moved away from the earlier mono recordings and into such salubrious, quadraphonic and surround productions, the standard for consuming music remains in stereo, and that is why we still mix using the stereo field.
It is, in fact, the best conciliation for all of the formats since it remains compatible with mono and so translates well enough over to monophonic systems. This is actually quite important since many people still consume their music on single-speakered radios and the like. If you start to mix in surround, the ways that individuals position their speakers will have a huge effect on how the surround mix translates over, and probably not very well! Whereas mixing in stereo will be compatible with all the systems on the market – from iPods to hi-fi – so for now, stereo it is!
Before you begin to make any decisions about stereo placement, you will need to get the overall balance approximated and we suggest that panning everything to mono will enable you to ascertain how much in the way of natural separation each sound has to start with. As mentioned earlier, go and check the balance outside of the room, as this can be very revealing.
Brief Disclaimer
It is important at this point to post a disclaimer stating
the fact that these tips are general guidelines and should not be adhered to automatically in every situation. Much of mixing is subject to program material and personal style, and therefore the mix needs to undergo a lot of experimentation before it will sound ‘right’. These tips are ones almost everyone can agree on as general rules but do not necessarily work in every instance or for every producer.
Vision
That being said, the first thing we want to do after our initial set-up process is to think of a solid vision for our mix that we will keep in mind throughout the mixing process. The vision and the ability to attain it is a large aspect of what distinguishes great mixers from mediocre ones. The vision is something that is largely subjective, but is commonly achieved by asking a series of questions pertaining to the song and serves as a consistent goal throughout the mixing process.
Key questions:
- What elements are most prominent?
- What is the feel or flow of the song?
- What elements should be emphasized/de- emphasized
-
Should the song sound intimate and close or large and superhuman?

In this particular loop (see screen grab above) I feel the vocal is largely expendable and the most important aspects are the drums and bass, with the piano and synth residing somewhere in the middle in terms of importance. As it is basically a hip-hop instrumental, I feel it will be somewhat low-end heavy, groove-based, and digital/electronic (as opposed to acoustic/organic) since it is an 808 beat and uses an obvious synth element.
If this were an entire song, the vision would be more in- depth and more interesting in terms of what should be expressed, how things should flow, etc.
Keep a multi-dimensional view at all times
Panorama Sketch
The next thing we want to do is to plan our panorama strategy. To do this, we want to take stock of our sounds and draw them out in a panorama sketch in order to get at least a general idea of how things should sit at the end of our mix. In this particular track, we have a drum kit consisting of a kick, snare, clap, hi-hat, open hi-hat, rim, a bass, a synth, a keyboard and a vocal track.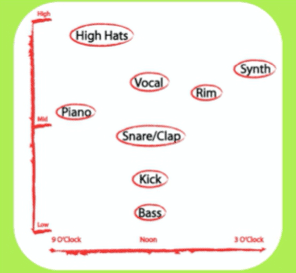
The most important and lowest registering elements are always panned down the middle. The kick, snare and bass are therefore always centred, as they are the foundations of the groove and the lowest registering elements (our clap basically serves as the 4th snare hit of a 2 bar loop, so that will go in the centre as well). These sounds do not necessarily have to be in mono, but it is a good idea to try this out (you can always add stereo information later). If keeping them in stereo, make sure there is a strong, centered presence and no extreme stereo information.
Lead vocals are always sent down the centre as well. The stereo width of the vocal should only be wide enough to keep the phantom centre and should not generally be mono. If there is a chorus or backing vocal, these should be panned to the sides, with the lower portions of the chorus closer to the centre, and with the higher tracks panned more towards the sides (as per our rule of deep sounds in the centre with higher sounds to the sides). These backing vocals should be sent to a separate group than the main vocal and balanced to fit just underneath the lead vocal.
Although it is recommended to place the other drum elements (at least in acoustic music) as they would appear to a listener of a live band, in most hip-hop and electronic music, this is mostly open to interpretation. Our open and closed hi-hats should probably inhabit the same area of the panorama field as they would come from the same hi-hat in a standard kit. Hi-hats are important elements of the groove so should remain somewhat centred if not completely. The only other element of our kit is the rim, which is often panned to 1 o’clock to balance out the hi-hats.
This leaves the piano and synth. In the track in question, it makes sense to pan the piano left and slightly hard since it is of a slightly lower frequency than the synth and will be less likely to conflict with the high frequencies of the hi-hats. I would pan the synth right and slightly harder as it serves more as an accent than a grounding portion of the melody and will help to balance the piano and widen our overall sound.
Panning According to Plan
It is important to note in Logic that the knobs that appear to be pan knobs just above the level faders in the mixer are actually balance knobs for balancing between the right and left channel level.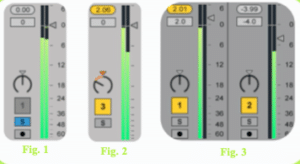
To explain the difference between balance and pan we can take the example of a stereo track with two different instruments panned hard left and hard right. In this example:
We have a shaker in the left channel and a high hat in the right. (fig 1) Moving the balance knob to the left increases the volume of the left channel and decreases the volume of the right channel as shown. (fig.2) We can see this more clearly by duplicating the effect of the balance knob using the volume faders on the separated left and right channels.(fig 3) As you can see the balance knob only alters the volume of the left and right channels. In the case of our high hat and shaker track the shaker has increased in volume and the high hat has decreased in volume but both are still perceived to be coming from hard left and hard right. If we want to alter the stereo placement of the stereo track we will need to use a true stereo pan. On hardware mixers we are able to do this because both the left and right channels of the stereo track are given their own channel strip so have independent balance knobs initially panned hard left and hard right respectively. If we want to alter the stereo pacement of the whole stereo track we can alter the balance of both channels simultaneosly using their respective balance knobs. We can duplicate this worlflow in Ableton using a simple effects rack using the Utility device as shown below. (fig 4)
To actually pan in logic we have to insert a direction mixer in one of the insert slots, which you can see below:
It is useful to sum all the tracks to mono in order to hear the thinnest sound possible in terms of stereo width and roughly place them around the panorama field according to the sketch above. Turning the elements to mono (and even turning off one speaker) helps to get a very precise idea of the sound placement and ensures there are no elements covering one another in the stereo field.
Phase Cancellation
Phase cancellation is when the left output of a stereo file is out of phase with the right output. In other words, the left speaker cone is pushing forward while the right is pulling in. This creates cancellations in the stereo output which quiets or completely cancels the sound.
Converting our sounds to mono does away with the possibility of introducing this cancellation into our mix, but does so at the expense of stereo information. To get around this in our example, we can either keep our sounds in mono and re-introduce more mono-friendly effects later on, narrow the stereo width of our sounds with the direction mixer until the sound is correlated, or throw out one channel of a stereo file and use the remaining channel in place of the missing one (left is now playing out of both left and right). In the latter case, you can then process one side slightly differently and pan each accordingly.
For our example, I would leave almost everything in mono except for the vocal and piano. Although much of what is lost after summing to mono is reverb (which can be reintroduced), these two elements are reliant on other effects for their distinct character. Getting rid of them completely would be counter to their core sound – so I would simply narrow their stereo image with the direction mixer and leave it at that.
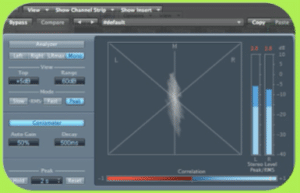
Logic’s Goniometer (found in the Multimeter) showing the stereo image of our track. A well-correlated stereo track will be ovular and centred around the vertical axis. A phase-cancelled track will be centred around the horizontal axis.
Masking
The only other point I want to bring up in this tutorial is the concept of frequency masking. Masking occurs when two sounds that inhabit the same frequency range are played simultaneously at different levels. In this case, the lower amplitude sound will be covered and indiscernible beneath the louder sound while making the louder sound muddy and undefined.
Without checking a frequency display, I have already avoided obvious possible masking in our example by panning the synth and hi-hats to opposite sides, and also from the decision to pan the piano and synth to opposite sides. The kick and bass pose an issue when they play together and will most likely be side chain compressed at a later step.
If you are having problems with masking, you can try one of several things:
- Filter the overlapping frequencies if they are not necessary to one or both core sounds.
- Move one instrument up or down one or more octaves.
- Side chain compress (as is often done with kick and bass) so one instrument ducks in level as the other is played.
- Pan one instrument to an opposite end of the panorama field.
- Rearrange your instruments so the conflicting elements do not play at the same time.
