Equalization
Equalization is the process by which an equalizer is used to either boost or cut different frequencies in an audio signal in order to change its tonal character. In mixing, the aim is to have the entire frequency spectrum shared comfortably by all instruments, so that each one can be heard clearly in its own space. Since some instruments may be strong in similar frequencies to another, this can often lead to them competing to be heard. Tweaking the EQ controls is one way to give them the required separation.
Even if we are not involved in music production, it would be fair to say that most of us are familiar with equalization as it has been presented on many hi-fis and listening devices. But to take a commercially mastered piece of music and apply to it a stereo EQ is not the same thing as when we use equalization in the multitrack environment to create space and clarity between the instruments. How do we get the bass kick to stand out from an overpowering bass guitar or vice-versa? How do we get a lead vocal to stand out from the crowd without bursting our eardrums? If you are looking to gain an understanding of these matters, a good knowledge of equalization is essential.
EQ Theory
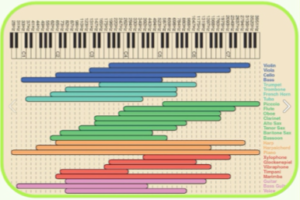
Your recordings are essentially an array of frequencies that hit certain amplitudes over a given timeline. The average human ear is capable of hearing frequencies as low as 20Hz and as high as 20,000Hz. More exist, but that is the typical human range. Certain instruments will dominate particular frequencies which have helped us to form a reference point for what we perceive as occupying bass, mid and high frequencies.
Hi-hats, for example, will have greater amplitude at around 3-5k but close to zero amplitude at 30hz. On the other hand, a bass will have a more dominant presence at around 80Hz but will lose it in the bands approaching 10kHz. When we are creating our soundscape, what we are usually trying to create is a relatively even representation across the frequency spectrum. The problem arises however, when an instrument’s bandwidth corresponds and conflicts with another. I use the term ‘conflict’ because when two or more instruments occupy or share parts of the spectrum, the result is loss of clarity and a ‘muddy’, incomprehensible mix. An instrument is likely to have a dominant presence at a certain frequency, but will also contain a range of others that all contribute to its characteristics. It is easy to see then, that the more instruments in the arrangement, the more probable it is that they will occupy similar frequency bands.
So, how do you make everything work together? The trick in a busy mix is to try to give every important sound/instrument its own little space in the mix so that it can be clearly heard but still blend in well with everything else.
I’ll just talk about the frequency plane for now. The key is to figure out which frequency range is most important for each instrument and to REMOVE any non-important frequencies that are competing with the important frequency range of other instruments. It also helps to kind-of map out your frequency range and figure out which instrument will be the primary instrument for each frequency range. You don’t want two different important elements competing for the same space.
The low end is usually the most difficult, and you usually need to decide if you want the bass or the kick drum to primarily occupy the low frequency range. Sometimes you can get them both working together, but more often than not you will need to choose just one for the low subs and remove the low subs from the other. In addition, you would most likely roll off all low frequency content from anything other than bass and drums, such as keyboards, vocals, guitar, etc.
 There are always exceptions though. For instance, in a lot of heavy metal music, the guitars have a lot of low-end beef to them, and the bass guitar sometimes will be playing the exact same part and just filling out that low end a little more. In those cases, you’ll find that there are rarely any low subs in the kick drum. Instead they make the kick drums very ‘clicky’, with a lot of top end to make them cut through the wall of guitars, and there isn’t much low end at all on the kick drums.
Basically, the first thing you should try to do is to CUT frequencies out of instruments to make them fit better in the mix before you ever try adding frequencies.
Types of EQ
An equalizer is a processor designed to specifically change the tonal quality of the signal passing through it. How it achieves this is by employing a number of filter circuits, which are able to apply gain within a desired frequency bandwidth. In this instance gain can be both positive (‘boost’), and negative (‘cut’). However, the proliferation of equalization software and the many features that they offer in order to differentiate can make the process of equalization a little daunting to start.
To begin we’ll take a look at the EQs that deal with the two extremes of our listening range: bass and treble.
High- & Low-Pass Filters
A low-pass filter is an audio filter that literally allows low frequencies to ‘pass’ while removing (or ‘filtering out’) high frequencies. A low-pass filter has a cut-off value, such that every frequency below the cut-off can be heard, and every frequency above the cut off is reduced or removed.
entirely from the audio. For example, if you use a low-pass filter with a cut-off frequency of 2000Hz, every frequency below 2000Hz will be heard in full, but every frequency above 2000Hz will be reduced or removed entirely.
A high-pass filter is the exact opposite of a low-pass filter, meaning that high frequencies above the cut-off point are allowed to pass, while frequencies below the cut-off point are reduced or removed. More sophisticated high- & low- pass filters permit you to manipulate the curve of the roll-off, steep or smooth.
Depicted below is a diagram of a high-pass filter, which has been programmed to reduce the level of all frequencies below 79Hz with a slope of 24dB/octave (an octave being a frequency doubling).
So if you apply a high-pass filter at 120Hz with a 12dB slope, it means that you are progressively reducing the level of the frequencies from 120Hz to 60Hz by 12dB, then again by 12dB from 60Hz to 30Hz.
In this figure we have a very steep slope for the high-pass filter from 80Hz and a smooth slope of 6dB/octave for the low-pass filter.
Shelving Filters
A shelving filter is designed to apply an equal gain change to all frequencies beyond a user-selected shelving frequency. They are probably the most common, with simple fixed-frequency implementations often used in domestic hi-fi amplifiers as tone controls. The treble tone control will typically be the gain control of a high shelving filter, while the bass tone control will be that of a low shelving filter. So in theory, if the fixed frequency for bass control is 80Hz, when boosting you will increase equally the level of all frequencies from 80Hz and below, and if the fixed frequency for a treble control is 10kHz, when boosting you will effectively increase equally the level of all frequencies from 10kHz and above.
Fixed-frequency shelving filters are ideal for beginners to equalization, and are often used within budget mixing consoles for the high and low EQ bands. The shelving frequencies are chosen to affect mainly the frequency extremes while leaving the mid-range largely unchanged.
Most budget mixers have a fixed frequency of 80Hz or 100Hz for the LF control and 10 or 12 kHz for the HF. More expensive mixers provide a frequency selector switch for the shelving bands, and high-end consoles offer smoothly variable shelving frequency controls. Here again digital or plug-in EQ usually offer all these options.
The figure below shows the Logic channel EQ. Here we have boosted 80Hz by 7dB and 10kHz by 12dB using shelving filters. Note that like high-end consoles, you can select precisely the frequency (hence it’s not fixed) as well as the curve of the shelving (here set at 1.00 for the LF and 0.71 for the HF).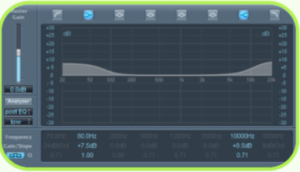
Peak Filters
Though shelving equalizers tend to be useful for gentle, overall tonal adjustment, they are less useful for those advanced applications where it is necessary to target specific frequency bands with greater accuracy. To affect a frequency band that isn’t at either extreme of the frequency spectrum, a peak filter is required.
Such a filter allows you to selectively emphasize or attenuate a limited band of the audio spectrum, and usually offers at least two controls: one to set the gain and one to specify the centre-frequency of the band to be treated. These are known as semi-parametric EQs. Unlike shelving EQs which equally increase or lower from a certain frequency and beyond, the peak filters allow you to increase or lower at a chosen frequency, but by doing so you will still alter the level of some of the frequencies below and above.
Note here that not only are we boosting 1kHz (centre- frequency) by 7dB, but you can see on the graph that the levels of 500Hz & 2 kHz are also increased by 5dB in the process. Most budget mixers come with at least a low & hi EQ (shelving type) & often a mid semi-parametric EQ.
More advanced equalizers also offer the possibility to alter the width of the band of frequencies affected by the filter. This control is given different names in different EQ units: resonance, bandwidth or Q. The narrower bandwidth has a higher resonance, or Q value, and allows more precision when dealing with localized frequency problems such as hum, noise, or vocal sibilance. On the other hand, the wider bandwidth has a lower resonance and is better for more general tonal shaping of your audio
In the next example, we are still boosting 1kHz by 7dB, but by using a narrower bandwidth (or Q), now 500Hz & 2 kHz are unaffected. Parametric EQs are very useful tools when you want to work over a very small range of frequencies.
Graphic Equalizers
A graphic equalizer is a high-fidelity audio processor that allows the user to see graphically as well as control individually a number of different frequency bands in a stereophonic system. A typical graphic equalizer consists of several audio filter/amplifiers, each centred at a specific frequency in the audio range. Most graphic equalizers have two identical sets of filter/amplifiers – one for each channel in a stereophonic system.
The gain (volume) controls in most graphic equalizers are slide potentiometers that are adjusted by moving a control button up or down. Sliding the button upwards increases the gain. The slide potentiometers for each channel are placed side-by-side, with the lowest frequency unit at the left and the highest frequency unit at the right. In this way, the positions of the buttons appear to follow a graphical curve that represents the gain as a function of frequency for each channel.
These types of equalizers are often used in more domestic applications such as car or hi-fi systems and are less common in the studios where the parametric design affords a better sonic character and response.

Somewhere between the two is the paragraphic equalizer, which is available within some software designs, and here the gain is illustrated by way of a slider, which allows for some six or seven parametric peaking filters.
In the analogue domain, fully parametric filters are less common than their semi-parametric counterparts, but they do exist and are able to offer swept high- and low-shelving filters, with at least one mid band with Q control. Equalizers of this type will only be found on the top-end of your analogue console, or within specific EQ modules, possibly with the option to switch the outer bands between shelving and peaking modes.
Yet in the digital domain these are far more common because of the relative cheapness of digital software compared to hardware manufacture. Further to this, these software imitations can offer displays of the frequency- response modifications generated by the current control settings for immediate visual feedback of the setting in use.
Whilst undoubtedly a potent means of tonal adjustment, you should not be surprised to learn that the software versions rarely sound as good as their hardware counterparts, which is why the demand still exist for good quality analogue consoles, such as the Neve, API, Avalon or Focusrite. In fact, beginners are likely to achieve more tangible results using a relatively basic analogue EQ than a complicated digital version.
Boost or Cut
Equalization is often used to correct the imperfections of the sound from its original source. It would be far better not to have to use equalization at all, but when we do, we need to be extremely judicious in its use. It is generally far better to cut frequencies then boost them but the inexperienced engineer will often tend to use additive EQ, because sounds that are louder or brighter usually sound better to the untrained ear.
So when people ‘solo’ things and start boosting EQ in various bands, this makes the track louder, which instantly sounds better to us. Thus the tendency for inexperienced engineers is to end up with a LOT of boost EQ across all frequencies on many tracks. When you add all those tracks together, there is simply too much frequency content competing for the same space in the mix, and everything sounds muddy and undefined, or like a big incoherent wall of sound. So take the lesson that applying an EQ cut to the instrumentation that is competing with the sound that you wish attenuate will result in a far more natural sounding representation, with the clarity that you should be aiming for.
Having said this, with a really good EQ you can begin to add more boost without the detrimental effects that poor EQs possess, which lend themselves to the kind of terms that are often used to express the results – honky, boomy and nasal-sounding being but a few.
As a general rule, gentle EQ roll-offs at either end of the spectrum sound fairly benign, and you can also make fairly deep cuts over a narrow frequency’s region without it sounding odd, but a significant EQ boost over narrow regions normally sticks out quite badly, especially with cheap equalisers. From this you can extract the general rule that boost should, where possible, be wider and less pronounced than cuts.
Notching Out
We will take the example of a voice, which will usually sit between the 2.1 and 2.5k mark. If you have a guitar track whose amplitude is peaking around the same bandwidth, the two will be competing for space.
To remedy this problem some of us might be tempted to simply turn up the vocals, but this will only place the vocal on top of the guitars, whereas the effect that we really want to achieve is the clarity of both instruments seemingly playing alongside each other. The solution is to notch out the guitar frequencies at the 2.1 – 2.5k mark leaving the rest of the guitar’s timbre intact. Now we have a uniform sound that the ear can comprehend and we are able distinguish each instrument.
Once you begin to apply this concept throughout your whole mix, you should see how clear each of the elements become, and if done correctly you will achieve a level of sonic definition that really helps your mixes stand-up in the commercial market. As a rule, I will roll off everything below about 80Hz on the guitar track and let the bass fill the gap. Played alone, the guitar part may sound weedy and uncharismatic, but once the bass is dropped in the difference is only for the better.
Cutting A Notch
If you are notching in a gap to correct a problem, then there is a simple little trick that you can use to identify the source of the competing frequencies. By using a peak filter type of EQ with Q control – parametric EQ – boost by at least 10 dB, with quite a narrow bandwidth, and start sweeping with the frequency control. It will be apparent when you hit a problem spot because the sound will be notably over emphasized and probably very unpleasant. Be careful not to have the monitors too loud when you are doing this or else you are likely to overload the speakers’ capacity for that frequency. Now pull the gain for that band down 3 – 4 db. Set the Q or bandwidth to be around 1 octave. Different EQs use different values for this, but basically, you only want the Q about as wide as the range you wish to notch out.
If at all possible, it is better to try and avoid instruments that compete with each other – a consideration for the early stages of recording and one that is not always viable. Your mid-range will be particularly vulnerable to problems, so try to get the right sounds at source. Separation and definition of sound can be vastly improved by spectral mixing whereby you are allocating each sound its own place within the audio spectrum but there will be times when you need to make some important EQ’ing decisions.
Boosting Up
Of course, there will be times when you want to accentuate some of the more pleasing characteristics of a sound and bring these features out more prominently within the mix. Over EQ’ing can, in some instances, be a powerful tool for creativity and in modern types of music it will be necessary. Boosting the frequency of your kick at around the 60–80Hz mark will give a fuller, more resonant sound applicable for many dance tracks. As I mentioned before, recording music has become less about recreating a recording as it sounds at source, but using technology to make it bigger, brighter and altogether more powerful.
Here’s the general guide:
- Kick Drum – Boost at 80Hz, cut around 350-400Hz, (removes “cardboard” sound) and beater smack is around 2-4kHz.
- Snare Drum – Fatness at 240Hz, crispness at 5kHz.
- Hats/Cymbals – Gong sound at 200Hz, shimmer/air between 8-12kHz.
- Toms – Boom between 60 and 200Hz, scoop out 100Hz-4kHz. Attack at 5kz.
- Bass – Boost between 80-150Hz to make a passive bass sound active, scoop around 35Hz, boost 800Hz for clarity or punch, and the slapping ‘popping’ thing is around 2.5kHz.
- Electric Guitar – Roll-off at 80Hz, cut at 800Hz to remove the ‘cheap’ sound, and the ‘edge’ is around 2.5kHz.
- Acoustic Guitar – Bottom at 120Hz, body at 240Hz, clarity at 2.5-5kHz.
- Piano/Organ – Just like acoustic guitar, except a piano may need a little boost around 10kHz
- Vocals – Scoop at 240Hz if muddy, boost at 4kHz for presence, and anywhere above 8kHz to add ‘air’. (sibilance is between 8-10kHz).
More on Equalization
One of the most important tools in mixing is the equalizer. It shapes individual sounds, buss groups and mixes into cohesive wholes. If used correctly it can add clarity to muddy sounds, or sparkle and definition to already great sounds. In this portion, we will take an in-depth look at some EQ tips, frequency concepts and a few instrument-specific techniques to help you create cleaner sounds and mixes.
Why EQ?
The purpose of EQ’ing is to create clearer and larger sounds that are well-defined and inhabit their own specific space within the frequency spectrum. This is achieved in different ways depending on program material, but the method by which it is achieved is largely systematic. What is needed more than anything in the process of EQ’ing a good sound or mix is an easily learned process, and a lot of experimentation and detailed listening.
Fundamentals
Theoretically, humans perceive waves as sound if they inhabit a range from 20-20,000 cycles per second (Hz). In reality, this number is closer to 35-18kHz cycles, with the bottom extreme being ‘felt’ more than heard, and the upper being barely audible. Within this spectrum, different instruments and sounds inhabit different frequency ranges that are specific to their type. Below is a list of (approximate) frequency ranges and some of the qualities found within them.
Sub Bass (0-60Hz)
- 0-25Hz should automatically be filtered as no musical events occur here and too much energy only serves to muddy the sound.
- 25-60 Hz gives music a sense of power. Once again, too much will give your sound an undefined low-end.
Bass (60-250Hz)
- 60-120Hz is the place for the fundamentals of the bass and the low end of the kick. 60-250Hz – too much makes the sound thunderous. This region can thicken or thin the sound.
Misery Range (120-350Hz)
- The area most often in need of correction. Some portion of most instruments reside here, creating undefined overlap.
Low Mid-range (250 Hz – 2kHz)
- The low order harmonics of most instruments. This range should be taken on a case-by-case basis.
If EQ’ed improperly, this range can sound nasal or cause listening fatigue.
Upper Mid-range (2-8kHz)
- 2-4kHz can mask speech recognition if too loud.
- Slightly decreasing instruments at 3k and slightly increasing the vocal at 3k can make vocals more defined without increasing output.
- 4-6kHz provides clarity and definition. Boosting here makes the sound seem closer; reducing around 5kHz makes it sound distant.
- 2-8kHz is the region of basic speech comprehensibility.
Upper Range (8-22 kHz)
- 8-12kHz cymbals.
- 8-16kHz clarity – too much causes sibilance.
- 12-22kHz is ‘air’. Broad Q to give more air.
A Quick Note on Gain
Channel level is another important aspect of mixing, which begins to flesh itself out during the EQ’ing process. As each new element is introduced for EQ’ing, it is first imperative that you set a preliminary fader level to get the sound, more or less, tucked into your mix in terms of amplitude. To do so, simply raise the level of the new element until it is far too loud and then slowly lower its level until it naturally finds its pocket.
Gain Structure
Another thing about gain that is worth mentioning is gain structure. For those who don’t know, gain structure is basically the act of keeping your levels in such a way that you do not raise gain at one point in your signal flow only to turn it down at a later stage (e.g. set the drum bus to +5dB and the master at -1dB), or excessively raising or lowering the levels at any one point in your signal chain.
A properly set gain structure is something that is always done in analogue mixing as improperly set levels will cause noise and other problems. In the digital domain this is also true, but to a lesser and sometimes non-existent degree – especially when working in a DAW such as Logic which supports a floating-point architecture. Even so, it is a good idea to adhere to the concept of proper gain structure as much as possible.
To do so, simply try to keep your faders as close to unity (±0) as possible without overloading the inputs of any channel strip or plugin. Be careful though, as your channel strips will usually only monitor the channel’s output by default and some parameter settings will probably need to be changed in order to monitor the signal input at any one point in the chain.
Gain structure is different from overloading the channel output (over 0dB of output), which largely needs no attention in DAWs that have a floating-point architecture.
You will not risk digital distortion in such instances on individual tracks. However, you can NEVER exceed 0 dB of output on the master out as the output becomes fixed, and clipping and its subsequent digital distortion will occur.
General EQ Tips
Although the choice of a starting point is somewhat open to personal preference, it is essential to begin with a prominent groove element such as the kick or
bass and build the groove around it one element at a time. Once the groove is sounding clean, add the other song elements one at a time while trying to clean up as much frequency overlap as possible.
No matter what element you are working with, the first thing you are going to want to do is add a low-cut filter. To find where the low-cut filter should be set, I generally start with it as steep as possible (48dB/octave or more) and sweep it up until the sound begins to lose some of its main tonal qualities. I then back down slightly on the frequency band until it is sounding natural and adjust the slope and Q to taste.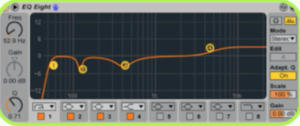
The next thing we want to do is to identify and eliminate any unnecessary or problematic frequencies. To do this, we first need to listen to our sound in isolation for any resonances or other qualities that should not be there. If any are present, the most widely used method for EQ’ing them (known as surgical EQ’ing) is to set a bell filter to a very high Q and very high gain and sweep until the frequency we want eliminated becomes exaggerated. The next thing to do is to flip the gain so it is cutting rather than boosting. Finally, play with the Q, gain and frequency levels to fine tune the sound.
Sometimes I have found it useful to cheat a little and simply start with the gain set so that it cuts immediately. I then
sweep through the frequency range until the frequency I don’t want disappears. I find this works well when there is a
particularly wide band that needs filtering, or the problem frequency is proving difficult to find using the conventional method. Whatever trick or method you employ is up to you, as the sonic result is really the only thing that matters.
Finally, we want to boost important frequencies in our sound. We do this in much the same way as the above method for eliminating frequencies, in that we will start with a high gain, high Q bell filter and sweep until we are exaggerating the frequency we want to boost. The next step is to bring down the gain to a more moderate level and to open the Q to a relatively wide setting to give a gradual and wide boost, before fine tuning the settings as necessary.
A rule of thumb in EQ’ing is to cut with a narrow Q and extreme gain reduction, and to boost with a wide Q and moderate-to-low gain increase. This is due to the fact that humans are much more sensitive to gains in amplitude than to reductions. You will notice this when you hear the resonance while sweeping to find the correct frequency as outlined above. The sound will be distinctly unnatural while the gain is boosting, but will smooth out and become natural when the gain is cutting, even at extreme settings.
Phase shift is also a concern as it always occurs when boosting. As such, it is a good idea to cut as much of what you don’t want to hear as possible first and then to boost the important areas somewhat conservatively. If you go straight to boosting only the frequencies you want to hear without first cutting, you are going to end up with (more or less) the same gain-ratio between frequencies whilst introducing unwanted phase shift. This can create problems down the road and make it more difficult to cut out problematic or unnecessary frequencies later on.
Specific EQ Tips
Kick
I always start with the kick, as that, for me, is the main grounding element and pulse of the song. The kick generally has a low centre around 65-110Hz and a head from 3-8kHz. Immediately I will low-cut the kick as much as possible to make room for the bass and then cut just above the low centre (110-300Hz) in order to clear the ‘misery range’ for other instruments. I will then use the low-pass filter and cut the top as much as possible without making the head sound too dull. From here it is a matter of playing around a bit to see if anything else can or should be cut. After cutting, I will slightly boost some of the more important frequencies of the kick to bring out some of its distinct character. Below, you can see how I have set the EQ with a moderate Q setting on the low and high filter to add some resonance and punch.
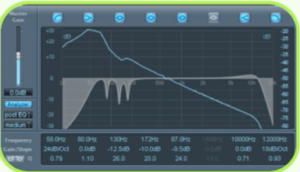
This particular kick sample has been processed with a large amount of sub-bass on it, which I am cutting along with a few other frequencies in order to make it sound a bit more clear and organic. If I decide to boost any of the frequencies later on, I will just add another EQ behind the first, as I have used all of my bell filters for cutting.
Snare
Next, I will go to the snare. Once again, I will set the low-cut filter as high and steep as possible and then back down a bit once the sound becomes too thin. I will then cut the top as much as possible with a low-pass filter, being careful not to dull it. I will then try to pick out resonances in the sound and cut those frequencies if they are present (snares are notorious for having ringing overtones which may or may not be wanted).
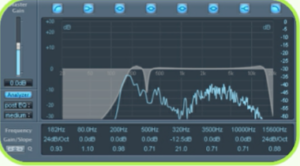 I will then take the snare out of solo mode and listen to it with the kick to see how things sit. I will then try to increase the frequency setting of the low-cut filter on the snare whilst using the low energy of the kick to compensate. This is done to help clear up the areas where the snare and kick overlap and create a more distinct separation of the two drums. I will then go through with a bell filter and sweep for frequencies that are not crucial to the snare (usually in the mid-range). Next I will crisp things up with a high shelving boost and wide Q increase over the point (and any other important frequencies) of the snare.
Despite the above outline, this snare was pretty straight- forward with only one bell filter used for cutting some unnecessary frequencies. The snare should always be outputting at about the same level as the kick.
Bass
I will always end up EQ’ing the bass against a soloed kick for fine tuning, so with that in mind, we can add the bass now whilst the mix is still in its infancy. As always, I will start with a steep low cut and sweep up until the sound begins too dull. In the case of the bass, obviously, this does not take much as I will only be cutting around 25-40Hz. I will then back off on the dB/octave ratio and adjust the Q and frequency to taste.
Next I am going to go in with a high cut, and bring that down until some of the twang of the bass dulls – then back off and adjust to taste. If there are any odd-sounding frequencies or resonances, I will go through and cut those with the surgical EQ tactic. From here, I can try a number of things in both the cut and boost departments and keep whatever sounds best.
Here are a few tips and tricks in EQ’ing bass to try out. The frequencies are generalizations, but they should be a good place to get you started.
- Use a narrow Q at 100-120Hz and 140-160Hz, and boost one while cutting the other.
- Boost at 700-900Hz for more clarity and attack.
- Reduce 20-80Hz to cut mud.
- Boost 80-140Hz to increase bass tone fundamentals.
- Boost 130-200Hz to increase overtones.
- Boost at 2.5-3kHz for snap.
- Give a moderate boost at a low frequency and then another boost at either half or twice the first frequency (e.g. boost at 50Hz and then 100Hz or boost at 120Hz and then at 60Hz).
With this bass I ended up shelving the low frequencies and cutting at 200Hz to decrease an overpowering low-end.
I raised some of the higher frequencies to help some of the articulation stand out and used the boost at 120Hz and at 60Hz trick to bring back a little of the bass energy I cut previously.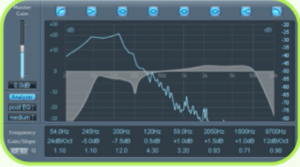
Hi-hat
The hi-hat is fairly easy to EQ as it largely consists of harmonics that can be cut drastically to fit in a mix whilst still retaining a characteristic sound. Once again I will low-cut this, whilst listening to the rest of the mix. This time, however, I will stop my low-cut sweep when I hear the low end of the hi-hat get (more or less) clear of the other instruments. Depending on the harmonics of the bass and snare, this
can vary widely. If I have a bass or snare with rich upper harmonics, I will somewhat ignore the frequency overlap of the hi-hat and bass and sweep until things fit. If the bass/ snare is very low with no snappiness, or are being cut with a large amount of low-pass, I will pay more attention to the frequency overlap and stop when the frequencies of the hi- hat and other instruments are clear of each other.
As I said, the values of the low cut can vary widely from 250- 1000+Hz depending on your genre, and what you are trying to accomplish sonically. The upper ranges of the hi-hat are going to make it more present, from 8-15+kHz, so this can be a good place to boost. I would also recommend first cutting surgically as much as possible from the upper end as the
hat tends to take up a lot of upper harmonic space, which is good to keep clear for other instruments and vocals.
(The HH only need a high- and low – cut filter for this instance
Vocals
Vocals can be the most difficult to EQ as they tend to be the most expressive, individualistic and most often multi- tracked element of a song. As such, vocals are the most open to EQ and in need of case-by-case interpretation. As usual, however, the first thing we are going to do is to low cut our vocal track(s) to the point at which we begin to lose the necessary low end. Once again, we immediately back off a bit on the frequency and steepness. Then we play around and fine tune all parameters to taste.
Next, I will once again do the same with a high-cut filter until things dull, setting the frequency, steepness and Q as done with the low-cut. I will then try to cut out any unwanted resonances, which usually reside in the 120-350Hz range (and elsewhere if they are present). From here, I will cut to taste whilst keeping the sound thick. I will then try boosting at 2-3kHz depending on if it is a male or female, in order to increase the comprehensibility.
It is recommended to cut sibilance by hand at every ‘S’ sound by automation rather than with a de-esser, as it gives a more accurate result. This can be started here as a rudimentary loop step just to give a general feel for how things sit, but the full-on automation should occur later as the vocal and track progresses.
Secondary Instruments
There are not really any hard and fast rules for secondary instruments such as toms, synths and electric pianos, but some of the basic fundamentals discussed above can and should be incorporated. Basically, always start with a low- cut/high-pass filter, set it the way described and then do the same with a low-pass/high-cut. Cut unnecessary or obscene frequencies drastically with a high Q before boosting those that are necessary to the sound’s character with a low Q and low boost.
