Dynamics
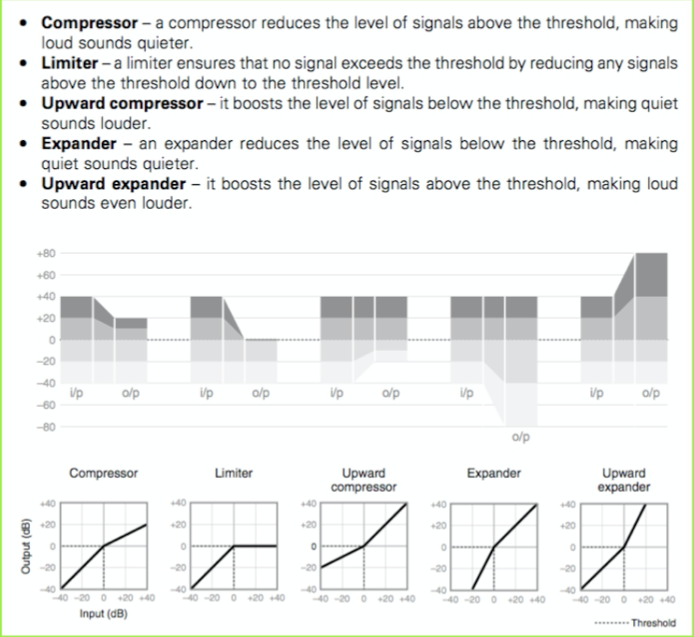
Compression
The human ear uses compression for pretty much the same reasons that we do in music, that being to control the level of an audio signal. As you may already be aware, the concept is to simply boost those signals that are quiet and suppress the ones that are too loud. Imagine you are recording a vocalist and at some parts of the piece he or she sings quietly and in others sings at full blast. This not only causes problems when trying to obtain a suitable recording level, but also along the chain of recording right through to the mixing process. If you were to try and compensate for these changes in dynamics manually, you would be adjusting the faders in response to varying amplitudes of the instrument or singer that you are recording – a technique called ‘riding the gain’ – but as you can imagine, this method would be very unpredictable and would require an extremely fast response. Enter the compressor, which essentially does just this. It could be most usefully described as an audio circuit that automatically ‘rides the gain’ – pumping up the volume when things get too quiet and reducing the peaks down when things get too loud. The goal of the compressor is to achieve a more uniform, consistent audio signal that is optimum for recording and listening.
While some are able to operate completely automatically, most will allow us to control the parameters of the compressor to allow for a more reflexive and even creative response. Specifically, we can program a compressor to reduce the audio signal when it exceeds a particular threshold level of our choosing. If, for example, we set a ratio level of 6:1, the output for every 6dB over the threshold will only produce an output of 1dB over the threshold. Simple mathematics will tell you that if the output has exceeded the threshold by 12dB, the resulting output will only be 2dB over the designated threshold, and so on. If the signal falls below the threshold, then the gain will return to normal – exactly the same process as turning the fader down, just a lot faster to respond then the human ear and fully automated.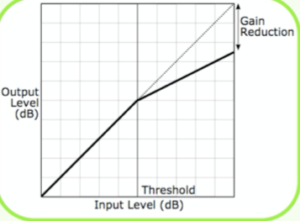
As with most technology, compressors can be too good at what they do, which can often produce artificial-sounding effects. This might be handy in some creative instances, but for the most part, we want to achieve a more natural- sounding response.
Aside from the threshold and ratio, there are many other parameters that work together to produce either more natural or artificial responses. What follows below is a detailed discussion of each.
Attack
 The attack time refers to the time it takes the compressor to reach its maximum level of gain reduction after the threshold has been reached.
Typical attack times range from less than 1 millisecond at the fastest, to more than 100 milliseconds at the slowest. Attack time settings affect the sound quality in terms of overall perceived brightness or high-frequency content. If you use very fast attack time settings, the compressor will activate very quickly, reducing gain instantly at the waveform level of the sound.
A fast attack can be useful for damping percussive peaks so the overall track level can be increased. It can also add punch to a track. However, since transient information at the front or attack portion conveys brightness character, especially with percussive sounds, immediately reducing it with the compressor will dull the sound. Selecting a slower attack time will allow the transient portion of the sound to pass through before the compressor starts clamping. However, if the attack time is too slow, ineffective and tardy compressor action may result.
If you compress a snare drum track with a fast attack, you may notice a diminished or shortened attack of the front portion of the snare drum sound. Instead of a good “hit” at the beginning, you will hear a very short “blip”. If the attack time were even faster, you wouldn’t hear any snare attack at all. Adjusting the attack control to a slightly slower attack time will lengthen this blip back to the original snare attack length. Engineers use a compressor to get more attack out of a snare drum by using a low threshold and a high ratio. After making up gain with the output level control of the compressor, the attack portion ends up greatly amplified just before the compressor starts squashing the trailing portion of the snare drum sound. I like to mix this (sometimes called) “thwacked” sound with the original un-processed snare drum track.
Release time is the time the compressor uses to return to unity gain after the input signal has fallen below threshold. The compressor is said to “release” from gain reduction. Typical release times on popular compressors go from as fast as 20 milliseconds to over 5 seconds. Most engineers envision their compressors doing their job of gain reduction quickly and then releasing quickly to get out of the way. For the most part this holds up for pop recordings, but super-fast release times, along with a fast attack time setting, will distort low-frequency sounds, as the compressor is capable of gain change within the period (the 360-degree cycle of the lowest fundamental frequency) of the sound’s waveform. You can demonstrate this by using a very fast release on a bass guitar compressor and have the player play loud and sustained notes.
A long release time can be useful for adding sustain to a signal – on guitar solos for example. But an overly long release time setting can introduce another form of distortion, since gain reduction is “stuck” clamping the sound down for an unnaturally long time period. “Pumping” and “breathing” are engineer jargon words for obvious compressor artefacts or side effects with maximum compression. Sudden and usually unwanted deep gain reduction is called pumping, while a slower return (release) to operating level with a noticeable rise of the noise floor is called breathing. Newer compressor designs have clever predictive and adaptive schemes that reduce these side- effects, making the compressor’s action nearly undetectable, or at least tolerable in most intense gain reduction situations.
Knee
 The exact moment the compressor starts gain reduction is called the ‘knee.’
‘Hard Knee’ compression describes this moment as sudden and certain.
‘Soft Knee’ or smooth knee compression is a less obtrusive change from simple amplifier to compressor.
Soft knee widens or broadens the range of threshold values necessary for the onset of compression. On quality compressors you can switch between hard and soft knee compression. The amount of gain reduction is measured and read on a standard VU meter whose needle rests on the 0 VU mark. The needle will deflect negatively downward to indicate how much gain reduction is occurring in dB. VU meters are RMS or average level responding and do not indicate fast or peak gain changes. LED’s are also used for VU meters, and they will better indicate peak levels. A well-designed compressor will have a good meter that reads input level, output level, gain reduction and any excessive peak output with an LED clip indicator. Once the amount of gain reduction is determined, the recording or operating level is re-adjusted with the output or make-up gain control on the compressor.
What this all means is that the soft-knee will generally be used to provide a smoother transition from amplifier changes from a unity gain amplifier (like the “theoretical” straight piece of wire) into a compressor that is reducing gain. Once the signal passes the threshold, the full ratio as set by the user is applied, but because some compression is applied to signals approaching the threshold, the transition from no gain reduction to full gain reduction is far smoother.
The question that might be asked then is: why don’t we use soft-knee compression all the time? We have hinted at the answer earlier when we talked about using compression as an effect rather than a tool for dynamic control. And this is basically the reason why sometimes hard compression can give us artificial pumping responses that sound great and give a desirable artificial perception of loudness and presence.
Another reason is that at higher settings, the hard-knee compression provides a tighter gain control – so if your signal is fluctuating to larger degrees, the soft-knee may not be able to produce the desired degree of levelling. In the end you will have to let your ears be the judge.
As if hard-knee and soft-knee compressors didn’t confuse the picture enough, there are other ‘side effects’ to consider. In a theoretically perfect compressor, once gain reduction is applied (in other words, once the input is above the threshold), the response is reasonably linear, so no matter by how much the input exceeds the threshold, the output level increase will always be the fraction of that amount determined by the ratio control. Both hard-knee and soft-knee compressors settle down into this type of linear response above the threshold. However, there are some compressor types that don’t exhibit a linear response above the threshold, and it’s not uncommon for the amount of gain reduction actually to reduce at very high signal levels. In effect, this means that at very high signal levels the compression ratio tends to fall to a lower value.
Look-Ahead
The look-ahead function is designed to overcome the problem of being forced to compromise between slow attack rates that produce smooth-sounding gain changes, and fast attack rates capable of catching transients. Look- ahead is a misnomer in that the future is not actually observed. Instead, the input signal is split, and one side is delayed. The non-delayed signal is used to drive the compression of the delayed signal, which then appears at the output. This way a smooth-sounding slower attack rate can be used to catch transients. The cost of this solution is that the signal is delayed, but this will not cause a problem if your DAW features plug-in delay compensation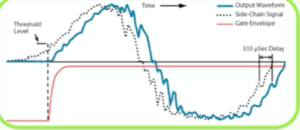
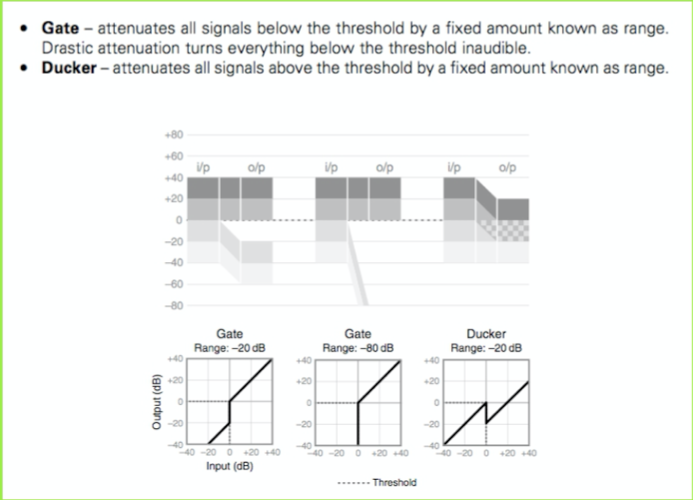
Gate
A gate is a switch that turns off the audio when it goes below a defined threshold. It’s great for removing room noise, and makes the recording dead silent when it kicks in. It removes completely any sound (noise) below a certain level. Check your vocal track for example: it is probably full of clicks, shuffles, breaths and headphone spill. You can set the right noise level floor with the threshold command.
Using the Noise Gate is especially important after compression: compression always raises the noise level! This is because compression brings the soft sounds closer to the loudest and so it boosts any noise in the track.
When producing music essentially within a DAW (computer & software), the need of a gate for basic noise removal isn’t as vital, since we can edit, cut out, automate, etc, any piece of unwanted audio. However, there are still times when using a noise gate is the fastest solution to the problem.
However, there are times when a very simple noise gate just won’t do the job either. For example, if a gate is used to clean up the snare drum sound, it is quite likely that the nearby hi-hats will spill into the snare drum microphone and cause the gate to open. Increasing the threshold level may cure this problem, but then there is a very real danger that any quieter snare drum beats may not cause the gate to open at all. Some gates offer other parameters to improve that problem.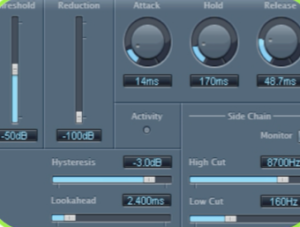
When it comes to hardware noise gates, the Drawmer DS201 has become the ‘classic’ gate found in nearly every commercial recording studio. In addition to the four parameters we mentioned earlier, it offers two more controls (actually three).
First is the inclusion of two variable filters, one high-pass and
one low-pass, which act upon the side-chain keying circuitry.
The second is the “HOLD” parameter. It determines the amount of time the gate is held open after the signal falls below the Threshold. It is variable from 2mS to 2 Seconds.
Side Chain

To better explain the range control on a noise gate, let’s introduce the extra input that some gates (and compressors) feature: the sidechain input. A signal, usually from a microphone, is connected to the sidechain input, and instead of the threshold functioning as normal, the sidechain input now takes control of it. As you speak, the noise gate drops anything else playing through it that’s below the threshold to the volume or “range”, set by the range control. It’s the same with a compressor – as you speak (or sing), the ‘background’ music going through the main inputs and outputs of the unit will be compressed to the level determined by the ratio control.
There are plenty of uses for a sidechain with both compressors and noise gates. With compressors, the most common use is to ‘duck’ instruments to make room for vocals. For example, a guitar can swamp the bandwidth that it shares with the vocals in a mix, so by side-chaining the vocals into a compressor that has a guitar signal as the input, when the vocalist sings, the guitars get compressed, allowing the vocals to sit in the mix better. Noise gates are popular with DJs, as by side-chaining their voice and setting a low range, when they speak, the music drops in level, allowing you to hear them more clearly.
Siechains can be found on products such as the Focusrite Red 3, The Focusrite Liquid Channel & Liquid Mix, and the Focusrite ISA220 & 430MKII. We will explore some of the practical aspects of side-chaining later on.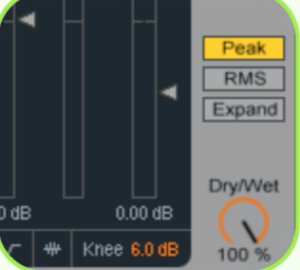
Peak or RMS?
The side-chain of the compressor is the part of the circuitry that listens to the incoming signal to see if it needs turning down or not. Most often, compressor side-chains are designed to respond pretty much like the human ear, which means that short sounds aren’t perceived as being as loud as longer sounds of exactly the same level. This is called an RMS response.
The implications of using a compressor with an RMS control law are that the compression will sound natural, but short duration, high amplitude sounds may pass through at a higher level than you expect. One solution when feeding digital systems that can’t tolerate overload is to use a fast acting peak limiter after the compressor.
Some compressors offer switchable RMS/Peak operation, and in Peak mode, the gain control responds more accurately to brief signal peaks than in the RMS ‘averaging’ mode. This ensures peaks are more accurately controlled, but at the same time introduces a greater risk that the audio will be squashed unacceptably whenever a loud, short transient sound occurs, an irremediable problem if recorded that way.
Stereo Link
The other important control you will always find on a compressor is the Stereo Link switch. This can be quickly explained: if you are compressing a stereo signal, the levels in the two channels will be unequal and will change from moment to moment. Unless something is done, the amount of compression will be different in the two channels, making the stereo image shift from one speaker to the other according to which channel is being compressed the most. To avoid this, the Stereo Link switch mixes the control signals for the gain elements together so that each channel is compressed to the same extent.
Output or Gain
This sets the overall output level of the effect (dB). It can be useful to whack up the output level again after it’s been reduced from applying compression to a signal. This is commonly known as ‘make-up gain’. 
Compressors are not inherently noisy devices, but because they reduce the dynamic range of the signal being treated, some make-up gain is needed to bring the peak signal level back to where it originally was. In other words, although compressors really just turn down loud sounds, once you’ve adjusted the make-up gain control, the loud sounds are back where they were and the quieter sounds are much louder. The quietest of quiet sounds is noise, so if you’re compressing to achieve 10dB of noise reduction, any noise that happens to be part of the signal will also be increased by 10dB for all input levels that are below the threshold. Periods of silence between words or phrases are most vulnerable, as it’s here that the compressor gain is highest. As well as starting off with the cleanest signal you can, it might be wise to gate the signal before it enters the compressor. Some compressors have built-in expander gates for this purpose; used properly, they really can make a difference.
Affecting the Top End
As we have already discovered, compressors can be most usefully thought of as automated faders, but on occasion their action can be somewhat at odds with the way that audio behaves. We know already that the production of bass frequencies requires far more energy than a loud high- pitched sound, and a great deal of contemporary music and subsequent energy is derived from the bass kicks, synths or guitars. When you come to mastering, placing a compressor on the overall mix means the compressor will respond to these frequencies in such a way that when a loud bass kick is played, for example, the level of the entire mix will be reduced for the same duration as the sound that the compressor is acting upon. Unless the amount of compression has been subtly applied, you will experience an audible pumping of the higher frequencies as they are reduced and returned to normal. You can set the attack time long enough to allow for the high-frequency transients to remain unaffected, but this is not always achievable and in some instances a faster attack time will be required to achieve a tighter overall finish.
 Enter the multi-band compressor as one solution to this problem, but not to be outdone, software designers of conventional compressors have come up with rather clever ways to counter this issue. Some designs employ circuitry that allow for a small amount of the high-frequency signal to bypass the effect of the compressor, meaning that the top-end remains unaffected by the compressor’s response to loud low-end amplitudes.
Although interesting, the technicalities are really matters for the software or hardware designers. What we as producers and engineers are primarily concerned with is the effect on the music that we are shaping. So with this in mind, use the knowledge you have gained here and listen to the different effects that we have described. Learn how to control your compression techniques so that it becomes more of a science than a hit-and-miss affair.
Limiters
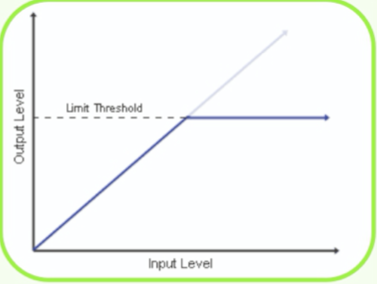
A limiter is a type of compressor designed for a specific purpose – to limit the level of a signal to a certain threshold. Whereas a compressor will begin smoothly reducing the gain above the threshold, a limiter will almost completely prevent any additional gain above the threshold. A limiter is like a compressor set to a very high compression ratio (at least 10:1, more commonly 20:1 or more). The graph below shows a limiting ratio of infinity to one, i.e. there is no gain at all above the threshold.
Limiters are used as a safeguard against signal peaking (clipping). They prevent occasional signal peaks, which would be too loud or distorted. Limiters are often used in conjunction with a compressor — the compressor provides a smooth roll-off of higher levels and the limiter provides a final safety net against very strong peaks.
Limiters can be used as mentioned here at the recording stage to prevent digital overload, and are almost always used nowadays for mastering.