Mastering
What is Mastering?
Mastering is a vital part of the recording process, so much so that a substantial amount of ‘mystery’ is associated with it. We’ve all heard stories of high-priced mastering engineers with mystical, proprietary gear based on vacuum tubes salvaged from ancient Russian submarines… or something similar. Mastering is the last step in the record-making chain, where you can alter the overall tone and loudness of a recording, as well as the track order of an album.
To put it very simply, mastering is the polishing, the icing on the cake. This is the process of optimising the sonic characteristics of a track to present your music in the best possible light. Compressors, EQ and limiters are the main tools used at the mastering stage, and all the ‘rules’ we have discussed throughout the course will apply here again: monitors, environment, referencing to other commercial CDs, quality and characteristics of equipment used (valid for plug-ins), etc.
Prior to the digital revolution, mastering had a much-defined set of functions. You brought your finished mixes on tape to a mastering engineer, who would often bounce them to another tape through various signal processors designed to ‘sweeten’ the sound. The tunes would then be assembled in the desired order, and acetate test pressings would be made to evaluate the final product prior to mass- producing albums. Mastering was rightly regarded as an arcane, mystifying art. Few musicians had access to the high-end, expensive tools needed to do mastering, nor did they have the experience of someone who had listened to thousands of recordings and knew how to make them ready for the real world.
Nowadays most commercial releases follow the same process, the artist/producer/engineer/A&R turn up at a commercial mastering studio with the masters (DAT, 1⁄2 inch tape, Data CDs, Wav Files, etc.), and the mastering engineer first works on each track separately (compression, EQ, limiting, and others) by transferring the masters in a computer system through the processing we just described. Once all the tracks have been recorded and processed, they then start the process of track-listing and implementing gaps, fades or crossfades. They also attend to the level between each track. The final product is transferred to a master (i.e.1630 U-Matic, DAT, pre-master CD, DDP exabyte, vinyl or sound files) that will be sent for replication.
To understand this and how it relates to the situation today we need to examine the pre-DAW recording environment of the 80s and 90s. During this time the vast majority of recordings that went to mastering came from large, well- equipped studio facilities that were staffed by highly trained, experienced and skilled engineers. It was essentially a given that the 2-track final mixes sent to mastering were not going to need much, if any, corrective measures or balancing. Mastering studios armed with increasingly more sophisticated 2-track stereo signal processing tools and being handed well-balanced mixes, were therefore able to focus primarily on sonic enhancements. Great 2-track mixes resulted in great mastering – all was well.
In recent years, the rapid worldwide migration of much music recording from large, expensive studio facilities with highly trained and experienced staff to smaller DAW-based “artist” studios has started to have a profound effect on the traditional mastering process. While many of these smaller studios are well-suited for creating and recording music, they are usually not acoustically designed or staffed for precision audio mixing. As a result, mastering studios have to cope with more and more mixes that are musically sound but sonically unbalanced. As a result mastering studios look at solutions to deal with this problem.
Multi Band Compression
In essence, a multi-band compressor comprises of a set of filters that splits the audio signal into two or more frequency bands. Three- or four-band compressors are perhaps the best compromise between versatility and ease of setting up. After passing through the filters, each frequency band is fed into its own compressor, after which the signals are recombined.
The main advantage of multi-band compression is that a loud event in one frequency band won’t trigger gain reduction in the other bands, so when that loud kick drum comes along, instead of pulling the whole mix down with it, only the low-frequency sounds (kick and bass instrument) will be compressed, leaving the mid-range and high frequencies untroubled. Similarly, a loud event in the mid-range won’t affect the extreme high or low frequencies for the same reason. Multi-band compressors are great if you need a fair amount of compression over the mix as they tend to be more transparent. For these reasons multiband compressors are quite widely used in mastering studios. However, with more parameters and more options at our disposal, a badly set up multi-band compressor can radically change the overall tonal balance of the mix. In my opinion, when it comes to buss processing, I find that a single-band compressor usually works best, and I keep multi-band compression for the mastering stage.
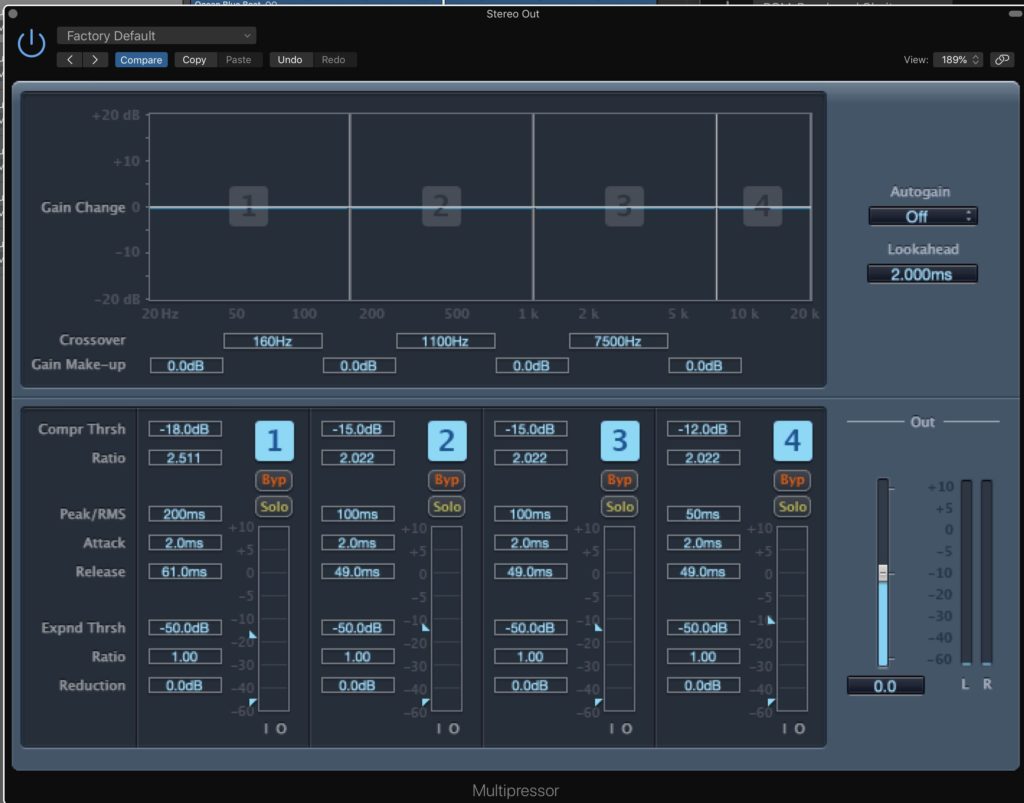
How Multiband Compressors Work
Multi-band compressors share similar parameters to single-band compressors. Although the interface may differ from plug-in to plug-in, once you have mastered the basics you should be at home using any multi-band compressor out there.
different areas of the overall frequency range. Most multiband compressors work from 20Hz – 20kHz. The number of bands they use varies and often they can be added or deleted. In most cases, the range that each band covers is also user-definable.
Each of these bands represents an individual compressor and has a full set of controls. All the usual suspects are here, such as ratio, threshold, attack and release settings. With your frequency band set, your compressor will only act on the specified frequencies. This is really ideal for treating a particular instrument or problem frequency in your mix.
Using Multi-Band Compressors on Your Master Buss
Multi-band compression isn’t specifically limited to use in mastering, but there’s no doubt this is where it’s utilized most. The ability to home-in on specific frequencies and treat them without colouring others is what sets multi-band processors apart from more basic single-band models.
With a decent multi-band compressor strapped across your DAW’s master output you will be able to tame subsonic frequencies, lower the level of problem percussion sounds, and bring rogue hi-hats and effects into line. All this can take place with varying amounts of compression, and each band can have different attack and release times, perfectly suited to the instrument in hand.
To home-in on each area, solo each band and identify the area you want to treat. Now set the compression so that a few dB of gain reduction is taking place when the instruments in that area are at their loudest. If you repeat this with each frequency band you should introduce a good amount of control that simply wasn’t there before.
For example, if I’m working on a track where I feel the bass end is lacking in weight, I may use a higher threshold and a higher ratio to bring up the average bass level, but still use subtle low-ratio settings for the mid-range and high end. Similarly, by applying heavier compression to frequencies above, say, 6kHz it is possible to increase the high-frequency density to create an effect similar to that of using an enhancer.
It’s worth remembering that when you’re using any kind of compression on your final master, it’s wise to aim for a ‘transparent’ result. This basically means you are aiming to solve any mix issues without it being apparent that there is any compression being applied.
This usually means opting for long attack and release times, low ratios and small amounts of gain reduction. If you find yourself having to use very heavy settings to get the desired effect, you may want to look at the original mix and make some changes. Of course, you may be looking for a very compressed sound as a creative effect, but this will be at the cost of your dynamic range.
Dealing With The Time Constants
Where the attack and release settings are independently adjustable, try to judge each band on its merits. For example, you might use a moderately fast attack time on the bass end because very low frequencies have no fast transients to compromise. This brings the level under control reasonably quickly. You should then set the release time as short as you can get it without any audible gain-pumping being evident. As a rule, the busier the music, the faster the release time you need to ensure the compressor’s gain resets itself between notes. However, low frequencies tend to hang on longer than high frequencies, so you may need a longer release time at the bass end than in the mid-range. As a starting point, setting twice the release time at twice your setting for the mid-band might be reasonable, though if you prefer to keep it simple, you’ll probably get reasonable results by starting off with the attack and release times for all three bands set the same.
The mid-band covers the majority of what we perceive in a musical mix, so this can be set up much as you’d set a full-range compressor. In other words, use a slower attack time if you need to enhance transients, and use a fairly short release time, but not so short that you hear pumping.
What you do in the high-band depends on the result you’re after. If the plan is to increase the density of the high end, use a higher ratio setting to push up the energy, and possibly a faster attack if you need to prevent the transients from becoming too pronounced. High transients tend to decay faster than low frequencies, so you may be able to use a faster release time than you did in the mid-range, but listen carefully for any pumping effects or other unnatural gain changes, and increase the release time as necessary to get rid of them. If you’re using a compressor that allows you to solo each of the frequency bands, setting the release time may be easier, but as a ‘ballpark’ figure, use half the mid-range release time as a starting point.
Multi-band compressors tend to be used early in the chain (I tend to insert it first), i.e. to bring out lost elements in the mix, then you can follow with EQ and limiting, for example.
Using Multi-Band Compressors in the Mix
Multi-band compressors can be just as useful in the mixing stage as they are in mastering. Obviously there is not a lot of point treating simple, monophonic sounds with a five-band processor, but groups of instruments can really benefit from this sort of compression.
With a multi-band compressor applied to your drum buss you can treat separate drums. Low- and mid-frequency drum parts can be attenuated without affecting any other area of your drum mix. This sort of treatment will also give your drum sound a cohesive quality that is often hard to achieve with a number of single-band compressors.
This technique is not just limited to drums and can work with any number of grouped instruments, such as guitars, vocals or even synth lines. As long as the contained sounds have a defined, unique frequency, then the multi-band compressor will be able to clamp down on them.
Multi-band compression is also useful when a number of instruments have been bounced down to one track, where you have lost the ability to tweak individual settings. When using loops from sample libraries you’ll probably find this indispensable.
Multi-Band Compressors as Dynamic Equalizers and More
Most multiband compressors also allow each band to be boosted in volume. This boosted area can then be compressed to bring it down to its original level as it fires. This mixture of amplification and attenuation is commonly known as dynamic equalization, and if the right balance is struck it can give you a really pleasing result.
When this technique is employed, areas of the mix that contain small amounts of the frequency band in question will be boosted and higher gain areas will be compressed. This results in a more even sound and can really open up a mix that is perhaps a little dull.
Multi-band compressors can be used for de-essing. Very high sibilant frequencies can be homed-in on and compressed when present. This is essentially what happens in the majority of de-esser plug-ins, but this way you actually have more control over the end result.
These examples show that multiband compressors can be used in a number of situations besides mastering. It’s well worth getting to grips with this technology.
Choosing Crossover Points
Multi-band compressors often allow the user to adjust the crossover points, so if we take a three-band compressor as an example, where is the best place to set them? The answer is that it depends on the type of material being processed and on what adjustments are needed. OK, I know that isn’t very helpful, so let’s narrow it down a bit and assume we’re processing a full mix of a typical pop song. Setting a crossover point in the middle of the vocal range for example, can mess up the vocal sound, especially if you use radically different compression settings on each side of the crossover frequency.
Generally it is best to set the low crossover point below the vocal frequency range and set the high crossover point no lower than 2.5kHz. A sensible low-frequency setting might be 120Hz, as this is below the vocal range, but above most of the deep bass and kick drum elements going on in the rhythm section. These are only suggested starting points and, as a rule, I’d suggest moving the high crossover point higher than this if you plan to do more than very subtle high- end processing, as it’s easy to over-emphasise the 2-4kHz area of the spectrum, which is where things can start to sound harsh. By contrast, if you restrict heavy processing to above 6kHz, you can significantly enhance the sense of detail and air, without affecting the crucial mid-range and disturbing the natural reproduction of vocals and many acoustic instruments.
Preparing Your Tracks For Professional Mastering
Apart from getting the music sounding right, it is just as important to supply the mastering engineer with the right information so that they can proceed with the job satisfactorily. Certainly any audio files sent to the mastering house prior to the session require detailed labelling so that they can be properly identified, but anyone attending a session also needs to have all the necessary information to hand. If ISRC codes are being used then, in the UK, these need to be obtained from Phonographic Performance Ltd (PPL) in advance so that they can be allocated to each track at the end of the session.
It is not recommended to start your mix with your ‘polishing’ buss processes in place, as you’re likely not to work as hard in getting the basic mix right at the first place. It’s important to do the very best you can with your mix before you switch in any buss ‘polishing’, otherwise the final result might suffer.
If you’re unsure about processing the whole mix, leave it untouched. Remember it’s easier for a mastering engineer to work from an unprocessed mix than an over-processed one.
Don’t add any fades while mixing — fades and crossfades should be done while mastering, when you have a better sense of the ideal fade time. As you mix, you should also watch closely for distortion — a few overloads may not be audible as you listen to the mix, but may be accentuated if you add EQ or limiting while mastering. It’s better to concede a few decibels of headroom rather than risk distortion. As a general rule, 3/4dB headroom is a good average, leaving headroom for the mastering process.
It’s not necessarily a good idea to add normalisation, as that means another stage of DSP (which may degrade the sound, however slightly) — and you may need to change the overall level anyway when assembling all the mixes into a finished album.
As for trimming the starts and ends of tracks, it’s better to leave a bit of space at the beginning and end of each mix, and to do the final trimmings at the mastering stage.
Master Mix Formats
Back in the early days of home studios, there was little choice when it came to recording your stereo master – the serious guys used a Revox quarter-inch tape machine running at 7.5 or 15ips (inches per second) while everyone else got by with domestic open-reel tape recorders or even cassette decks. Even today, those old Revox machines can give fantastic results, but now they compete with DAT, Minidisc, CD-R, CD-RW and hard drives as a medium for your mixes.
If you plan to take your mixes to a Mastering studio, BE AWARE of the formats they accept, as you don’t want to turn up for the session only to find out that they can’t play your mixes on their system. Most professional mastering studios will accept a wide range of formats to master from, as well as for producing mastered versions that will be sent to the replication factory. Smaller CD mastering studios will probably mainly deal with DATs and CDs (maybe ADAT/Tascam). Which formats you choose will depend on your need and budget. However with a DAW in home studios most mixes are recorded ‘in the box’.
As I have mentioned several times before, most DAWs offer the possibility of working and recording at 24 bits. If you choose to work in this format (which you should really) you should stay in this format until the very last stage, which means that you should record your final mixes at 24 bits as well. The same applies if you work at sample rates higher than 44.1kHz, such as 48kHz, 96kHz and 192kHz.
You all know that Audio CDs have to be at 16 bits 44.1kHz, but that reduction should only happen at the very last stage. If you plan to master it in a commercial studio, chances are that they are best-equipped to perform that task, and if you plan to do DIY mastering, it’s better to do all the processing in the same format, as you will have a far better result, before converting it to the CD format. If DAT and 1⁄2” were the standard during the 80s and 90s, it is now becoming fairly common to record the final mixes in the DAW and then bring the audio files to the mastering studio on a CD.
Note that in this situation you should bring a data CD containing your final mix (in the original format, as mentioned previously). Do not bring an Audio CD, as that means that you will have already converted the mix to 16 bits. Also make sure to check with the mastering studio which audio file formats they accept – wav., AIFF, SDII, interleaved or split stereo, 24bit (or 32 bits even), and the sample rates. All of these may differ from studio to studio.