Reverb
Natural space
As you should be aware from the week one lesson on acoustics, when we experience a sound we are not only hearing it from the direct source, but also from the environment in which it is situated (reflections from walls, furnishings, outside etc). You only have to compare the voice from within a cathedral, bathroom, or outside to experience dramatic differences in timbre (ever noticed how great your voice sounds in the shower?). The reflections in the large dimensions of a church can be heard long after the initial sound creation compared to an open space, with nothing to reflect back. A domestic setting, such as a room, is likely to afford very short reflection delays, which may be imperceptible unless suddenly taken away.
The patterns that reverberation creates get evermore complex with the more surfaces they encounter, and this can quickly result in a convoluted reverberant wash. Yet if you take these reverberations away, you will experience a distressingly dead quality to the sound, as anybody who has been inside an anechoic chamber will confirm. An anechoic chamber is a room so well acoustically treated that little, if any, reverberation can be heard, making even the sound of your own voice nearly imperceptible. Sonic reflections are a necessary facet in providing a sense of place within the world, but many recordings take place in an acoustically absorbent setting, so we need to add the reverberations artificially after the actual recording takes place to help restore the natural order of things.
The acoustics of your control room need to be measured and treated to ensure as little reverberation as possible, but this is a slightly different matter when it comes to the live room. Many recording studios build their selling point upon the unique quality of their live rooms in so far as they are able to offer unique and, presumably, lush-sounding environments in which to record – whether it be a large wooden hall, stone cavern or small recording booth.
Although recording techniques have changed radically over time, the basic premise remains that when making an acoustic recording, you ideally want to capture the natural reverberations of a good-sounding environment. Techniques differ, but one of the core concepts dictates that the further away that the microphone is placed from the source, the more of the room’s reverberation will be captured in the subsequent recording. To gain more flexibility during the mixing process, another technique involves close mic’ing the direct source, and using either one (mono), or two (stereo) mics further away to capture the reverberation separately. The reason for this, and the reason that we want our control rooms to be acoustically sterile, so to speak, is because, once captured, reverberation is difficult to remove. In fact, the only reverb that you might want on the recording is that recorded from heavily compressed room mics that are recording your drums.
However, as we are now aware, modern music is not so much about recreating the performance as played, but artificially adding an environment that was not present in the first place. Bigger-sounding sonic qualities are usually now the norm for contemporary mixes, and more often than not, artificial reverb and other effects will be desired.
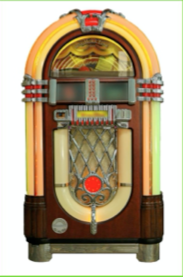
1925 saw the advent of electric recording and, for a brief time, some record companies would record in reverb-rich environments, such as churches and meeting halls etc. Yet the introduction of the jukebox demanded a deadening of the sound to accommodate the way in which jukeboxes reproduce the recordings. This is the main reason why, from about the mid 30s to 50s, records were produced as dead-sounding as possible.
Artificial Reverbs
Echo chambers
 The founder of Universal Records, Bill Putnam, is credited as being the first person to create and use an echo chamber to produce artificial reverberation. This occurred in 1947 for a pop record. Whilst many recordings prior to this were replete with reverberation timbres, Pitman designed the first device that controlled the amount of reverb that could be sent from the recording desk and returned to the mix in variable degrees.
Acoustically speaking, the classic echo chamber creates echoes in the same way in which they are created in churches or caves — it is simply a large, enclosed empty space with floors and walls made of a hard material (such as polished stone or concrete) that reflect sound waves well. The basic purpose of such chambers is to add colour and depth to the original sound, and to simulate the rich natural reverberation that is a feature of large concert halls.
The development of artificial echo chambers was important for sound recording because of the limitations of early recording systems. Except in the case of live performances, the majority of commercial popular recordings were made in specially constructed studios. These rooms were both heavily insulated to exclude external noises and internally anechoic — that is, they were designed not to produce any internal echoes or reverberation of sound at all.
When it came down to live rooms, flexibility was the biggest concern. An 80-piece orchestra sounded great in a room with a lengthy reverberation, but it was hardly desirable for a rock band. Specially made reverb chambers were developed using a send (also called an echo send) from a console which the engineer could adjust to control how much signal would be sent to that chamber and what channel would receive the treatment.
Note: Most audio engineering text books This will refer to “echo” as a small number of repeats, each discernible. This is a misnomer in the case of “echo” chambers. Most echo chambers provide reverb, which is usually accepted as thousands of repeats that are unable to be individually picked out by the human ear.
How It Worked
The rooms were not nearly as large as you would expect (or as they sounded). Studio architects used what little trickery they had at their disposal to exaggerate the acoustics of what was often little more than a large pantry. Echo chambers would have shellac or tile on all surfaces of the room, much like a shower. The loudspeaker (playing what was being sent from the echo send on the console) would usually be placed not facing the room, but facing a reflective wall. This increased the reflections in the room, and also decreased the amount of direct signal that would be picked up by the microphone(s). In the early days of recording the echo chambers would be mono send, mono return.
Many of the smaller independent labels could not afford extravagant purpose-built echo chambers, so often exploited the reverberant qualities of more unorthodox spaces such as corridors, lift-wells, staircases and even toilets by means of substitution. In fact, Atlantic Records recorded the reverberation you hear on many of their famous releases, simply by positioning a speaker and microphone in the office toilet. This tactic was also employed on LA Woman by the Doors in 1970.
Spring Reverb
 First introduced in the 1930s, a spring reverb system uses a transducer at one end of a spring and a pickup at the other to create and capture vibrations within a metal spring. Guitar amplifiers frequently incorporate spring reverbs due to their compact construction and low cost. Spring reverberators were once widely used in semi- professional recording due to their modest cost and small size.
Many musicians have made use of spring reverb units by rocking them back and forth, creating a thundering, crashing sound caused by the springs colliding with each other. The Hammond Organ included an inbuilt spring reverberator, making this a popular effect when used in a rock band. The operation is relatively simple – the audio signal is coupled to one end of the spring by a transducer (a bit like a speaker in this case), which creates waves that travel through the spring. At the other end of the spring, there is another transducer (this time more like a pickup microphone) that converts some of the motion in the string into an electrical signal, which is then added to the dry sound.
Spring reverbs, as you may be aware, respond to motion. If you have ever dropped a guitar amp, you may well have heard the twang of a spring coil, an effect exploited in quite a few Dub recordings.
Plate Reverb
 During the 60s and 70s, most artificial reverb used on recordings was generated using a reverb plate, sometimes called (inaccurately) an echo
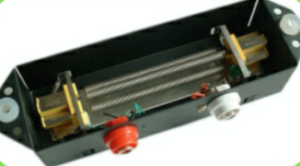
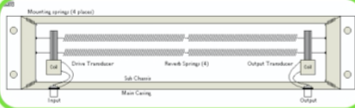
 plate. The reverb plate is an ingeniously simple device, but it takes a lot of tweaking at the design stage to get it sounding right. Plates work by suspending a thin sheet of metal under tension within a rigid frame via springs or clamps attached to the corners. A transducer similar to the voice-coil of a cone loudspeaker is used to inject audio energy into the plate, and two or more contact microphones fixed to the surface of the plate then pick up the vibrations inside it and feed them to preamps connected to the console effect returns. By feeding the different contact microphones to left and right channels, a pseudo stereo reverb output is created.
Because metal plates have a tendency to ‘ring’, getting the plate thickness, size, material and tension right is quite an art, and some pre- and/or post-reverb EQ is invariably needed to fine-tune the sound. Furthermore, because the plate is very sensitive to external sounds and vibrations, it has to be mounted in a soundproof box, ideally on shock- mounts.
Unlike digital reverbs, which have innumerable adjustable parameters, the plate reverb relies purely on EQ for tonality, and physical damping for decay-time control (usually via a motorized felt pad). Pre-delay was often added by using an open-reel tape machine on the input, and replaying the input signal via the replay head to exploit the time gap between the record and replay head. You just had to hope the tape reel didn’t run out during a mix.
Because a typical plate may only be between one and two square meters, and because sound travels much faster in metal than in air, the reflection density within the plate builds up very quickly following an impulse. The sound from the input transducer spreads rapidly across the surface of the plate in all directions until it encounters the edges of the plate, whereupon it is reflected and re- reflected back into the plate. To get the most random reflection build-up, it’s best to have the transducer mounted a little way off-centre, and to get a wide stereo image, the two pickups are sited at slightly different distances from the plate edge.
The characteristic plate sound is bright and extremely dense, with little or no impression of individual early reflections. The reverb builds very quickly and decays smoothly with a maximum un-dampened decay time of several seconds. Digital reverbs can provide a reasonable emulation of the coloration and envelope of a plate reverb unit, but only the more processor-intensive models produce the speed of reflection density build-up required to be truly convincing. Plate reverb was very popular for vocal and drum treatments, and though digital reverb has largely replaced it, many purists still prefer the ‘real’ plate sound for certain applications
Digital Reverb
We have come some way since these large and often quite expensive and cumbersome techniques. Today, hardware and software units are available with sophisticated algorithms developed to recreate the reverberation environment of every situation that you could think of and more!
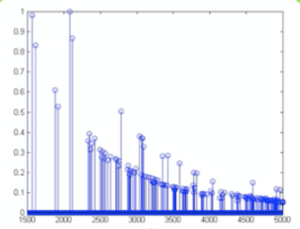
The differences in sound quality will vary depending on the amount of processor power used and the individual approach to reverb that each designer adopts. Digital synthesis of reverb is not an easy thing to recreate and it is as much an art form as a science. There exists anything between 1000 and 3000 separate echoes to recreate a natural sounding reverberation and the spacing between these echoes needs to be as arbitrary as possible to mimic a natural reverberation response.
Digital synthesis offers many advantages, not only with size and cost, but with the number of different simulations the typical unit is capable of. The user also has a greater degree of control of the settings and can return to a saved preset on demand. The downside of these simulations is that, if poorly designed, they can sound extremely unnatural.

(Alesis Midiverb II, used to be found in many home studios in the 90s.)
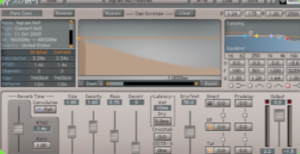
Control Reverb
 Designers realize that there is nothing quite like the real thing and have been busy developing sample-based reverb units. Yamaha and Sony paved the way with the hardware units and software developers, such as Waves and Logic Pro, quickly followed suit with their software equivalents. Being sample-based affords the option to sample from any space, be it the Sydney Opera House or your favourite local boozer. It is also able to simulate its predecessors in sampling spring, plate or other classic sounding digital reverberations.
It is essentially a room simulator, which utilizes samples from real acoustic environments. The particular characteristics of the space are captured using a special sweep tone played by a speaker and recorded by microphones in the actual space, or by firing an alarm pistol and recording that with microphones. A convolution reverb adds the same sound to any sound that it is used on as the room did to the gunshot or sweep. This sample is called an impulse response, in short: IR.
Not only are you able to create your own impulse responses but there already exists a vast source of ready-made IRs. The only setback comes when, having created the algorithm, there is little scope to manipulate it afterwards.
Reverb Parameters
So now that we understand that digital reverberation aims to simulate the way surfaces reflect and re-reflect from surfaces in a real environment, what we are going to look at are a few parameters that help achieve this effect and the different ways that we can use them to manipulate the original sound-source.
The reverb effect has two main elements:
to the gunshot or sweep. This sample is called an impulse response, in short: IR.
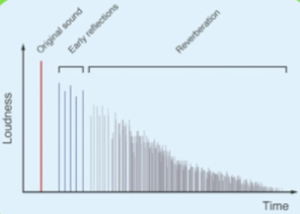
- The early reflections (also called initial reflections) consist of the first group of echoes that occur when sound waves hit walls, ceilings, etc. (The time before these sound waves actually hit anything is called pre-delay.) These reflections tend to be more defined and sound more like “echo” than “reverb”.
- The decay, which is the sound created by these waves as they continue to bounce around a space. This “wash” of sound is what most people associate with reverb.
Following are the types of parameters you’ll find on higher- end reverbs. Lower-cost models are likely to have a subset of these:
Room size
This affects whether the paths the waves take while bouncing around in the virtual room are long or short. If the reverb sound has flutter (a periodic warbling effect that sounds very unrealistic), vary this parameter in conjunction with decay time (described next) for a smoother sound.
Decay time
This determines how long it takes for the reflections to run out of energy. Remember that long reverb times may sound impressive on instruments when soloed, but rarely work in an ensemble context (unless the arrangement is very sparse).
Decay time and room size tend to have certain “magic” settings that work well together. Reverb presets lock in these settings so you can’t make a mistake. For example, it can sound “wrong” to have a large room size and short decay time, or vice-versa. Having said that, sometimes those “wrong” settings can produce some cool effects, particularly with synthetic music where the goal isn’t necessarily to create the most realistic sound.
Damping
If sounds bounce around in a hall with hard surfaces, the reverb’s decay tail will be bright and more defined. With softer surfaces (e.g. wood instead of concrete, or a hall packed with people), the reverb tail will lose high frequencies as the reflections bounce around, producing a warmer sound with less “edge”. A processor has a tougher time making accurate calculations for high frequency sounds, so if your reverb produces an artificial-sounding high end, just concede that fact and introduce some damping to create a warmer sound.
High and Low Frequency Attenuation
 These parameters restrict the frequencies going into the reverb. If your reverb sounds metallic, try reducing the highs starting at 4—8kHz. Remember, many of the great-sounding plate reverbs didn’t have much response over 5kHz, so don’t fret too much about a reverb that can’t do great high- frequency sizzle.
Having too many lows going through the reverb can produce a muddy, indistinct sound that takes focus away from the kick and bass. Try attenuating below 100— 200Hz for a tighter low-end.
Early Reflection Patterns
These are created by the designers to emulate plates, halls, chambers, tiled rooms and so on, and though their overall duration may be adjustable via some kind of room size parameter, the pattern itself is fixed. The greater the spacing of the early reflections, the bigger the virtual room sounds. The rate at which early reflections build up differs depending on the position of the listener within the hall, so some manufacturers provide a number of positioning options. As a rule, a listener at the back of a concert hall will hear the early reflections building up more slowly than a listener near the front. Most basic reverb will give you a choice between at least Room (i.e. ambience, chamber, tiled room, etc), Plate (based on the plate design, usually quite bright) and Hall (much bigger space, usually warm sounding).
Early Reflections Diffusion
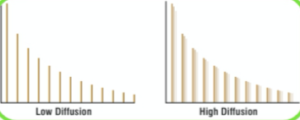 Sometimes just called diffusion, this is one of the most critical reverb controls for creating an effect that properly matches the source material. Increasing diffusion pushes the early reflections closer together, which thickens the sound. Reducing diffusion produces a sound that leans more towards individual echoes. For percussive instruments, you generally want lots of diffusion to avoid the “marbles bouncing on a steel plate” effect caused by too many discrete echoes. However, for vocals and other sustained sounds, reduced diffusion can give a beautiful reverberant effect that doesn’t overpower the source. With too much diffusion, the voice may lose clarity.
Note that there may be a second diffusion control for the reverb decay. With less versatile reverbs, both diffusion parameters may be combined into a single control.
Early Reflections Pre-Delay
It takes a few milliseconds before sounds hit the room surfaces and start to produce reflections. This parameter, usually variable from 0-100ms or so, simulates this effect. Increase the parameter’s duration to give the feeling of a bigger space – for example, if you’ve dialed in a large room size, you’ll probably want to employ a reasonable amount of pre-delay.
Reverb Density
Lower densities give more space between the reverb’s first reflections and subsequent reflections. Higher densities place these closer together. Generally, as with diffusion, I prefer higher densities on percussive content, and lower densities for vocals and sustained sounds.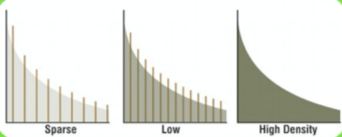
Early Reflections Level
This sets the early reflections level compared to the overall reverb decay. The object here is to balance them so that the early reflections are neither obvious, discrete echoes, nor masked by the decay. Lowering the early reflections level also places the listener further back in the room, and more toward the middle.
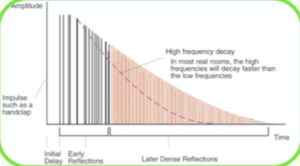
High Frequency Decay and Low Frequency Decay
Some reverbs have separate decay times for high and low frequencies. These frequencies may be fixed, or there may be an additional crossover parameter that sets the dividing line between the lows and highs.
These controls have a huge effect on the overall reverb character. Increasing the low-frequency decay creates a bigger, more “massive” sound. Increasing high-frequency decay gives a more “ethereal” type of effect. An extended high-frequency decay, which is generally not found in nature, can sound great on vocals as it adds more reverb to sibilants and fricatives, whilst minimizing reverb on plosives and lower vocal ranges. This avoids a “muddy” reverberant effect, and doesn’t compete with the vocals.
Gated & Reverse Reverb
Another type of early reflection found in most reverb units is gated reverb. Originally, gated reverb relied on micing the ambience of a live room, often heavily compressed, then using a noise gate to produce sharp cut-off rather than normal reverb decay. The outcome is a burst of reverb following the initial sound that ends quite abruptly. Most digital reverbs now offer an emulation of this classic effect as a separate algorithm, and though it was somewhat over- used in the 80s – Phil Collins was among the first to exploit this technique commercially in ‘I Can Feel It Coming In the Air Tonight’ – but it is still a useful treatment for making drums sound more powerful or for giving electric guitars a raw edge. The main parameter is gate time, though some algorithms also include a trigger threshold below which no effect is produced.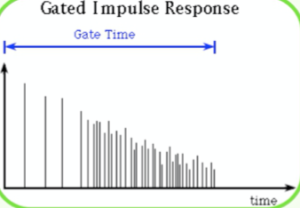
Reverse reverb is a modification of gated reverb where a reverse-type envelope (slow attack, fast decay) is applied to the early reflections cluster. Like gated reverb, the main parameter is the time taken for the reverb to build up and cut off. In use, the effect gives the sound being processed a certain backwards quality, even though nothing is actually being reversed.
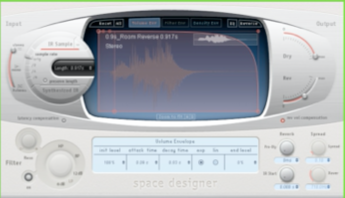
(Logic’s ‘Space Designer’ Reverb Plug-in set to a Gated ‘Room Reverse’ simulation)
In Application
 The effects of reverberation on sound could most usefully be described as analogous to the effect of light and shadow on the visual plane. A sound devoid of reverb has the same lifeless characteristic as a beautiful landscape lit only by perfectly diffused light that leaves no room for shades of shadow. Conversely, you may think of strong light casting strong shadows that completely obscure parts of the scenery in the same way that too much reverberation will mask elements of the mix.
As with all the techniques that we will look at during this course, there are no hard-and-fast rules when it comes to using reverberation in your mix, but we can provide some general guidelines to help you get started. So, before you do anything, take a listen to how some of your favourite producers use reverb in their tracks. You may not even be aware of its presence until you begin to look for it, but once you have found it ask yourself some questions about the quality of the reverb: is it long, short, mellow or bright? How many different types of reverb can you hear? The typical pop record will often feature one shorter reverb for the drum parts, for instance, and a longer one for the vocals.
Note about Hardware Units
Before the use of plug-ins, the patching of a reverb unit was Digital Mixing as follows:
- Auxiliary send from the mixer into input of the unit
- Unit outputs (usually left & Right) into FX return or channels of the mixer.
Using this configuration, the effect unit has to be set up as 100% wet, so that it outputs the reverb sound only, with no direct sound at all. That way, you can adjust the desired amount of reverb for an instrument using the auxiliary send from that channel (how much dry signal you send into the FX unit).
Digital Mixing
The advent of digital mixing has changed the ways in which we operate, and now we can run many instances of the same plug-in that can be inserted directly onto the channel strip of the virtual mixer. Typically, inserts on hardware mixers only tended to be used for compressors and EQ, but because of this feature, many beginners will end up placing a separate reverb plug-in on each different channel. This is not advisable for the reasons cited below:
- No matter how powerful your computer is, you will end up compromising on the quality of the plug-ins used to accommodate the CPU. Good quality plug-ins are CPU hungry, like good hardware units are expensive, so you can rarely afford to have many of them.
- If you apply too many different types of reverb to different instruments, you might lose a sense of cohesion – too many different spaces are quite improbable.
- When a reverb is directly inserted on the channel to be effected, you have less control over the space, as the control pan will affect both the reverb and the direct sound. You can’t, for example, pan the direct sound on one side and the reverb on the opposite side.
Reverb for Drums & Percussion
As we discussed earlier, unless working in a good quality live-room, close mixing reveals little of the room’s natural reverberation character, and the same can be said for using unprocessed samples of a drum machine. Using too much reverb on your kick drums can be problematic, resulting in a wash of low frequencies that really muddy the bottom end of your mixes. If you want to achieve the generally more desirable punch from a kick, then a shorter, more ambient setting is preferable. This type of preset will cause the extra reflections to add to the dry sound and stretch out the timbre over a longer period of time, but unlike the traditional reverbs, are programmed to fade- away earlier before they have a chance to interfere with the sounds. Gated reverbs also work well for the same reasons, but will, if not used delicately, give you the same sounding timbres used in pop records of the 80s. You may, of course, want this.
The prominence of the kick is desirable and is indeed the main driving force of most dance genres, but it is often the snare sound that defines the overall experience of the drum section. Since they produce little in the way of low frequencies, you can typically get away with applying more reverb to your snares, and plate settings can be good for this, being beautifully bright and replete with fast attack parameters. Unless the music allows for it, you should keep the delay comparatively short, nothing over 2 seconds. As a general guideline, the tempo and density of the track should dictate the decay time. The faster and denser the track, the shorter your reverb time needs to be to avoid colouration.
These are general rules of practice and I am sure you will be able to find snare reverbs with delay settings of 1-3 seconds being used commercially, but the sound that you experience is also affected by the wet-to-dry ratio parameters of reverb units or plug-ins. With very short reverb settings you can often mix in more reverb, to create a very live sound, but without allowing the mix to get messy.
As we discussed earlier, unless working in a good quality live-room, close micing reveals little of the room’s natural reverberation character, and the same can be said for using unprocessed samples of a drum machine. Using too much reverb on your kick drums can be problematic, resulting in a wash of low frequencies that really muddy the bottom end of your mixes. If you want to achieve the generally more desirable punch from a kick, then a shorter, more ambient setting is preferable. This type of preset will cause the extra reflections to add to the dry sound and stretch out the timbre over a longer period of time, but unlike the traditional reverbs, are programmed to fade- away earlier before they have a chance to interfere with the sounds. Gated reverbs also work well for the same reasons, but will, if not used delicately, give you the same sounding timbres used in pop records of the 80s. You may, of course, want this.
The prominence of the kick is desirable and is indeed the main driving force of most dance genres, but it is often the snare sound that defines the overall experience of the drum section. Since they produce little in the way of low frequencies, you can typically get away with applying more reverb to your snares, and plate settings can be good for this, being beautifully bright and replete with fast attack parameters. Unless the music allows for it, you should keep the delay comparatively short, nothing over 2 seconds. As a general guideline, the tempo and density of the track should dictate the decay time. The faster and denser the track, the shorter your reverb time needs to be to avoid colouration.
These are general rules of practice and I am sure you will be able to find snare reverbs with delay settings of 1-3 seconds being used commercially, but the sound that you experience is also affected by the wet-to-dry ratio parameters of reverb units or plug-ins. With very short reverb settings you can often mix in more reverb, to create a very
If you are looking to add sparkle and life to a tired, dull snare part, then a typical method is to use a heavy dose of short, bright plate or tiled-room ambience. A larger, fuller sound will require short-hall or longer plate, to which you can add a small amount of pre-delay to give the sensation of ‘slap-back’ to the snare hit. Similarly, unless miking your hats independently, using a short ambient plate will add the all-important space and high-frequency detail without the long reverb tail.
Because of the inherent longer sustains that tom drums are known to produce, they will generally need little in the way of reverb, however, the shorter settings on a verb unit can add a degree of power and presence and help place them within the sonic environment, so should not be left entirely dry. Percussive sounds will also benefit greatly from added ambience, but as before, long amounts of reverb are usually reserved for cinematic or slow atmospheric music where there is the space to do so.
On a final note for this section, be aware that the quality of reverberation synthesis varies hugely from one processor to another, so when trying to emulate real spaces you should be using your best plug-in or device. On other occasions, the kind of textures that some of the cheaper models produce might be exactly what you were looking for. Don’t throw away the old cheap units, and let your ears be the final judge.
Be Aware of Reverb Modulation
If you possess a unit or plug-in that is able to offer an internal pitch modulation parameter, or you are experimenting with a chorus effect placed before the reverb, then you will need to ensure that the treatment is appropriate for the type of instrument that you are working with. By way of example, a rich, heavy modulation can sound wonderful on a string section but completely wrong for an acoustic piano. Even the smallest about of pitch modulation will have your classical piano sounding more reminiscent of a honky-tonk. This premise also applies to the harp or acoustic guitar, but can work wonders on brass sections or other ensembles, providing a vibrancy and flamboyant texture if used subtly and with caution.
Heavily modulated reverbs can work well for some synthesizer patches or for an electric guitar, mainly because of the expectations of each instrument. The ear will typically demand that each acoustic piano shares a relatively uniform timbre, whilst the electric guitar provides scope for a range of different timbres, which we could readily identify with. So with this in mind, the more traditional a sound that you require, the more you should set about recreating a natural ambience and stay away from the modulation!
A Note for Guitars
 The distinctive spring reverb timbre is most often associated with the classic electric guitar sound, not necessarily because they work well together, but more to do with the technology of the time. Your classic guitar amp is likely to be fitted with a spring reverb unit, and in some instances this is a notable design feature, as in the famous Fender Twin reverb. In fact, many units will attempt a simulation of the spring reverb, but some more than others are able to achieve this successfully.
Differing styles can work better with some reverb types than others, so start experimenting across the range and also try your effects with or without pre-delay for extra variation. If you are looking for the big Pink Floyd sound, then compress your guitar and then add a large, bright hall setting. Used correctly, this can be an extremely effective treatment for your guitar, but it will require a certain amount of space within the track to allow it to breathe.
Gated and reverse treatments for the guitar are also worth trying out for the same reasons as with the earlier applications that we mentioned. They can add the spatial quality of a three-dimensional surrounding without cluttering up the remainder of the mix. If you are planning to treat an acoustic guitar, then consider using a bright plate reverb, particularly if you’re looking for that American West Coast sound, but remember to keep an eye on your delay time or else you will be in danger of drowning out the original timbre.
Ambience
Much of the music you will encounter today uses less of the more obvious reverb experience, instead relying more on the ambience algorithms available. These types of effects set out to simulate the effect of a good ‘live room’ by recreating the early reflections of a room, without adding long reverb tails. If you wish to make close-miked or synthesized sounds sit more comfortably in a mix, then the ambience settings will help you achieve this. This is because the extra reflections add to the original sounds – percussive parts treated with ambience often sound more powerful. Convolution reverbs are ideally suited for this job.
