Delay
Spatial Awareness
Much of the contemporary applications of music technology have shifted away from the natural into, arguably, more creative and artificial-sounding recordings. You can, for instance, pan a completely dry sound to one side and pan the reverb to the other side to produce a superior, albeit unnatural, sense of space and this effect can work well if you are using plenty of pre-delay. Or you could even, as some producers prefer, place a mono recording of the reverb in the same place as the dry recording to get a more centralized, focused experience of space.
Although you should note that while panning enhances the general sensation of space, it will actually de-correlate directional information drastically enough to make it very difficult to locate the sound within a three-dimensional space. So, if you are looking for a greater degree of control over you reverberation treatments, then try patching a delay line between the effects send and the actual reverb input. This will afford you a greater degree of control than the pre-delay found on most units, and just adding a little bit of feedback can create a more complex reverb effect.
Delay and reverb are governed by the same laws of physics and are really one and the same. For us, the distinction arises from the amount of time that it takes to hear a reflection of the original audio.
A delay is classified as such when we can hear what we take to be two separate snaps or audible echoes. As delay times shorten, there reaches a stage where the ear can no longer distinguish the reflections as two separate quantities and at this point we experience what we have come to call reverb.
The precise length of time that governs whether we experience two separate snaps, depends on the type of sound, and will be shorter for sounds of slight duration, like ‘clicks’ and ‘pops’ for example.
Most of us are familiar with the effects of a delay unit, but what of the musical considerations behind adding essentially more notes and material to the score? And, as with the reverb units, there are many different types of delay effects, including chorus, flanging and phasing, amongst others. We will need to examine these properties in detail but we shall begin by taking a look at the most basic ECHO type, whose simple purpose is to create repetitions of the original signal.
A Brief History of Delay
Originally – as early as 1920 – magnetic recording devices that recorded the audio with one head and reproduced the audio with a different head produced delay. The spacing between the heads and the speed of the magnetic medium (the recording tape) determined the delay. Several units were made with one record head and several playback heads to give several possible delays simultaneously. Adding feedback to a delay will generate repeated echoes. Some early tape delay units provided a means of sending the delayed signal back into the input of the unit to provide a repeated echo effect.

Utilising delay as an effect in commercial music recordings has been credited to Les Paul, who is reported to have realized that the space between the record and playback heads of a tape recorder could be utilized to create a delay. This is how the term Tape Delay was conceived. It is achieved by sending audio signal to a tape deck to capture the sound of the delay time created by the distance between the record head and the playback head. Because the tape passes over the record head before the playback head, there is a delay. This method was quickly adopted as an early effects alternative to expensive reverb chambers and plates. This short delay is still commonly known as ‘slapback’.
Later, to increase the delay time, Les Paul tied two tape recorders together and, with the advent of variable-speed playback decks, he could control the actual delay time by slowing or speeding up the second deck. But he was faced with a problem every time the tape on the second deck ended.
The solution came a few years later with a dedicated tape echo machine: Echoplex. This utilized a continuous tape loop, which allowed for continuous delay without running out of tape.

(The brand “Echoplex” was very popular in the 1960s.)
The Echoplex gave the user variable control over the distance between the record and play head with a crude but effective sliding lever control labelled Echo Delay, which moved the play head up and down a steel track. This allowed for a fine control of echo timing (delay time), which of course allowed the echo to be timed to the tempo of the song.
The other critical control is the Echo Sustain/Repeats, which controls the number of repeats, also known as feedback. As with all cool vintage gear, there’s usually one or two things about it that allow you to do what’s not intended and not proper, and the Echo Sustain is that bit of magic with the Echoplex. The beauty of this control is that when it’s pushed into the infinite range, the repeats begin to feed back on themselves, allowing for otherworldly sci-fi effects. Used in conjunction with the Echo Delay, the user can play the Echoplex as an extension of the source signal, or even as its own instrument. Other controls included Echo Volume and Recording Volume.
In the late 60s, devices were marketed that had a small speaker playing into a long tube with a microphone at the end. Such devices required extensive equalization to have a flat frequency response, tended to be noisy and only had fixed delay times.
In the 70s, two electronic devices were marketed to achieve delay. The first such device was the analogue delay line. The first analogue delay lines used filter circuits with a flat frequency response in the audio-frequency range. The filter slightly delayed the audio signal and longer delay times could be obtained by putting the signal through a series of filter circuits.
Space Echoes
Refining the technology resulted in the now famous Roland Space Echo, Maestro Echoplex and WEM Copycat tape delays, opening up further treatments and effects beyond that of slapback. Tape delay systems used the same principal technology as slapback, but added some significant enhancements, including the ability to fully vary the distance between the record and playback heads (and, therefore, create a variety of delay times) as well as the opportunity to add feedback, or regeneration. Feedback sends a nominal amount of the signal back through the delay line to form a longer repetitive echo. Due to the sonic distortions of tape and the high-frequency loss occurring on each, it became possible to produce evolving and otherworldly delay effects.

Flanging uses an LFO to modulate the delay time. Because the delay time is set initially very short (0–40ms) the result is a pronounced comb filtering combined with a sweeping movement. Extreme feedback settings became a popular feature, as exploited by dub artists such as King Tubby.
 The availability of inexpensive digital signal processing electronics in the late 1970s and 1980s led to the development of the first digital delay effects. Initially, they were only available in expensive rack-mounted units but eventually as costs came down and the electronics grew smaller, they became available in the form of foot pedals. The first digital delay offered in a pedal was the Boss DD-2 in 1984. Rack mounted delay units evolved into digital reverb units and on to digital multi-effects units capable of more sophisticated effects than pure delay, such as reverb and audio timescale, pitch-modification effects.
(Boss DD-2)
Digital delay systems function by sampling the input signal through an analogue-to-digital converter, after which the signal is passed through a series of digital signal processors that record it into a storage buffer, and then play back the stored audio based on parameters set by the user. The delayed ‘wet’ output may be mixed with the unmodified (‘dry’) signal after, or before, it is sent to a digital-to- analogue converter for output.
Many modern digital delays present an extensive array of options, including a control over the time before playback of the delayed signal. Most also allow the user to select the overall level of the processed signal in relation to the unmodified one, or the level at which the delayed signal is fed back into the buffer, to be repeated again. Some systems today allow more exotic controls, such as the ability to add an audio filter, or to play back the buffer’s contents in reverse. Multiple delay (multi tap), pitch shifting, sampling and looping are some of the features that you could find in advanced devices, making them essential tools to creative music production.
As digital memory became cheaper in the 80s, units like Lexicon PCM84, Roland SDE3000 and the TC Electronic 2290 offered more than 3 seconds of delay time – enough to create background loops, rhythms and phrases. The 2290 was upgradable to 32 seconds, and Electro-Harmonix offered a 16-second delay and looping machine.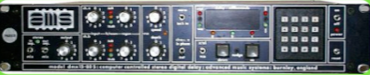
In 1978 AMS introduced the world’s first microprocessor controlled, 15-bit digital delay line: the AMS DMX 15-80. Later the DMX included “loop triggering”, launching the use of digital sampling. The DMX later included pitch changing and up to 32 seconds of delay, and some models had the option to sample a sound in the internal memory and trigger it from an external source. This was used a lot to replace drum sounds in the mix. It also had a pitch shifting option, sometimes used to tune particular parts – usually vocals.
Delay Plugins
Today’s delay plug-ins are essentially digital delays, but are often able to simulate their vintage analogue predecessors (some more effectively then others). Those designed with more complex algorithms will demand greater processor power and may often incorporate filters, distortion, frequency band-splitters and the like.
Basic Parameters
Unlike reverbs, basic delay units don’t necessarily host a huge amount of parameters to set.
![]()
(Lexicon PSP 42 is a digital stereo delay and phrase sampler plug-in based on the famous Lexicon PCM 42)
Delay Time
Digital delays allow you to dial in the exact time, usually in ms. Although early digital units were limited in delay time and were rarely able to go over few hundred milliseconds, later designs could reach over 1 or 2 seconds of delay time. Some devices allow you to enter the tempo and then enter the value in rhythmic musical value such as 1/8, 1/32, etc, so that the delay locks automatically to the tempo of the project. Most plug-ins work in that way, but some still allow you to switch to ms, which is very useful if you don’t want your delay to be too ‘quantized’ – more about that later.
Feedback
This is basically the number of repetitions. With no feedback, the delay will repeat the signal only once. The more you increase the feedback, the more repetitions occur, thus creating the effect of the sound being further away or in a bigger space.
High-Cut
Another parameter commonly found in digital delay is high- cut or high-frequency damping. Echoes that occur in nature get duller every time they reflect from a new surface. We’re in the realms of psychoacoustics here, but to put it simply: if the delay is quieter and duller-sounding than the original, we accept it as an echo, but if it’s equally loud and just as bright, it’s simply another note. Part of the problem is that digital delays produce almost perfect copies of the original sound, whereas tape delays had a spectacularly poor frequency response, which made the delays seem more like natural echoes, which is why some delay units have included the high-cut parameter.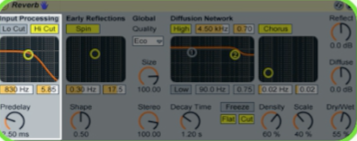
Extra Parameters
Some models offer more than just the parameters described above. Although each model houses its own design (thus a different set of parameters), we’ll look at some of the more common extra parameters.
Pitch Modulation
The old tape delay units had terrible technical specs, but they still produced a wonderfully warm sound, and their limited bandwidth was only one of the reasons. Another reason was the rather poor stability of the tape transport, so instead of producing super-clean repeats, the tape delay unit would apply a tiny amount of vibrato to them, pretty much by accident. You can simulate this sound with a multi- effects unit by placing a chorus or vibrato block before your DDL – but keep the effect very subtle, otherwise the ‘chorusing’ will be too obvious.
Other units offer a LFO type of modulation, usually affecting the pitch, like on the PSP 42 delay plug-in (as the original). The modulation can be used from subtle (to simulate the old tape echo) or quite radical for more creative effects.
Multi-Tap Delays
Multi-tap delay means at least two different delay times are available. The most basic example of multi-tap delay is using a stereo delay and adjusting each side to a different time (i.e. left 250ms and right 500ms), although it wouldn’t be a true multi-tap echo. Multi-tap delays usually have 4 or more delay lines where you can define the time for each of them. In some units you can define the feedback, volume & pan for each delay line. These features allow you to create anything from subtle stereo enhancement to complex rhythmical patterns. Multi-tap delays are also very useful when you don’t want the obvious regular repetition of a single delay – changing the times slightly for each delay line will give you the effect of a less rigid echo.
Ping-Pong Delays
This creates a delay that bounces from left to right, useful for creating interesting movement in space. They usually work with one mono input and generate stereo output signals, but some work with stereo inputs.
Logic’s delay plug-in is a bit of everything and more. It has 4 independent delay lines (like a multi-tap), the pan position can be modulated (a ping-pong-like effect), it also has filters (different types with resonance), LFOs everywhere, distortion, etc, for truly wild effects.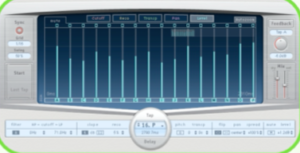
In Practice
Patch the delay
We tend to patch delay units the same way we patch reverb – using auxiliary sends (usually post fader) to send the signal to the delay, and then bring the output of the delay into either dedicated FX returns or input channels of the mixer. This configuration allows you to pan & process the sound of the delay without affecting the original dry signal. However, in certain applications when using plug-ins, it might just be quicker to insert the channel across the desired channel and adjust the level of delay using the DRY/WET parameter – just remember that if using this method, you won’t be able to eq, pan and/or add processing to the only the delayed sound; whatever plug-ins you add to the signal will affect both the direct sound and the delay effect.
Choosing Delay Time
What exactly is a delay in musical terms? A delay device repeats the original sound one or more times, so the musical outcome is to add more notes to the performance at time positions later than the original. However if you have a very pronounced delay and the delay time doesn’t fit in with the tempo of the music, the delay may upset the musical timing of the piece.
So how can we find out the delay time to fit the tempo of a piece?
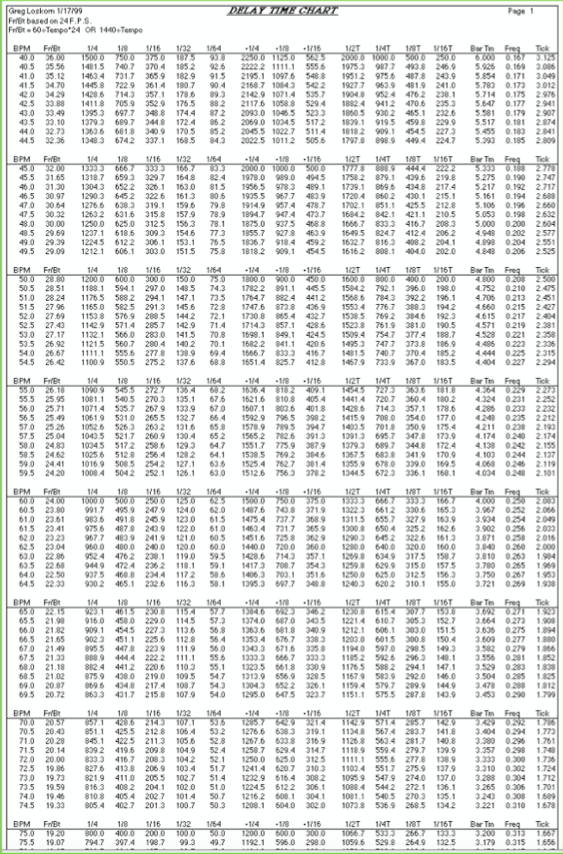
 If the piece has a fixed tempo, things are far easier, which is the case in most modern productions. If the tempo is 120 beats per minute, there are 120 beats in 60 seconds or 120 beats per 60,000 milliseconds, which is one beat every 500 milliseconds. So with 4 beats in a bar, quarter beats are 500ms, eighths are 250ms, sixteenths are 125ms, etc. In the 80s and 90s, a mix engineer wouldn’t leave his house without a delay chart – a table indicating delay times in ms at each given tempo (usually from 60 to 180) for different rhythmical figures (a bar, a beat, quarter of a beat and so on). You still can find these tables, courtesy of the internet.
There is a tendency when mixing everything within the computer to sync everything perfectly. Because delay FX are part of the overall groove and feel of the track, very much like quantizing with midi parts, you should try experimenting with the delay times, so instead of being a perfect 1/16, adjust the times up/down by a few milliseconds (5 to 20).
If setting a delay time with an old tape delay relies purely on your ears, most modern digital/plug-in allow you to sync the delay to the tempo of your sequencer automatically. All you have to do is enter the rhythmical value (1/4, 1/8, 1/16, etc). This is very useful if you require a very precise delay time, also essential if your composition contains tempo changes and you want your delay to follow the changes. Most plug-ins will allow you to sync parameters such as delay time, LFO and other modulation parameters.
Stereo Delay
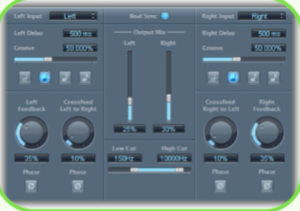 This is where the understanding of what makes things stereo and mono is extremely important. The thing that makes a sound come from the left can be more than just it being a mono signal panned to the left. It can be a stereo signal, where the left is different from the right, yet appears to come from the left. If we were to set the delay unit so that the left delay is 510ms and the right is 490ms, the delays would be 20ms apart, right? If two sounds are 20ms apart or greater they sound like two different signals left and right, so if two delays are 20ms apart then they should sound as though they come from left and right.
This is where the understanding of what makes things stereo and mono is extremely important. The thing that makes a sound come from the left can be more than just it being a mono signal panned to the left. It can be a stereo signal, where the left is different from the right, yet appears to come from the left. If we were to set the delay unit so that the left delay is 510ms and the right is 490ms, the delays would be 20ms apart, right? If two sounds are 20ms apart or greater they sound like two different signals left and right, so if two delays are 20ms apart then they should sound as though they come from left and right.
Delay As An Essential Mixing Tool
Delay can have various applications in the mix. Some musical genres rely on the delay effect extensively like Dub, Reggae or Trance for example. Delays, like reverbs, are great tools to add space to parts in your mix. In an interview with Mark ‘Spike’ Stent, he mentioned how he liked using delays to create space rather than reverbs, which can sometimes add a washing effect. Longer delay times can really add a sense of depth to an instrument or voice, even a mono one – especially a tape echo type where the repetition isn’t too pronounced. Long delays are often associated with atmospheric sounds but short delays are great tools too. They can be particularly helpful in fattening up sounds (ADT), or spreading the stereo image of a mono.
Automatic Double Tracking
ADT was a system designed to augment the sound of voices and instruments during the recording process. In ADT, linked tape recorders were used to create an instant and simultaneous duplication of sound, which could then be captured on tape. During the 1950s it was discovered that double-tracking lead vocals in popular song recordings gave them a much stronger and more appealing sound (especially for singers with weak or light voices). First pairs of tape recorders were used, then later multi-track recording machines were employed to produce the effect.

(Double Tracking Vocals)
However, until the invention of ADT it was necessary to record the vocal tracks twice, with the second vocal take in synchronisation with the first, a process which was both tedious and exacting, and might require several takes and rewinds.
ADT was invented specially for The Beatles on April 6, 1966 by Ken Townshend a recording engineer employed at the EMI Abbey Road Studios in St John’s Wood, London. He developed it mainly at the instigation of John Lennon, who hated the tedious double-tracking sessions and regularly expressed a desire for a technical solution to the problem.
Double-tracking is extensively used in modern music production either by creating it at the recording stage, like old times, or creating it artificially like the Beatles. However, it is very unlikely that you will have a couple of tape recorders in order to create the effect, hence we can use a delay plug-in. Note that artificial double-tracking will never sound as convincing as the real thing. Instead of having two identical performances differing in a human way, with digital devices you will have a perfect copy played a few milliseconds later. Usually we use a time from 10-25ms. To help make it sound more convincing, try adding a slight change in pitch.
More Stereo
You can add stereo width to a mono signal using the same technique as described above (ADT). If you pan the original signal to one side, then use a delay of about 10-40ms, and pan the delay to the opposite side, you will create a stereo space without using a reverb, so you will still keep a strong, focused sound. This works great on vocals, BVs and guitars.
EQ the Delay
As mentioned earlier, for a delay to be perceived as such it needs to be not only quieter than the original sound but also duller, which is why some units have a high-cut parameter. However, you might want to recreate it yourself by simply applying EQ to the delay effect itself – that way you really can get some creative sounding delayed sounds.
Note that you could apply the same to feedback. If you want to try a different feedback sound, instead of using the one provided on the unit or plug-in, feed the delay back into itself.
If, for example, you use send 1 to feed the delay input, send the signal of the actual delay channel to send 1, and increase until you have a suitable effect. Be careful here as too much will degenerate into a frenzied feedback that could damage both speakers and ears!
Reverb Your Echo!
In real life, there’s no such thing as a clean echo, each echo will have some ambience because of the multiple reflection paths the original sound creates. To emulate this electronically, we need to add a hint of reverb to each echo. The easiest way to do this is to place a reverb block after the delay block. You don’t necessarily need a very long reverb to make this technique work, but as a special effect a reverb of up to three or four seconds can sound quite spectacular, adding a huge sense of space, but again without the washing effect of a long reverb. Some multi-effect units let you add a reverb after the delay, however I find that I tend to use one of the long reverbs I already have in my mix by sending the delay sound to the reverb via an FX send/auxiliary, exactly as you add reverb to any other elements of your mix.
Ducking Delay
There are times when there’s a lot going on in a given piece of music and delays can just clutter up the sound… yet in a less busy section the echoes may not be dominant enough. One answer to this is to use ducking delay, a delay that drops in level when there’s a strong signal, and comes back up in level during pauses or quiet passages.
You can achieve this by setting up a compressor or gate in ducking mode, then feeding the delay unit through the ducker, triggering the ducker from the dry signal using a side chain (as discussed in compressors and gates). These days, an increasing number of effect units include ducking delay as standard, and having the solution already inside your effect unit makes life a lot easier and saves patching. It also means that you don’t have to tie up a gate or compressor that might be better used elsewhere in the mix.
Effects such as chorus, flanging, pitch shifting and phasing are all based on the “delay technique”.
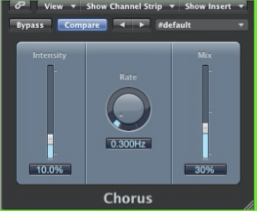
Chorus
 Chorus is created by adding a slightly delayed, pitch- modulated version of a sound to the original sound, in roughly equal proportions. The intention is to create the illusion that two or more instruments are playing the same part at the same time to fatten up the sound and make it richer. Like ADT described earlier, the problem is that the illusion is only approximate, because if two or more people are playing together any beat frequencies caused by tuning disparities will vary from note to note, whereas a chorus is modulated from an LFO, which produces a definite cyclic beating. Because of this, chorus has become an effect in its own right rather than an especially successful means of emulating ensemble playing or double-tracking, though if you pull an early string machine apart you’ll probably find it contains three or more chorus sections, all running at different speeds to produce a richer, smoother ensemble sound.
Today, chorus is used extensively on guitars (very 80s), occasionally bass (use with moderation), and keyboards (check the chorus on the Roland Juno 106). It creates a sense of movement and stereo width, but those very attributes also tend to push a sound further back in a mix. If you want a sound to stand out, it should be fairly dry (in terms of added reverb), and it should be positioned close to the front of the mix. Chorus, however, has the effect of ‘de-localising’ a sound – it sounds rich and wide, but you don’t really know where it’s coming from, and the outcome is that it sits further back in the mix. If you pull up the sound’s level to try to get it to the front again, it may become too loud, so the most sensible way to use chorus is to apply it mainly to those sounds that are supposed to be part of the backdrop. This is only a general rule and it can be thrown out of the window when you’ve got a fairly sparse mix, which is why chorused guitar helps fill out the sound in a small band.
Where some chorus effect is desired to add interest to a sound but you don’t want to the sound to recede in the mix, try a very shallow, slow chorus where the cyclic effect isn’t too obvious. I’ve also found that panning a mono chorus to one side of a mix and the dry sound to the other often produces a more spatial effect than a dedicated stereo chorus unit, and without making the sound seem as disembodied.
Another useful alternative to the traditional way of working is to add chorus only to a track’s reverb send, so that the dry sound stays solid and upfront, while the reverb takes on an attractive shimmer.
)The classic 1979 Roland Dimension D is more than a chorus; it is really a unique sound enhancer for adding spatial and stereo widening effects. With only four push button ‘dimension’ settings, the Dimension D is the ultimate in functional simplicity.)
Parameters Rate/speed
This sets the speed at which the modulation occurs – use a slow setting for subtle fattening and a faster speed for a more extreme, bubbling effect.
Depth/Intensity
Controls the intensity of the modulation effect.
Other units may have parameters such as: Waveform (from smooth to square, like a LFO), Vibrato or Extra LFO modulation type, EQ, etc… It is also quite common in multi- effects processors to be able to chain a series of effects, such as chorus, followed by delay, followed by reverb, for example.
Pitch Shifting
In situations where you specifically want an ensemble effect, try a pitch-shifter set to detune mode rather than a chorus effect, as this will avoid the regular beating effect.
As a bonus, most pitch-shifters also include a variable delay time to emulate the effect of two players not quite in perfect time with each other (ADT type).
Pitch-shifters allow you to change the tuning of the signal (usually in cents). The better models, such as the AMS mentioned earlier, were even used to tune vocals.
Another classic piece of hardware in the genre is the Eventide H series (from H910 to H4500) – they are among the leaders in the world of multi effect manufacturers.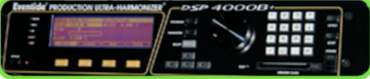
The Eventide H3000SE, a classic in the 90s, and known for its pitch-shifting also boasted various other effects, from delays, reverbs, flangers, etc. At the time it was possibly one of the best multi processors around and is still favoured.
Pitch-shifting is typically used on vocals, i.e. for an ADT type of treatment, and it usually works great on backing vocals for that slick pop/R’n’B effect. A good starting point for a pitch-shifting effect such as the ADT type is to set the left hand side to +8 cents & the right to -8 cents – that will give you a slight detune, a bit like a chorus but it works much better on vocals than an actual chorus. Remember you can also pitch the signal by more than just a few cents – whole octave or harmony parts can be created that way. This effect is used a lot on vocals to create different tones – dark, Mickey Mouse, robotic, and weirder. It works really well with guitars too, like octaving for example, or harmony parts, and more wonderful, weird effects.
Most pitch-shift units include a delay line, and sometimes feedback, for more extreme effects.
Pitch (in semitones)
This allows you to pitch up and down the signal in semitone increments. You can go pretty extreme (up to 1 or 2 octaves depending on the unit used). Stereo pitch-shifting allows you to set up each side to a different pitch. Although pitch-shifting can be useful to create harmonies, one of the problems of nearly all pitch-shifting effects is that they add a lot of other harmonics to the original signal, thus deteriorating the sound, often in a robotic kind of way, which is why they’re extensively used for sci-fi projects.
Pitch (in cents)
This allows you to alter the pitch by a smaller amount, in cents. This used to be useful in the old days as a tool to fix vocal tuning for example – obviously better tools are now around to perform that job. However, this is still used to create a slightly detuned version of a signal, typically as mentioned earlier – and works well on BVs.
Delay/Feedback
With some units you can delay the signal before or after pitch, useful for creating an ADT for lead vocal.
Define original signal
In some effects you can define what the original source is, e.g. drums, speech, vocal – or in others you can define the original key of the source if it’s a vocal or monophonic melody, e.g. in D minor.
