CREATIVE AUDIO & EFFECTS
1. Introduction
The last few lessons have provided you with the techniques to create new and interesting sounds for your sound library. Whether it’s creating sounds from scratch through synthesis or manipulating audio in a sampler, further processing can be the ‘icing on the cake’ that gives your sounds that professional sheen. In this weeks lesson we’ll be looking at various techniques to enhance your productions, whether it’s layering audio to create interesting new composite drum sounds or using effects to alter the sonic character. To start with we’re going to take a quick look at awesome Drum Synths in Maschine. There’s an infinite variety of drums sounds at your disposal and they’re the perfect place to start for a collections of sounds to layer with.
2. Maschine’s Drumsynths
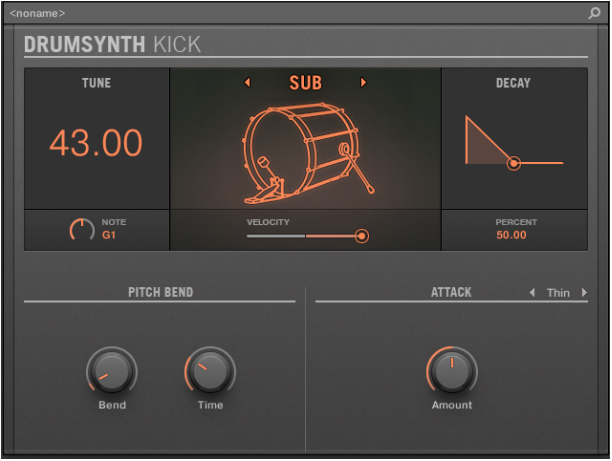
Drumsynths are a powerful set of monophonic internal instrument Plug-ins (to Maschine) that allow you to generate individual, fine-tuned drums sounds. Each synth uses a variety of different of synthesis types to generate the sounds, with each synth capable of producing a vast range of that particular sound, including 808/909 drums as well as physical modeled ‘real’ sounding drums too. Programming drum sounds has been made incredibly intuitive, with each parameter accessible from the Controller. The great thing about this is that you don’t have to worry about what type of synthesis to choose; you can concentrate on tweaking a great drum sound!
There are 5 different Plug-ins to choose from and they each deal with a different type of drum or percussion.
- Kick
- Snare (including Claps)
- Hats
- Tom
- Percussion
Each Drum Plug-in contains different engines that allow you to use between different types of that particular drum sound. For example the Kick Synth has engines like Sub, Tronic, Dusty, Raspy, Snappy, Bold, Maple, Push & Grit each with a different character.
You can load a Drumsynth into a Sound Slot in exactly the same way as you did the Sampler namely:
- From the Controller:
o Select the Group and Sound that you want to load a Plug-in. o Press the little plug icon to display the Plug-ins.
o Click the slot with the ‘+’’ icon to access the Plug-in list.
o Choose your Plug-in.
- From the Maschine 2.0 Software:
o Press CONTROL to enter Control Mode.
o Press a Pad to select and focus it.
o Press SHIFT + BROWSE to bring up the Plug-in Browser and browse for a Drumsynth.
With such a variety of sound options the best thing to do is to get stuck in and experiment. The work flow in Maschine is quick and highly creative, so much so that it’s incredibly hard not to do it with a big grin on your face!
Routing Outputs
Once you have your sounds created, you’ll want to be able to route them into your DAW for adding to your productions. With a focus on layering this week, it means that you can bring each sound into it’s own channel and then add more sounds to ‘beef’ it up. To do this we need to set up the output routing in Maschine, thankfully this is a relatively painless process!

Output routing happens in the mixer section in Maschine. To select the mixer you can either:
- From the Controller, press SHIFT + NAVIGATE to switch between the Arrange and the Mix View.
- From the Software, click the Mix View Button.

Once you’re in the Mix View, you can select from one of 16 individual outputs (EXT) from the drop down list under each channel.
Save up and bring Maschine 2.0 into your DAW as a Plug-in. Make sure that you use a multi-output version of the Maschine 2.0 Plug-in and set up the outputs in your DAW as you would normally. Now you should have each sound routed out through it’s own output.
3. Layering
Layering is essentially the process of placing sounds one on top of the other to create new composite ones. Whilst this may seem simple on the surface, consideration needs to be given as to the different sonic character that each layer brings. It’s worth putting thought into what each layer is doing and what part of the sound you want to use.

Volume shaping using fades or envelopes is an essential part of the layering toolkit as it enables you to precisely sculpt the individual layer, and don’t forget to use EQ to make sure that the frequency boundaries of the different layers are kept in check- and, remember volume is cumulative!
There are a few general tips that can help when adding layers together. To start with you could start by copying a sound to multiple tracks. If you just duplicate a sound to a new track, this will only make it louder – you might as well turn up the fader by 6dB instead. If you duplicate a sound and try one of these techniques on the new track, you should find you get a fatter result when you:
- Detune – If the sound is musical then ideally you should detune both by opposing equal amounts i.e. instead of detuning by 30; detune one by +15, and the other by -15.
- Pitchshift -, values of +/-12 should fit musically or 4, 5, or 7 can also work. If you want to make the sound more intense then go for +/- 1, 2 or 6.
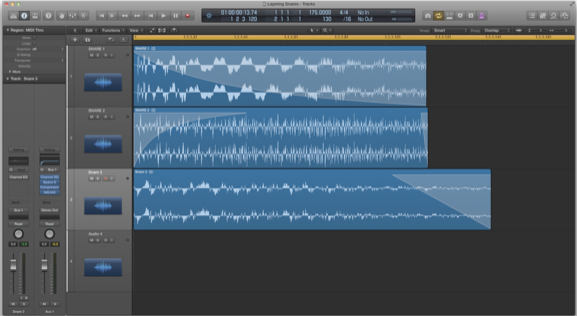
- Delay – This is the easiest! When you duplicate the track, just drag the sound slightly later, as can be seen in the screenshot at the top of the page. If you don’t move it enough, you’ll find it creates a “phasey’ sound.
- Short Reverb – Can just add a sense of power to the sound without an obvious effect
- Distortion – If you want something more in your face, crack open the distortion. However, use it with care as it can just create a nasty fatiguing sound
- Multiple Layers – If two layers isn’t happening, then four or even ten might do the job! For more interest, try layering different sounds and perhaps use some panning to create a wider texture.

Layering Drums
Layering is a fantastic way of creating composite drum sounds using the ‘weight’ from one sample with the transient attack of another for example. There are a couple of things to watch when you layer sounds in this way and it is definitely advisable to use your DAW to do the layering as you can control each sound on its own channel. Layering drum sounds can bring several advantages:
- Add width, depth and overall thickness to a main sound you’ve chosen.
- Allow for very detailed tonal sculpting.
- Layering frequencies enhances the perceived harmonic (or enharmonic) content of the result.
- Layering small elements from different samples avoids the frequency smearing that’s so common with complete-waveform sample layering.
- Sensible layering techniques give you control over frequency mishaps such as summing, cancellation and clashing.
- New, unique tones can be created that otherwise would not be available in stock drum sample libraries.
(Bazil, SOS 2012)
As with layering in general, it’s worth thinking of your composite sounds in terms of an ADSR envelope.
Each sound that you bring into the layer should be responsible for adding a stage of the envelope. You might want to use a sound with a fast transient attack for the ‘attack’ part then fade it quickly into something that gives it weight for the ‘sustain’ part and then use a very short reverb on the overall sound to give you the overall release.
For example, blending a dull but bottom heavy kick drum with another that contains lots of top end click is a great way of creating a composite kick drum. You can also try mixing electronic and acoustic textures to create powerful new drum sounds.
One of the main things to watch when blending in this way is how the frequencies of each of the parts interact with each other and also in relation to time. This can cause real headaches due to the partial cancellation and addition that occurs when you add signals of different phases together. For example, if you have two sounds with pronounced initial transients, then adding them together could cause clipping. One solution is to adjust the time position of one of the audio files relative to the other, that is to nudge one of the audio files by a small amount left or right in your DAW to change the phase relationship and alter the overall timbre of the sound.
One tool that that is essential to this process is the Event List Float, which can be summoned by pressing alt-e with the audio region selected. Here you can nudge the position of the audio file by individual frames.

(The event list float is a great way to move audio regions)
It is possible that the layers just won’t sit together (frequency clashing) such as the meeting of harmonic and inharmonic content. If this happens then try tuning the individual sounds as much as you can and if all else fails look for different sounds for the layers!
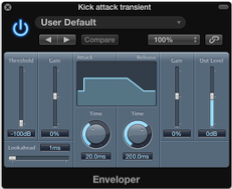 The Enveloper plugin is a very useful effect when it comes to blending sounds as it enables you to adjust the signal transients in a very precise way. For example, if you want to accentuate the attack phase, you can boost the gain slider on the Attack side, which is incredibly useful for adding ‘snap’ to a drum sound. Conversely drag the gain slider down on the release side to ‘dry’ the sound out.
Finally watch out for frequency masking. This occurs when two identical frequencies meet and the amplitude of one is higher than the other and the quieter frequency will seem to disappear from the mix. Essentially the louder frequency hides the quieter one. Adjusting phase can be a solution to this, so that both frequencies don’t occur at that the same time but remember that this can have an affect on the overall timbre of the sound.
Layering Melodic Parts
A lot of the techniques that apply to drum layering also apply to layering of more melodic sounds. When creating melodic layers it’s also worth thinking what the ultimate aim of the layered sound is. In certain styles like Dubstep, Trance and EDM, the idea is to come up with a killer hook that occupies the entire frequency range from booming sub to soaring highs. When creating full frequency sounds like this planning and forethought can go a long way to getting the results that you want to achieve. There are a few points to watch out for:
- Keep the sub layer Mono.
- Watch out for different rhythmic layers at different tempos- too many and the overall result can become really messy
- Try and avoid adding multiple delays and reverbs (Watch out for over long feedback and reverb tails specifically!)
- Make use of high and low pass filters to allow the layers to ‘slot’ in to each other.
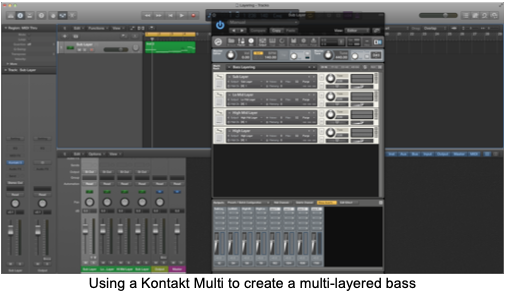
The diagram above shows a way of using different instruments in a Kontakt multi for each of the layers in your composite sound. The different audio layers, having been processed and bounced in Logic, are placed in individual Instruments with each having a different output routed in to the Logic X mixer. In this case all the instruments are set to the same MIDI channel so that all play the same melody. Each layer could be set to a separate MIDI channel, but this unison technique creates a coherency and stability in the overall sound. If each layer was playing a different melody things could get messy very quickly!
Once you have the layers all working nicely together you can then think about grouping them together for additional processing such as bus compression to ‘glue’ them all together. It can be worth experimenting with multi-band compression but be careful, as it’s far too easy to squash the life out of it!
Layering with Logic’s Track Stacks
You’ve already come across Track stacks in the ITP course. It’s a great new feature in Logic X and it’s very relevant to layering as the Folder stack essentially lets you combine multiple tracks and control them as one unit. This can make the process of layering sounds together much simpler and what’s even cooler is that doesn’t matter whether the tracks are audio, software instruments, external MIDI instruments or aux tracks!

The concept of layering can be applied to all areas of sound design, and is a quick way to make sounds thicker, fatter and more interesting. We have to carefully balance that against making sounds too big, as you’ll find these difficult to fit in a mix, and that goes for whether you’re layering up beats for the ultimate kick drum, or creating a killer rise.
There are literally endless possibilities when layering, and it pays to experiment around and you’ll find sounds in your sample library that work well as layers, or you might get your sound by using busses and plugins.
4. Creative Flextime
As you’ve already seen, Flex Time analyses the content of an audio track for transients and any detected transients are marked. Once analysed the timing of the audio file can be adjusted and it can be time stretched to alter the tempo without altering the pitch. Depending on the algorithm selected most audio files can be altered (within reason) fairly transparently- which is exactly what we don’t want to do here!
Thankfully, for the more adventurous, there are two Flex Time modes that can be used to radically alter the audio content, namely Tempophone and Speed.
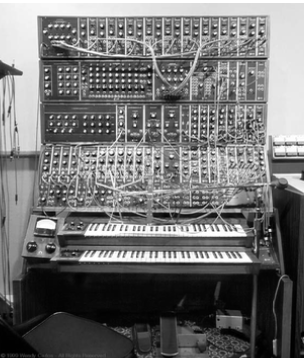
Tempophone
The Tempophone is a mechanical device that uses magnetic tape to allow for independent processing of pitch and tempo. The Tempophone in Logic uses granular synthesis to achieve the same effect.

(A real tempophone)
What makes the Tempophone mode interesting is that we can control the individual grain size from a drop down menu in the inspector.
To see this in action:
 Grab an audio loop and drop it into the tracks Area.
- Set the project tempo from the audio loop.
- Hold down alt and grab the bottom right hand corner of the audio region and drag it out for a reasonable length (try stretching a 2 bar loop to, say 32 bars)
- Listen to the effect that this creates and then try different grain sizes.
- Once you’ve got something you like you can bounce the audio in place to create a new audio file.
This a great way to come up with the beginnings of long evolving type sounds and can also be used to create all sorts of effects depending on the source material used.
Speed
Speed works in the same way as the pitch control on a record deck. As you slow down the tempo the pitch of the audio file will lower or if you increase the tempo the pitch will increase too. Where this becomes useful for extreme effects is in in placing and moving Flex markers within the audio file.
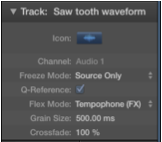
A great way to demonstrate this is to use and audio file of a basic analogue waveform such as Sawtooth:
- Drag and drop the Sawtooth audio file into the Tracks Area
- Enable Flex Time and select Speed Mode.
- Click in the top half of the audio file to create a Flex marker and repeat several times through out at different positions.
- Move some of the Flex Markers to create different Time-stretched regions with in the audio file.
Now when you press play you should hear the pitch of the sawtooth changing as the audio file plays in a step-sequenced kind of way.
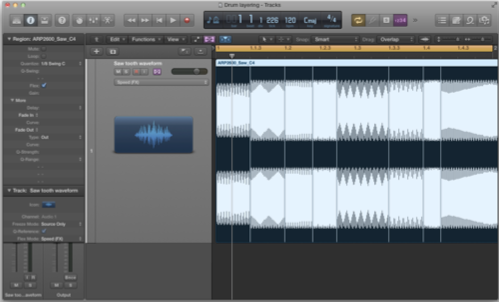
(Flex Time’s Speed Mode in action, note the placed Flex Markers)
5. The Vocoder
A vocoder (name derived from voice coder, formerly also called voder) is a speech analyser and synthesizer. It was originally developed as a speech coder for telecommunications applications in the 1930s, the idea being to code speech for transmission. Its primary use in this fashion is for secure radio communication, where voice has to be digitized, encrypted and then transmitted on a narrow, voice-bandwidth channel.
 In 1970, electronic music pioneers Wendy Carlos and Robert Moog developed one of the first truly musical vocoders.
A 10-band device inspired by the vocoder designs of Homer Dudley, it was originally called a spectrum encoder-decoder, and later referred to simply as a vocoder.
The carrier signal came from Carlos’ Moog modular synthesizer, and the modulator from a microphone input.
The output of the 10-band vocoder was fairly intelligible, but relied on especially articulated speech.
In 1971, the vocoder entered the pop culture mainstream when Kubrick invited composer Wendy Carlos to score the music to his controversial adaptation of Anthony Burgess’ A Clockwork Orange. Employing a vocoder to “sing” on “Timesteps,” Carlos produced a classic of early electronic music.
In the years since the vocoder has leant atmospheric touches and a futuristic ambience to a bevy of songs, including Laurie Anderson (“O Superman!”), Kraftwerk (“We Are the Robots”) the Beastie Boys (“Intergalactic”) Daftpunk, etc…. The vocoder’s popularity somehow seems fitting; its trance-like effect has elements of human warmth but also a decidedly metallic tone. A product of the communications revolution, the vocoder has become a perfect fit for artists seeking a “new millennium” sound.
At one time, vocoders were considered quite esoteric, but nowadays they come built into some multi-effects units, less costly stand-alone units are also fairly common. On top of that, there are some very effective vocoder plug-ins that can be used within sequencers.
Carrier and modulator
A vocoder requires two inputs to generate an output, a “carrier” and a “modulator”. It analyzes the modulator signal, applies its frequency characteristics to the carrier signal and outputs the resulting “modulated” carrier signal. In the most typical case, the carrier signal is a string or pad sound and the modulator signal is speech or vocals – the result will be a talking or singing synth sound. The modulator could also be drums or percussion (for rhythmically modulated sounds and effects) or any sound with changing frequency content.
Filter bands:
Essentially, the vocoder superimposes the frequency spectrum of one sound (the modulator) on the second sound (the carrier). The way this is achieved is that the frequency spectrum of the modulator is continually monitored using a bank of frequency-spaced band-pass filters, and the information is used to control the gains of a corresponding bank of band-pass filters in the carrier’s signal path. Thus, as the spectrum of the modulator changes, the carrier’s filter bank settings follow it. If a voice is used as the modulator and a harmonically rich musical sound as the carrier, this results in the classic vocoder sound, the voice seems to take on the pitch and timbre of the carrier sound, but the vocal articulation is still recognisable, because of the dynamic action of the filter bank following the continually changing spectrum of the voice. As you might imagine, the more filter bands the vocoder has, the more accurate and intelligible the speech-like element of the output signal.
In Practice:
It is apparent from this description of the vocoding process that you need signals arriving at both inputs simultaneously before you can obtain an output signal. It can also be helpful to compress both inputs to the vocoder, in order to keep the output levels stable. On the other hand, if the modulation input is a voice, you might find that the vocoder is triggered undesirably by breath noises, in which case a gate inserted between the microphone and the vocoder’s input will also be an improvement.
The talking synth effect has been used on countless records (for example, ‘Blue Monday’ by New Order, ‘Mr Blue Sky’ by ELO and ‘Rocket’ by Herbie Hancock), but this isn’t the only way to use a vocoder. By substituting the vocal input with a recording of background noise in the local pub, and by vocoding this with a rich synth pad, you can create a very organic pad sound with a lot of movement. Similarly, two different synth sounds or samples can be vocoded together to create a totally new sound. If the modulator signal includes dramatic changes, such as a filter sweep, these will be imposed on the carrier. The real key is to experiment, but a point to keep in mind is that, because the end result is created subtractively, the carrier signal needs to be harmonically rich in order to give the filters something to work on. If the carrier is a synth sound, an open filter setting combined with a sawtooth or pulse wave works well.
5. Ring Modulation & Frequency shifting
These two related effects are based on modulation of the signal amplitude. Both effects were popular during the 1970s, and are currently experiencing something of a renaissance. The ring modulator, for example, was extensively used on jazz, rock and fusion records in the early 70s. The frequency shifter was, and still is, found as part of many modular synthesizer systems. Due to the intricate nature of its hardware, the frequency shifter was (and remains) relatively expensive to produce, and was therefore never as widespread as the simpler ring modulator.
The ring modulator modulates the amplitude of the audio input signal using either the internal oscillator or a second audio signal. The frequency spectrum of the resulting effect signal equals the sum and difference of the frequency content of the two original signals. For example, if you were to put in two sine tones at 500Hz and 600Hz, the output would comprise tones at 1100Hz and 100Hz. Conversely, feeding the same 500Hz tone into both inputs would produce components at 0Hz (a silent DC offset) and at 1000Hz (an octave up from the pitch at the inputs). However, the results are only as simple as this when you input pure tones, when harmonically rich sounds are used; all those harmonics contribute to the sum-and-difference process, resulting in a harmonically very complex output.
 The frequency shifter hosts an elaborate array of all-pass filters that enable to separate the sum and difference signals into two separate audio signals. One carries the audio signal with its frequency spectrum shifted up, the other with its spectrum shifted down. The amount of frequency shift is set via the frequency of the internal sine wave oscillator.
Frequency shifting should not be confused with pitch shifting. Pitch shifting transposes the original signal, leaving its harmonic frequency relationship intact. The frequency shifter shifts the frequency content by a fixed amount and, in doing so, alters the frequency relationship of the original harmonics. The resulting sounds range between sweet and spacious phasing effects to strange robotic timbres.
The Ringshifter is a Logic X plug-in that emulates both Ring modulator & Frequency shifter. It can operate with one input (using the internal sine wave to modulate), or you can include a second input using the side chain in Logic.
Because of the way in which the output frequencies are generated, ring modulators generally produce atonal, non-musical sounds, which have made them popular for science-fiction special effects, but they can also be used musically with a little care.
For example, if two similarly pitched synth patches are ring modulated together then, providing the input waveforms are not too harmonically complex, the output can be both interesting and musically useful. Some non-harmonic components will almost certainly still be present, and detuning the two inputs by a very small amount can produce unusual low-frequency beating effects, but you can arrive at some very worthwhile sounds in this way.
If you find ring modulation a little too strident for you, it can often be made more palatable by blending some of the original unprocessed input in with the processor’s output. If you’re still a bit cagey about using this effect, then perhaps the safest tactic is to use it as a sound design technique, sampling any isolated moments for later use, ring modulating a 100Hz tone with a vocal to produce the familiar Dalek voice is always fun, at least!
Processing percussion via a ring modulator can be good, use a pitched synth sound for the other input and you’ll end up with a metallic, pitched drum part that could form the basis of an experimental electronic song or dance track. Ring modulating different cymbal sounds together is an interesting experiment, which creates new, electronic-sounding cymbals.
If you want to create new sounds and treatments based upon a basic ring- modulation sound, try combining it with other effects. For example, use a dry sound as one input to the ring modulator and its reverb or delay as the other. You can also further process the ring modulator output using conventional but dramatic effects such as flanging or heavy delay.
6. Space Designer’s Warped Effects
One of the advantages of a convolution Reverb like Space Designer, from a sound design point of view, is that the impulse response that is ‘convolved’ with your audio signal (to produce the Reverb) is a standard audio file and as such can be any audio file. This means we can step far outside the realms of your bog standard rooms and halls to create reverbs that provide more than a sense of realism for sticking your Drums in. It is possible to record your own impulse responses in Space Designer but for the uninitiated Space Designer comes with a bunch of presets that can radically transform a sound.
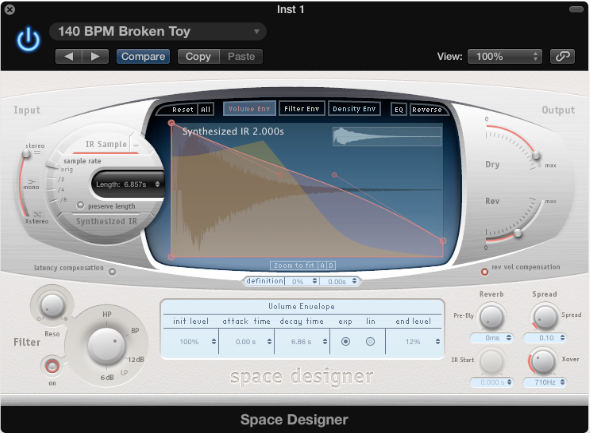
Unusually for reverb, the warped effects tend to work best as insert effects with little or no dry signal present. The first 3 sub folders (Drone Tones, Moving Spaces and Textures) provide radical sound altering possibilities from dreamy and melodic to cold and atonal and it’s worth experimenting to see what works best with your source material.
The drum transforms are impulses that add a rhythmic flavour to whatever is put through space designer. These impulses and the Ghost rhythms are ones that can be used in a send-return loop but my personal preference is to go 100% wet, bounce them down and then blend them back in to the original signal that way.
Talking of the Ghost Rhythms, you’ll notice that each impulse has a BPM next to it. This is the BPM at which the impulse response was recorded and to ‘sync’ it you need to change the BPM of your project to match it. Remember that an impulse response it a standard audio file and as such will not change tempo to match the project.
The best way I have found to do this is as follows:
- Ifyouroriginalsignalisanaudiofile,Flexit.Thismeanstheaudiofile will change tempo when you change the project tempo to that of the Ghost Rhythm.
- ChangetheprojectBPMtothatoftheGhostRhythmimpulse.
- Bouncetoanewaudiofileandthenflexit.
- Returntoyouroriginaltempoandthebouncedfileshouldfollow.
There’s definitely room to experiment here. Try changing the tempo to 1⁄2 of the BPM of the Ghost Rhythm (70 BPM if the Ghost Rhythm is 140BPM say), or a 1⁄4 or 1/3.
7. Delay Designer
Delay designer is a multitap delay that offers up to 26 individual taps that are all fed from the source signal. The delay provides control over the level, pan position, and pitch of each individual tap as well as low and high pass filters for each.
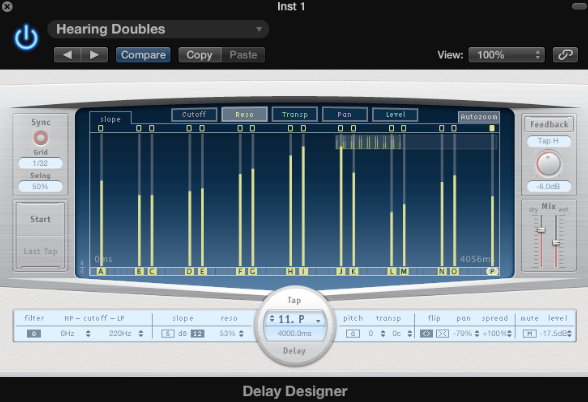
In reality this means that it is possible to create everything from a simple echo (using one or two taps) up to a full audio pattern sequencer, with each tap sync- able to tempo if so desired. Not only that, but Delay Designer’s sync mode allows for full quantisation including swing!
The key to understanding Delay Designer lies in the taps and their relationship with each other. As each tap is created it is assigned a sequential letter starting at A, then B and so on.
You can create taps in one of three ways.
- UsingtheTapPads:Clickon‘Start’ontheupperpadonthelefthand side of the GUI and a timer will start (indicated by a red progress bar in the identification bar under the main display) you can now tap out a rhythm on the tap pad. When have finished creating your rhythm, click Last Tap to end the recording.
- Clickinganywhereontheidentificationbarwillcreateatapwhereyou click.
- Copyinganexistingtapbyoption-dragginganexistingtap.

You can edit each tap individually by selecting from the drop down list in the circular tap delay box. With the tap selected you then have access to all the relevant parameters for that tap (pitch, filtering, panning, etc)

Alternatively you can select the same parameters by clicking the boxes at the top of the display and then change it by click-dragging up and down on the tap itself.
8. The Pedalboard
The Pedalboard is a hidden gem that was primarily designed for use by guitarists. It gives you a complete set of Stomp Boxes to play with every flavour of effect represented and you can chain boxes together by dragging and dropping them on to the board itself.
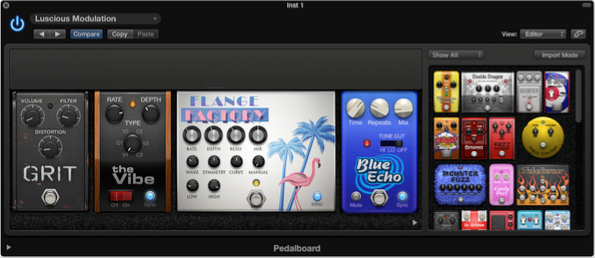
You can think of the Pedalboard as a modular effects processor that is capable of some pretty complex modulation routing. The picture below shows the Splitter and the Mixer which are two utility modules that allow you to route the signal to two discrete signal busses in parallel (the splitter) and then recombine then at a later point in the signal chain (the mixer).
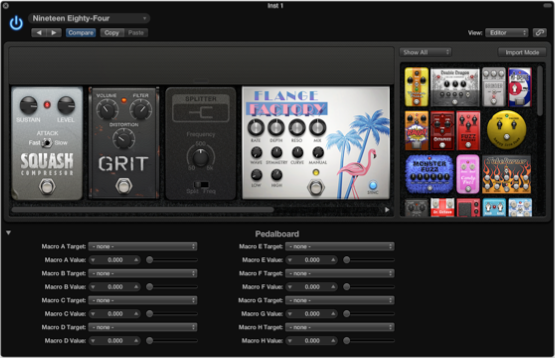
Additionally, you have access to up to 8 Macro Targets (see above) that can be mapped to any parameter of a stomp box in the chain. These Macros can be MIDI controlled for maximum real time tweakability.
What makes the Pedalboard so much fun is that every Stomp box has it’s own character and it’s well worth your time exploring the range of modules present!
