SAMPLING IN KONTAKT AND MASCHINE PART 2
1. Modulation in Kontakt
As we’ve already seen, modulation is the key to creating expressive and dynamic sounds and no synth worth it’s salt would be found without them. This is also true for samplers and Kontakt comes fully loaded with a massive range, from different types of Envelopes, LFOs and external modulatorsthrough to step sequencers.
To access modulation you will need to right click on the target that you want to modulate which brings up a dialog box containing the list of modulators
When a modulator is applied, an entry will appear for it in that Module’s Modulation Router. This can be accessed by clicking on the button labelled Mod in the bottom left hand corner of the Module

From the Router you can adjust parameters like the modulation amount. If a Modulation Router entry uses an internal modulation source for the assignment (such as an envelope) you’ll always find a corresponding modulation source panel in the Modulation section at the bottom of the Rack in Instrument Edit mode. To access the relevant modulator from the Modulation Router, just double click on its Modulation entry. Modulators can be deleted by right clicking on them and selecting delete.
2. The Wave Editor: Zone Envelopes
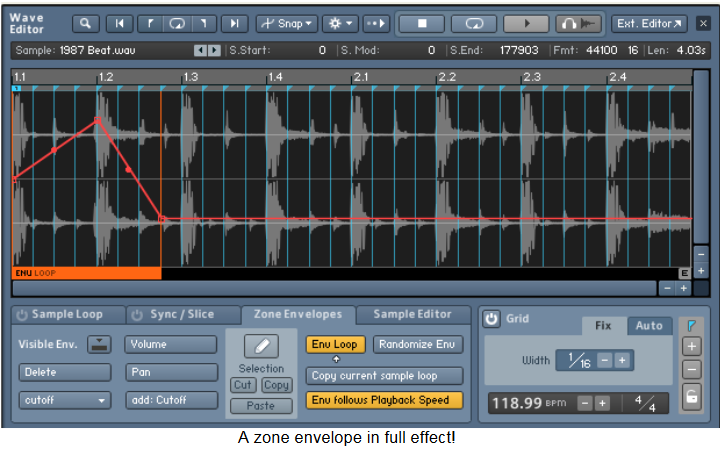
Zone envelopes are an insanely powerful feature in Kontakt 5. They allow you to apply multi–break point modulation to the sample in a zone directly in the wave editor. Not only that but with the Grid switched on these breakpoints can
be tempo synced!
The modulation can be applied one–shot or it can be looped with the use of the Env loop button. It’s also worth noting that the Env Loop is independent of the sample loop and you can apply multiple zone envelopes to a sample.
In the diagram above you can see the application of a zone envelope to the cutoff of a filter. To do this you need to do the following:
1. Select the Zone Envelopes (ZE) tab in the Wave Editor
2. Add a group insert FX (say a ladder LP4)
3. Move the Cutoff of the LadderLP4, you should see ‘add: Cutoff’ appear in the Visible Env section of the ZE tab.
4. Click ‘add: Cutoff’ to create the envelope, a red line will appear in the wave editor display
5. Click and drag the envelope up and down whilst triggering the zone. You should hear the filter opening and closing.
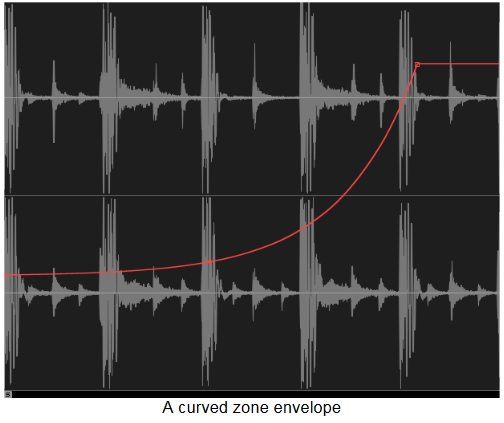
6. To create a breakpoint right click on the red line. To delete it right click it again, Once you’ve created a breakpoint you can change the shape of the envelope from concave to convex by clicking and dragging on the small round dot that appear half way between the two breakpoints (see below)
Working with zone envelopes can be a little tricky for two reasons. Firstly you can only see one zone envelope at a time, which can make it incredibly confusing when working with multiple envelopes. The second point is that the
display does not follow the envelope, even with Env Loop on; my advice on this is to set it with your eyes but use it with your ears!
3. The Wave Editor: Sync/Slice
Any of you that have ever worked with Recycle will have an idea of what’s coming here, Kontakt 5 has its very own beat slicer and tempo synchroniser built in. This does awesome things to samples and totally comes in to it’s own
with rhythmical and percussive loops.
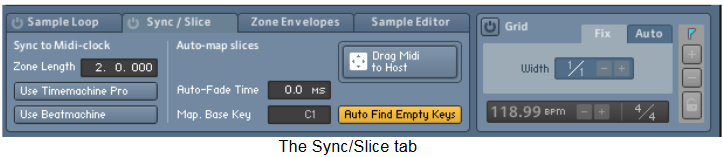
The tab is separated in to 3 sections:
• Sync to MIDI-clock- this syncs the loop to the tempo of Kontakt or your DAW using one of two source modes, Timemachine Pro or Beatmachine (more on these later)
• Auto-map slices, Kontakt’s very own recycle! This will slice up your loop based on transient markers provided by the Grid section, then you can create a MIDI file from this to drag into your DAW
• Grid: Reads the BPM from the sample and then either creates transient markers based on transient information in the sample (Auto mode) or overlays a fixed grid of markers based on a beat division (Fix Mode)
 For accurate BPM detection and syncing make sure that your samples
are edited precisely to whole number bar lengths
Sync to MIDI–clock
Sync to Midi–clock provides you with a simple way of getting your sample to follow the BPM of either Kontakt or your DAW. There are two different ways of doing this; the first of which uses Timemachine Pro, a high quality time stretch algorithm.
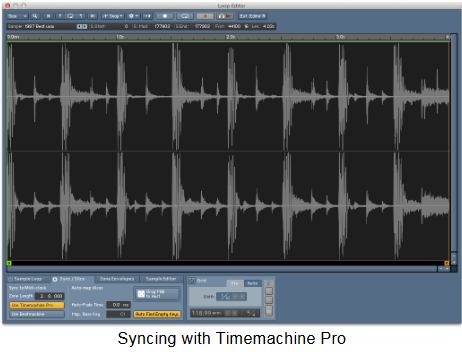
To do this accurately you need to provide the length of the sample in the Zone Length box or, alternatively you can switch Grid on and enter the BPM of the sample there. As this mode treats the sample as one continuous region
with no regard to Slices it’s best used for tonal phrases, leaving the next option to handle the rhythmic and percussive stuff. The second option is to use Beat Machine. This will slice your sample up and playback the individual slices in turn using the internal sequencer.

Auto–map slices
With the Grid activated this section enables you to slice the sample up based on the transient markers and map these slices to empty keys. This can be done in one of two ways. Clicking on ‘Drag MIDI to Host’ will slice the sample up and map the slices sequentially starting on the lowest available empty key (in the diagram below you can see the slices starting at key C–2 in the mapping editor) Additionally ‘Drag MIDI to Host’ creates a MIDI file containing the slices that you can drag and drop to your desktop in standalone mode or to the arrangement area of your DAW (exactly like Recycle!)

Be aware that a large number of slices can be created and you will need empty keys for them so it’s worth placing the original sample on a single key fairly high up the keyboard. If there are not enough empty keys, if the original
sample zone is over a range of keys say, then you will get an error message.
The second method involves manually selecting the slices to be mapped by holding down ‘cmd’ and clicking the slices you want. Once you have made your selection you can drag them into the mapping area in the same way you
can drag in multiple samples.
Grid
There are two ways to place markers using the Grid, the first of which we have already seen. FIX mode splits up the sample into slices of equal length, which are determined by the tempo of the loop, it’s time signature and a selectable note value. Kontakt works out the BPM of the sample by the sample length and the time signature so it’s important that the sample is edited cleanly.
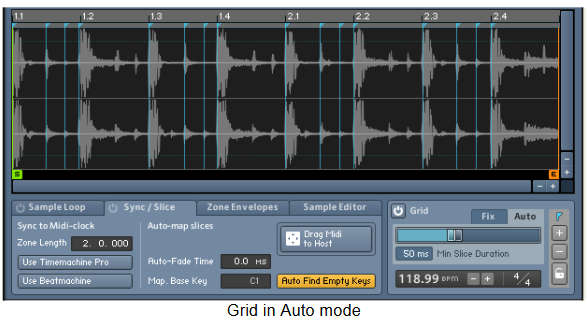
 In Auto mode Kontakt detects transients in the waveform of the sample and creates slice markers at these positions. You can adjust the sensitivity of the peak detection threshold by moving the slider in the middle of the Grid area. It’s quite possible that you might find a sample that doesn’t respond too well to an automatic threshold setting. In that case you can set the markers manually, using the icons show to the right. To add a marker click ‘+’ and click in the waveform display at the relevant transient point, to remove a marker use ‘–‘ instead. The final button allows you to lock the markers in position and if you wish to lock all the markers alt–click the button instead
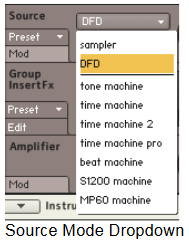 Now this is where we start to discover the true power of KONTAKT 5. The Source module is a core ingredient of every instrument is the start of the signal chain and cannot be deleted. To select a mode, drop down the selector to the right of the Source label on the left of the module (see figure 8, above right)
Sometimes as you work with these modes, particularly the Tone and Time Machine you might want to save some of the settings in a preset. Here’s how you do it:
1. Click on the Preset button.
2. Click on Save Preset.
3. Name the Preset.
4. Click on Save. The Preset defaults to being saved in the Source directory, located in the Presets directory within the KONTAKT 5 folder.

This is the classic, traditional style sampler that stores the data for each WAV/AIFF in your system RAM and plays it up or down in pitch by resampling the audio data. Basically it abides by the old pitch and time rules so If you play
a sound up in pitch it will play faster and down in pitch it will play slower.
Tune: Changes the pitch for the selected Group in semitone steps, up to plus or minus one octave. For finer adjustments, hold the Shift key while dragging the knob.
Reverse: Reverses playback for all Samples contained in the selected Group.
Tracking: When enabled, a Zone’s pitch changes as you play different keys on the keyboard. This is important for pitched sounds, such as instruments. When disabled, the Zone always plays at its original pitch, without transposi–
tion. This is useful for layering a drum sound across several keys so you can trigger it with several fingers (e.g., to play rolls or to play it polyphonically) without affecting the pitch.
 DFD is identical to Sampler mode except for the fact that you can’t use Reverse on the samples in the currently selected group. What happens in this mode is that samples are streamed from hard disk instead of from RAM. This
is great if you don’t have much RAM but have chosen to use very long samples. For example, if you have a 30 GB piano sample library, it’s unlikely you’ll have 30 GB of RAM in your machine. Streaming the 30 GB piano from
disk instead solves that problem.

 Here’s some information about the parameters:
Tune: Changes the selected Group’s pitch in semitone steps, up to plus or minus one octave.
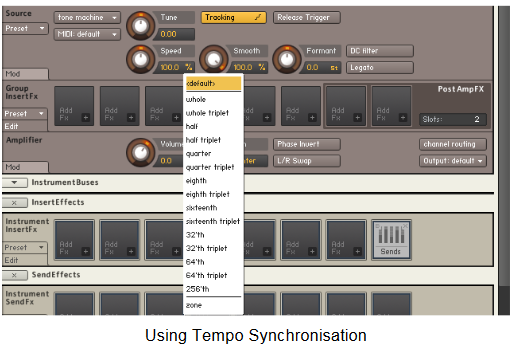
Smooth: Adjusts the amount of granular micro–envelopes to reduce unwanted artifacts, thus altering the sonic character of the re–synthesis process. Turn the knob until it sounds the way you want. Note that small values generally cause a buzzier sound.
Speed: Changes the playback rate, independently of pitch. The Speed values are expressed as percentage: for example, 100% plays back the sound at the original speed, 200% doubles the speed, 50% halves the speed, etc. A value of 0 stops playback entirely.
This parameter can sync to an external MIDI clock or your host software’s internal clock. To choose the rhythmic value, click on the percentage symbol and choose a note length value from the drop–down list. For example, if you choose Whole from the list, the length of the sample will be time stretched to fit exactly into one bar of your song. Once the rhythmic value is selected, the Speed control can select a multiple of the chosen note value (e.g., if 16th note is selected, use Speed to select a duration of 2, 3, 4,5, etc. 16th notes).
Formant: Transposes the formant (timbral characteristics) in fractions of a semitone, independently of pitch. Mapping this to a midi controller and rotating it from left to right adds a ‘vocal’ characteristic to the sound.
DC Filter: Corrects waveform asymmetries that can be produced by the Tone Machine algorithm. It’s recommended that you leave this enabled.
Legato: This is a great function that needs to be witnessed to be understood. If you hold down a key whilst already pressing another key with this option turned on, the new sample won’t be triggered from the beginning but will play
from wherever the original sample was when the new key was pressed.
To explain this further we’ll use the example of a drum loop with 4 beats in 1 bar. In the table below you’ll see the beats from left to right with two keys on the keyboard one above another:


This table shows you that with Legato off, the beginning of the loop (beat 1) will be triggered at each key press.
Tracking: If this is on you can play notes at different pitches.
MIDI Channel: This allows selecting a MIDI channel for the currently selected
Group. Leave this set to “Default (Instrument)” unless you want to specify a different MIDI port / channel for the current group.
Release Trigger: Same as the Sampler mode so see above for an explanation
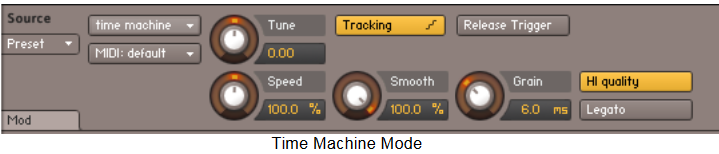
This is a wicked real–time Time stretch and Pitch changing mode. If you want to change the pitch without affecting tempo or change the tempo without affecting pitch this is the mode for you. Just map some midi controllers onto
these for some amazing sonic reconstructive power!
The controls and general comments are the same as the Tone Machine, including Speed synchronization, but with the following exceptions:
Hi Quality: This button replaces the DC Filter button. When enabled, the Time Machine operates on pre-analyzed sample data; when disabled, it works without knowing the sample data’s characteristics. High-quality preserves the
sample’s signal properties at very slow playback speeds, whereas low-quality does not (although the artifacts it produces at low speeds can serve as a creative sound-shaping tool).
Grain: This control replaces the Tone Machine’s Formant control, and determines the size of the sound particles used for re-synthesis. Changing the grain size has little effect in high-quality mode, but can make dramatic changes when high- quality mode is disabled.

The original Time Machine is a bit rough and ready, nothing wrong with that but if it’s a cleaner result you are after try the Time Machine 2. This mode has been optimized specifically for the highest possible quality of time stretching
and pitch shifting so works great with drum loops or musical sections. The Tune, Speed, Tracking, and Release Trigger parameters work the same way as with Time Machine. There is no Smooth control. Following is a description of controls unique to Time Machine II.
Transient Copy: When on, transients are preserved as accurately as possible. This is recommended when working with material that contains a lot of transients, such as drum loops.
Transient Size: When the Transient Copy function is enabled, the Transient Size knob adjusts the size of those transients that remain untouched.
Grain Size: This is a drop–down menu (it normally says “Default”) that adjusts the grain size. It isn’t always easy to predict the effect this will have on the sound, so try the various options to determine what sounds best.

