SAMPLING IN KONTAKT AND MASCHINE PART 1
Kontakt 5 is the most amazing sampler I’ve ever come across without a doubt. It’s an absolute powerhouse for sound creation and comes with a vast library of instruments covering everything from a full Classical Orchestra and
authentic sounding acoustic pianos to synthesisers, percussion and vintage drum machines. Kontakt is also the only sampler that can truly break free of the whole ‘pitch and time’ rulebook giving elastic audio a new definition.
1. Sampling Basics
Whether you’ve graduated from the Basic course here at Point Blank or you’ve dived in without studying here before it’s worthwhile refreshing our minds as to what exactly sampling is. In week 1 we looked at the Sampling process where analogue sound is converted into Digital via an A/D converter. Back in the day, Hardware Samplers were the only tools for the job and came with their own A/D converters built in
You would take a lead from whatever you were sampling, say a mixer with a turntable connected and plug it into the sampler’s input. Using that tiny LCD screen and the tools on offer you would arm the sampler, cue the record to
the point you want to sample and then push record. Once converted to a digital audio waveform you could edit that sound’s start and end point, maybe add a loop (we’ll talk about these later) and then map the sound onto a key or
several keys on the keyboard so that you can play it.
It’s worth noting that software samplers don’t have an input stage, they use pre-sampled WAV/AIFF files instead. This means that if you want to record sounds into your sampler you’ll have to import audio via your Sequencer or a
dedicated Wave Editor.
Software samplers come in many forms, there are a lot of them out there, but there is a reason why Kontakt is becoming the closest thing you can get to an industry standard. It’s a tool that gives you incredible flexibility and power. Kontakt can be used either standalone and in your sequencer and we’ll be looking at both of these.
2. Introduction to Kontakt

(The Kontakt Interface)
The Kontakt Interface is split into 4 main areas:
• The Browser to the left
• The Main Control Panel section to the top,
• The rack containing the Multi Instrument Header and individual instruments
• The output section to the bottom. This can be a musical keyboard or an Output mixer depending on the selection made from the Main Control Panel
Kontakt 5 can be loaded into your host DAW in a variety of plugin formats
(AU, VST, AAX) and in any configuration up to 32 outputs. Each DAW
handles this differently so it’s advisable to look at the configuration in Kontakt
5 first.
Thankfully Kontakt makes this relatively painless and then allows you to save
different default configurations depending on the type of use you want.
Before set up it’s worth thinking about the number of outputs you would realistically use in any given scenario and setting them accordingly. For example, if you are using a Kontakt multi as a full orchestra with individual Kontakt instruments for each section it may be worth using multiple outputs. But if you are using it for one or two sounds, say layering for sound design, then a stereo pair may be more apt.
3. Configuring Outputs
On the Master Control Section, push the Outputs button at the top of the Kontakt screen to access the configuration section. Kontakt’s outputs default internally to 2 stereo and a single Surround (5.1) channel – not your typical music production setup to be honest, so let’s sort that out. For our example we’re going to configure the default for 8 stereo channels.
It’s possible to delete individual channels by clicking in the top right hand part of the channel (it will highlight yellow) and pressing delete channel, but there’s a far quicker way of doing things! 1. Click the Add Channel button
2. Change Quantity to 8 and leave Number of channels set to 2. This will create 8 stereo channels.
3. If you are in standalone mode, then the Soundcard/Host output option will show you your physical sound card
outputs. If you are using a sound card with a limited amount of outputs then it’s best to leave the Ascending output assignment box unticked. If you are in your host sequencer, then the dropdown box will show you the available inputs to your sequencer. NOTE: The list is sequential and starts at the top with input 1 L then input 1 R, then input 2 L and input 2 R and so on down the list, regardless of what theyactually say!
4. Make sure that you have Delete existing channels before creating new ones selected
5. Click OK and the channels will be created
6. Now to make these changes permanent click on the Make Default button
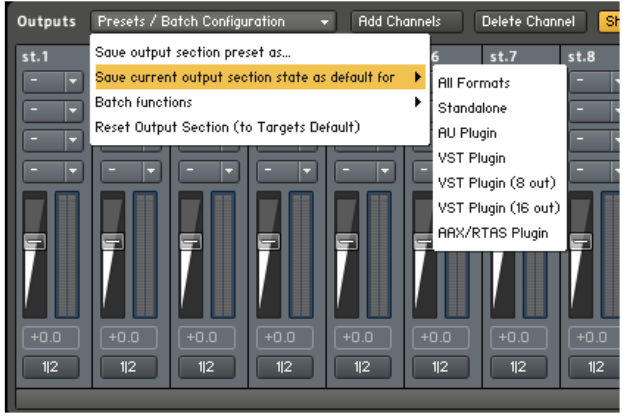
The Presets/Batch configuration drop down allows you fine tune your output
section further by saving its state for different formats.
4. What’s in the Kontakt Rack?
Multi Instrument Header

Kontakt is capable of receiving up to 64 individual MIDI channels (4 banks of 16 channels), which means that you can have up to 64 separate instruments in a Multi, each receiving on their own midi channel i.e.
• Midi Channel 1: Bass
• Midi Channel 2: Piano
• Midi Channel 3: Strings
The multi header (or Multi for short) provides information about the whole
rack as follows (left to right)
1. Quickload Multi into the Same Slot. The drop–down menu to the left
of the Name field allows you to select a new Multi from the Quickload
list replacing the existing.
2. Multi Name. Enter a name by double–clicking the name field and
typing in a new one. To edit a name, drag across the section to be
changed, and overtype the changes.
3. Load Next/Previous Multi into the Same Slot. The left/right arrows
to the right of the Name field select the previous or next Multi in the
current folder on your hard drive. Selecting this replaces the existing
Multi.
4. Choose Multi Page. Choose one of 4 potential slots of 16
Instruments. Each page can hold 16 Instruments or Banks, and each
of these can have its own MIDI channel if you want.
5. Show/Hide the global Script Editor. The Script editor is a powerful
and flexible scripting language that allows you to interact with the MIDI
side of Kontakt. As you will see shortly it is capable of doing some
amazing things and lies at the heart of multi and instrument
customisation.
6. Show/Hide Aux Send strips. Shows or hides the Aux FX Send strips
located below each Instrument in the rack – we’ll be looking at these
next week
7. Maximise / Minimize all Instrument Headers. This maximises or
reduces the space that Instrument Headers take up vertically in the
rack – very handy if the screen is cluttered.
5. Loading Instruments
KONTAKT 5 includes a comprehensive library overflowing with top–quality
instruments: As well as the factory library containing a selection of orchestral,
band and synthesised instruments, there other libraries include the amazing
Studio Drummer, The Giant piano, 3 beautifully sampled pianos and other
libraries catering for a wide range of styles and genres
You can load an instrument from one of 3 places;
1. The Browser – click on the instruments tab in the relevant library and
then double click on the desired instrument name or drag it into an
empty space on the rack
2. The Multi–Instrument Header Load/Save menu – navigate to Files/New
Instrument from List to access the Quickload menu and choose from
the list i.e. Grand Pianos > Steinway D > Steinway D Lite
3. An existing Instrument – Drop down the Quickload menu (Down arrow
to the left of Instrument name) and navigate or click on the left/right
arrows to load the previous/next instrument in the quickload list.
All that needs to be done for you to play the instrument is for you to assign the
correct Midi Transmit channel in your sequencer and away you go.
Minimized Instrument Header View Parameters
![]() (Minimised Instrument Header)
(Minimised Instrument Header)
The Minimized view appears when you first bring an Instrument into the rack, or create a new Instrument. You can do the following from the minimized view.
1. Edit Instrument. Open the Instrument to reveal its various modules for detailed editing
2. Quickload Instrument into the Same Slot. The drop–down menu to the left of the Name field allows selecting a new Instrument from the Quickload list (as described in the Browser section). Selecting this replaces the existing Instrument.
3. Instrument Name. Enter a name by double–clicking the name field and typing in a new name. To edit a name, drag across the section to be changed, and type in any changes.
4. Load Next/Previous Instrument into the Same Slot. The left/right arrows to the right of the Name field select the previous or next Instrument respectively in a list of Multis (e.g., Multis all stored in the same directory). Selecting this replaces the existing Instrument.
5. Solo and Mute buttons. S is Solo, M is Mute.
6. Volume and Pan Sliders. Volume is on top and Pan on the bottom
7. Output Meters & Volume Slider These show the Instrument’s signal level. If the red clipping indicators toward the right light up, reduce the overall level to prevent distortion.
Maximized Instrument Header View Parameters
 (Maximised Instrument Header)
All parameters in the Minimized View are also available in the Maximized view, as well as the following additional parameters.
• Output We set them up earlier – here’s where you drop down to select which of the available outputs your Kontakt Instrument will use.
• MIDI Port and Channel Choose one of the 64 MIDI port / channel entries, e.g. “Port A / 3”, on which the Instrument receives MIDI data. The default is Port A / 1, where the Instrument responds to data coming in on Port A MIDI channel 1. To change this, click on this field and select a channel from the drop–down menu. Note: To layer Instruments, simply set the same MIDI channel for two or more Instruments. By default multiple instruments will be given sequential MIDI channel numbers as they are loaded
• Voices (Note Symbols) This shows how many voices are in use at any given moment, and is not an editable parameter.
• Memory This read–only indicator displays how much RAM the Instrument has reserved for itself.
• Max This sets the maximum number of voices that will be allocated to this Instrument. Click on this field and drag up or down to increase or decrease respectively the maximum number of notes the Instrument can play. For the most efficient operation, do not use more notes than is needed, as each note requires a certain amount of CPU power. For example, with bass, you seldom need to assign more than 2 or 3 notes. However, with an instrument like piano with a long release time, several notes may sound simultaneously as they decay. For this, you would need to assign more notes to avoid “voice stealing” (i.e., newer notes have to steal a voice from notes still sounding in order not to exceed the maximum amount of polyphony).
• Purge analyzes which samples were used in an arrangement, and removes from RAM any samples that weren’t used. Thus, KONTAKT 5 can handle huge amounts of samples while exhibiting very low RAM usage. Although the Purge function is available on a Global level, in this case it can also purge samples from individual instruments. Instrument purge is handy if you’ve finished a part; you can purge samples for that Instrument alone, thus freeing up RAM for additional overdubs.
• Tune This changes the Instrument’s master tuning in semitones, up to ±12 semitones (one octave). To fine tune the control, hold down the Shift key while dragging the mouse
• Aux Show/Hide Button This is just below the Minimize/Maximize button. Click to show or hide the Aux Sends strip below the Instrument maximized view (this button is not visible in the minimized view).
6. Script Processor
This wicked tool might seem a bit techie (and it is!) but it is well worth checking out. The Script Processor basically allows you to manipulate incoming Midi data and transform it within the Kontakt Instrument itself, much like midi insert plugins on your sequencer. There’s a large collection of preset Scripts including Chord Generators and Arpeggiators so let’s have a look at an introductory example without having to even look at the code itself.
1. Load a piano instrument or anything that plays a variety of pitches.
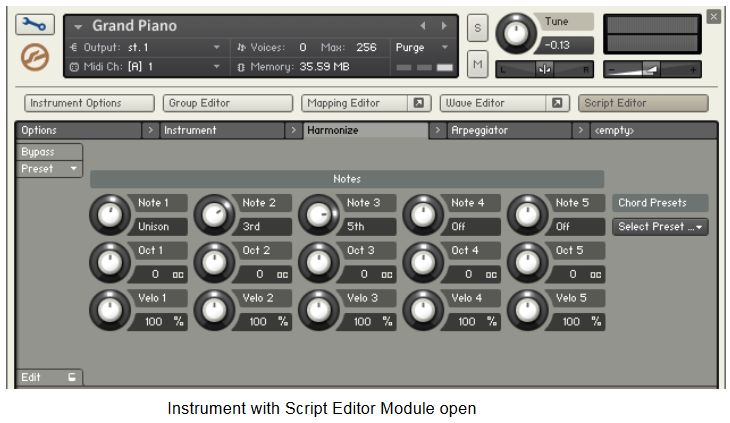
2. Open up the instrument by clicking on the Wrench on the Instrument Header
3. Click on the Script Editor button to open up the grey horizontal Scripts Module.
4. Drop down the Script Menu on the left hand side and select Harmonization > Harmonize
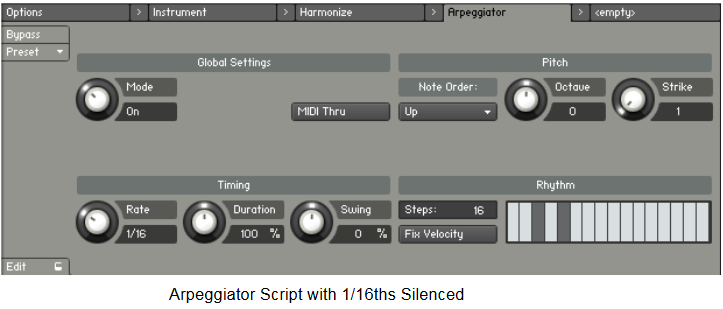
5. Now click the next empty Script tab and drop down the Script Menu to select Sequencing > Arpeggiator
6. Now for the cool bit, with the Arpeggiator tab selected, find the 16th grid display and drag a couple of the vertical volume bars down – the image below is a good guide.
7. Now play on your keyboard and you’ll get an automatic Latin vibe that can be modulated up and down in pitch whilst playing the keys on the keyboard up and down.
8. Try changing the notes in the harmonizer script for different chords. Hopefully this demonstration has shown a little bit of the potential of the scripts, you’ll find a good guide to them all in the Kontakt 5 Documentation folder called Kontakt 5 Script Library.pd
7. Building a Kontakt Instrument
Mapping Editor
The Mapping Editor is where you place samples on the keyboard, layer them in Zones, assign them to specific velocity ranges, do velocity– or pitch–based crossfading among overlapping samples, and more.

1. An Upper Edit strip with various buttons, and a sample selection field toward the lower right.
2. A Zone Info strip that displays several Zone–related parameters
3. A keyboard along the bottom and a blank space above it, called the Zone Field. Assuming your MIDI keyboard is hooked up properly, playing notes should place little red dots in the field. The height of the dot corresponds to velocity.
Mapping Samples
There are three ways to select Zones.
• Click on the Zone.
• Shift–click to select multiple Zones.
• Click in a blank spot in the Zone Field, outside of the Zones you want to select, then draw a rectangle around the Zones to be selected. Even if a Zone hides another Zone by being overlaid on it, both will be selected if you drag over them.
Drag the boundaries of zones to spread them up or down the keyboard, vertically to cover the velocity ranges.
This editor allows you to work directly on the sample contained in a specific zone.
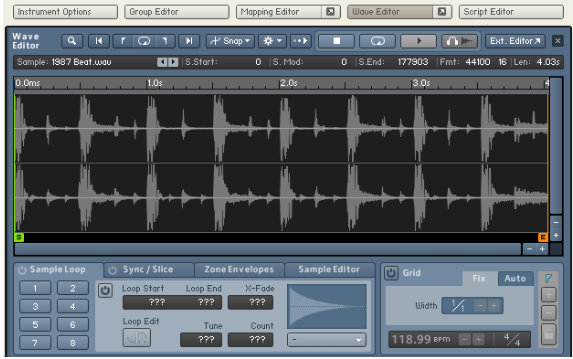 (The Wave Editor Window showing the Sample Loop tab)
• Sample Loop, here you can add up to 8 different loops to the sample.
• Sync/Slice, allows you to chop up the sample into slices, we’ll look at this next week in more detail.
• Zone Envelopes applies modulation directly to the waveform, we will be looking at this next week.
• Sample Editor, gives you access to sample edit functions like copy, paste etc.
• With the Instrument editor open, click on the Zone you want to edit in the Mapping Editor, then click on the Wave Editor button.
• Open the Wave Editor, then click on a Zone.
• If the Wave Editor isn’t open, double–click on a Zone to open the Loop Editor and load the Zone’s sample.
Furthermore, there are horizontal and vertical scroll bars with “+” and “–” zoom buttons, allowing you to zoom in and out on the loop. These features allow for very detailed, precise loop editing.
bottom scroll bar views different portions of the Sample; the “+” and “–”buttons zoom in and out, respectively. The calibrations along the top vary to accommodate changes caused by horizontal zooming.
View Menu
When editing a sample, it’s convenient to be able to jump to different portions of the waveform. The location you select will be centred in the viewing area. If there are no loops, the choices are Sample Start and Sample End. If there are loops, the view can also jump directly to the selected Loop Start or Loop End, as well as enable the Loop Editor (described later).
Here are details on each option:
• Go to Sample Start: The sample start point appears at the left–most side of the viewing area.
• Show Both Channels: When enabled (as indicated by a diamond to the left of the menu option), both channels of a stereo file are displayed. When disabled (as indicated by a blank space to the left of the menuoption), both channels are summed together in mono.
• Loop Edit Mode: This splits the screen in two parts. The left part showsthe end of the selected loop. The right shows the start of the selected loop. This allows judging how well the two match up, as the transition should be as seamless as possible; you can change the loop start andend parameters to adjust the loop, while seeing the results in real time.
Snap Menu
The Snap menu chooses whether Loop Start and End points will “snap” to places where the signal amplitude is equal, thus minimizing clicks or pops caused by an abrupt level change when the loop jumps back to the beginning. It’s generally thought that any Loop Start and End points should be at zero amplitude for optimum looping. However, the crucial aspect is not necessarily that the points be at zero amplitude, but that they have equal amplitude. So, KONTAKT 5 offers two different ways to optimize loop points. For example, some loops sound more seamless when the Loop Start and Endpoints are on peaks of the signal.
• Snap to Zero Crossing: Snaps the Loop Start or Loop End point (whichever is being adjusted) to the nearest zero crossing that sits in a transition from negative to positive. Note: In some cases, you’ll obtain a better loop by setting loop points at zero crossings where the signal transitions from positive to negative. For this, use “Snap to Value Crossing” (described next) instead.
• Snap to Value Crossing: If you set one of the Loop points to a particular value with Snap off, then turn on Snap to Value Crossing, adjusting the other loop point will snap it to a part of the waveform with the same level, and with a transition in the same direction (e.g., goes more positive or more negative through the value crossing).
Command Menu
KONTAKT 5 includes some basic artificial intelligence to help find good loop points; it can analyse a waveform and decide where good loop point candidates would be. While not infallible, this can speed up the process of finding good loops. The Command menu also provides other functions.
Find Loop End (Long): This is a similar automated loop finding function, but can lengthen the loop considerable if KONTAKT 5 thinks the end result will be a good Loop End point. As with finding short loops, you can apply this
repeatedly if desired.
Restore Loops From Sample: Reverts to the original loop settings when youopened the sample, thus undoing the effect of any loop editing you’ve done.
Remove DC Offset: Removes sub-sonic artefacts. While inaudible, these take up bandwidth and therefore limit headroom during the mixing process. The process of transposing and processing samples can create these
artefacts, so it’s recommended that before looping, you invoke DC Removal to have the “purest” sample possible. Note that this is a destructive operation that overwrites the sample data on disk.
To All Selected Zones:
The above commands apply to individual samples. However, you can also choose several options for all selected zones. These are:
• Copy Current Zone’s Loop Settings: The current Zone’s loop settings are applied to all selected Zones.
• Restore Loops from Samples: The same as for a single Zone, but affects all selected Zones.
• Adjust Loop Ends –1: Moves all loop ends one sample to the left, thus making the loop one sample shorter.
• Adjust Loop Ends +1: Moves all loop ends one sample to the right, thus making the loop one sample longer.
• DC Removal: Removes DC offset for all selected Zones.
using these options to compensate.
Wave Editor Information Strip
These parameters show various loop characteristics.
• Sample: Shows the name of the sample loaded into the Loop Editor.
The two arrows choose the next and previous sample in a list of
samples (e.g., the samples in a directory), and loads the selected
sample into the Loop Editor.
• S. Start: Sets how far into the sample that playback begins. For
example, starting later can bypass a sound’s attack. The value shown
is in samples. Edit this parameter by clicking and dragging the green
“S” (Sample Start) marker.
• S. End: Sets where sample playback ends. Edit this parameter by
clicking and dragging the red “E” (Sample End) marker.
• Bits: Displays the Sample’s bit resolution. This cannot be edited.
• S. Rate: Shows the Sample’s sample rate. This cannot be edited.
• Len: Shows the Sample’s total length, in seconds. This cannot be
edited.
Sample Loop Tab
The sample loop tab below the waveform determines the number of loops (up
to 8) and whether they are enabled or not. The reason for having multiple
loops is that you can repeat a loop for a specific number of times. As just one
example, you could load a 16–bar sample of, say, a vocal, and loop specific
parts for a certain number of times to create a “stuttering” effect.
Loop Selection buttons: Before editing a loop, you first need to select the
one you want to edit. Click on one of the 8 loops for editing. The button for a
loop being edited glows orange. Buttons for any other loops that are turned on
are blue, while loops that are turned off (and therefore have no effect on the
sound) are gray. Note that these buttons themselves do not turn loops on and
off, but instead select them for editing. You can also select a loop for editing by clicking on it in the waveform view.
Its corresponding button will glow orange.
There are six looping modes.
• Off: Turns off the loop. The waveform view will no longer show the
loop, and the loop start and end points will be reset to the beginning
and end of the sample.
end and there is a release time on the amplitude envelope, the loop will
continue during the release phase.
• Until End <–>: This is similar to Until End, but the loop plays forward, then backward, then forward, etc.
• Until Release: Plays the loop as long as the note is held down. Upon releasing the note, the loop stops and the rest of the sample after the loop plays through.
• Until Release <–>: Resembles Until Release, but the loop plays forward, then backward, then forward, etc.
• One Shot: Plays the sample one time, from sample start to sample end, and ignores note off events. This is typically used for triggering drum sounds, which when triggered, continue until they end.
Note that if there are several loops in a sample, Until End and Until Release
affect only the last in the series of loops. The behaviour of prior loops
depends on the Count control, which determines how many times a loop
repeats before moving on to the next loop
Here’s where you can assign midi controllers or assign parameters to me automated by the sequencer. Click the Auto tab in the Browser and choosethe desired automation Mode:
• Midi Controller is for assigning knobs and sliders on your controller
• Host is for recording Automation from the sequencer itself
With Host Automation mode, select an unused ID and either double–click or click on Set to perform the assignment. The automation always applies to an entire group. In host automation mode, make sure you assign the automation ID in Kontakt to a parameter control BEFORE you use it in your DAW. Note: Several parameters can be assigned
to the same controller. This is great if you want a single control to do many things, such as increase brightness while
increasing level. Also note that the Mod wheel is usually fixed at Controller 1, and
Volume at Controller 7.
• Remove To remove an automation assignment, select it then click on Remove.
• Smoothing Incoming MIDI data is “quantized” to 128 divisions. Sweeping some parameters with this quantized signal produces a “stair–step” or “zipper” effect. The Smoothing parameter smoothes the incoming MIDI data (through a process of mathematical integration, just in case you wondered) by creating a ramp between values rather. than a sudden jump. However, note that higher smoothing values also make the control less responsive when controlled over MIDI.
• Soft Takeover Enabling Soft Takeover causes a parameter not to change until an external controller matches its existing value. Example: Suppose a level parameter is set to halfway, and a hardware control assigned to level is turned all the way down. Without Soft Takeover, as soon as move the hardware control the parameter will jump to the new value – in this case, something close to full off. With Soft Takeover, nothing will happen as you turn up the hardware control until the control is up halfway. It now matches the existing parameter value, which allows it to take over parameter control.
• Cancel So you didn’t really mean to assign that controller after all? Click on Cancel.
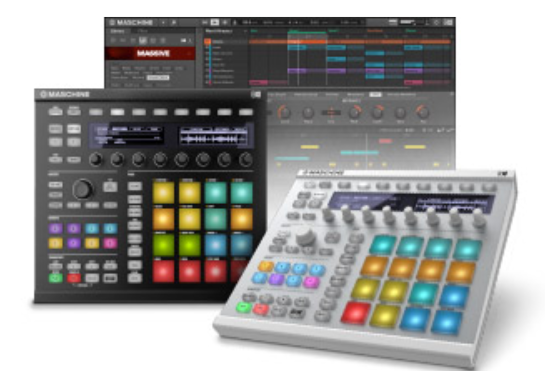
Maschine is a fully featured beat–making powerhouse of, well, a machine that gives you the feel of an old school drum machine but with a 21 st century heart.
Although it’s capable of far more, for the purposes of this week, we are going to look at how we can use Maschine as fully featured sampler that has some pretty nifty tricks up it’s sleeve. By focussing on using sampler side, it’ll give
you a good insight into what it was like working with a hardware sampler without the limitations!
Maschine 2.0
The hardware and software side of Maschine are tightly integrated meaning you can work on either towards the same result. We’ll be looking at using it from the hardware side but every function works in both. Before we begin we need to understand the hierarchy of Maschine,
Sound: The basic building blocks of all sound content. Each sound is made up of any number of plugins (Instruments, FX etc) There are 16 Sounds in a Group. Each sound is mapped to an individual pad.
Group: Contains 16 sound slots. Each Group can have it’s own effects, example you can use this to add compression to 16 sounds making up a drum kit. You can think of this as similar to AUX’s in Logic.
Maschine can be used as a fully–fledged sampler that allows you to record both internal and external audio signals via your audio interface. You can also use Soundflower (on a Mac) to route signals from audio sources within your
computer and finally you can also use it to resample from within Maschine itself.
Firstly we need to load a sampler into a sound slot:
1. Press CONTROL to enter Control mode.
2. Select the Sound, Group or the Master where you want to load, remove or replace a Plug–in.
3. Press Button 6 (PLUG–IN) to display the Plug–in slots of the selected Sound, Group or the Master.
4. Press Button 7/8 to navigate to the desired Plug–in slot. The name of the selected Plug–in appears in the field between the left and right arrows under Button 7 and 8. If there are no Plug–ins in the channel this will read (NONE).
Now you need to load a Sampler into the selected Plug–in slot:
1. Press SHIFT + BROWSE to open the Plug–in Browser and browse for the Sampler Plug–In
2. On the left display, use Knob 1 to select TYPE to INTERNAL. The right display shows the list of available Plug–ins in this sub–category.
3. Make sure that you have selected the first Plug–in slot of a Sound, and use Knob 2 to select the SUBTYPE to INSTR (Instruments)
4. Turn the Control encoder (or Knob 5) to select Sampler from the list in the right hand window.
5. When you have found the Sampler Plug–in, press Button 8 to load it.
 With the sampler Plug–in loaded we can now access Sample Mode which gives you access to all the functions you would expect to find in an sampler.
1. With your controller in Control mode, press the pad of the desired Sound to put it under focus.
2. Press SAMPLING to enter Sampling mode and access the Sample content of the focused Sound:
3. Press Button 1–4 to select the desired page:
• The Record page allows you to record new Samples.
• The Edit page allows you to apply destructive edits to existing Samples.
• The Slice page allows you to create Slices from your existing Samples.
• The Zone page allows you to assign your Samples to particular note and velocity ranges (called Zones) in your Sound and to adjust various playback settings for each Zone individually
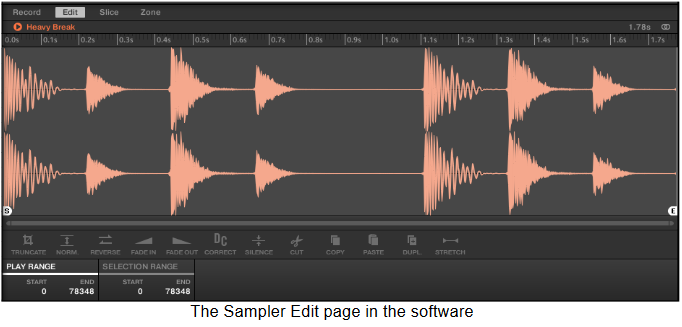
1. Drag and drop an audio file (aif or wav) into the Edit page from the Files tab in the Browser.
2. In the Record page you can record your own samples directly into Maschine from either an external source or internally from Maschine itself (resampling).
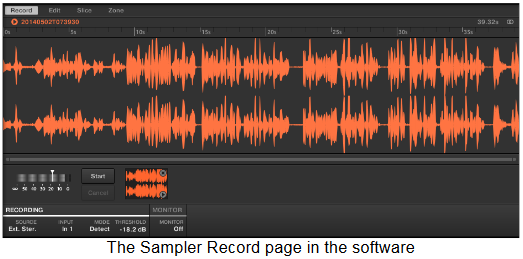
To record a sample in the Record page you first need to select a source using the Source Selector
• If you select Internal, you can specify which Group or Sound you wish to record.
• If you select External you can choose one of Maschine’s four external inputs.

Once you have your input source selected there are then two ways of triggering the recording.
• Sync: If Sync is selected, you can synchronize the recording function to the sequencer, so that the recording starts in sync with the sequencer after you clicked Start.
• Detect: If Detect is selected, you can set a certain threshold using the THRESHOLD control on the right. After you clicked Start, the input signal level exceeding this threshold will start the recording. You can then manually stop the recording by clicking Stop. This is useful to record a singer or an instrumentalist, for example. You can also adjust
the threshold by dragging the slider that appears on the horizontal input level meters above the RECORDING section.
With the sample recorded into Maschine, we can now manipulate and edit it exactly as we want, but more of this next week………..
