REAKTOR PART 1
1. Introducing Reaktor
So this week we move on to Reaktor, possibly one of the most complex tools for music making you can come across. Reaktor is like a Lego box, full of blocks that you can use to build anything you want, whether it’s a synthesiser, effects device or loop playback device. It is capable of creating sounds that are almost impossible to create on other tools and is a source of truly unique textures for your productions.
To kick things off gently we’ll be starting with a guided tour through some of the ready made Instruments and effects available ‘out of the box’ The format of the lesson will be different to normal too, with short demonstrations followed by hands on practical sessions. These ‘tour’ Ensembles are built by professionals with years of experience so don’t be daunted by the scale and complexity of some of these, you wont be expected to build something this complicated yourselves next week when we get building!
Reaktor can be run Standalone or as an Instrument/FX within your Host sequencer. We’ll be working with it initially in Standalone mode – it’s actually less stress on the computer and also clearer to see what is happening on screen. Reaktor has many windows and having more ‘real estate’ on screen definitely helps.
Ensembles and Instruments
Remember the Kontakt lesson where we had a Multi-Instrument that contained several Instruments? Well Reaktor is similar in that an Ensemble can contain Instruments too. The Ensemble is like a container for various elements which although they could be anything from a synthesiser to an effects unit they are all classed as Instruments.
REAKTOR 5 includes an impressive library of ready-to-play Ensembles and Instruments. You can get started with these very easily, and without having to dive into REAKTOR 5’s deep editing possibilities.


Loading from the Browser Tab
 By default the browser tab will be open in the Side panel on the left hand side of the display but if it isn’t you can select it by selecting the Show Browser entry in the View menu. Hitting F5 will also open the browser, as will clicking the magnifying glass in the Ensemble header.
- To open an Ensemble you can navigate to the relevant folder in upper window of the browser tab and then double-click the Ensemble in the lower window.
- Alternatively you can drag and drop the Ensemble into the main window.
Loading via the File Menu
1. Click on the File button (or click the drop down tab)then select Open… from the drop-down menu.

2. Navigate to where you installed the REAKTOR 5 content library, then double-click on a file you want to load.
Auditioning Ensembles
In order to listen to the sounds of the Ensembles, it is sometimes necessary to;
- Run the internal clock (Press play on the Ensemble header). This is especially true for sequenced Ensembles.
- Play some notes on either the MIDI keyboard or the QWERTY computer keyboard. Check for a blue light next to MIDI on the Ensemble header, when pressing a key.
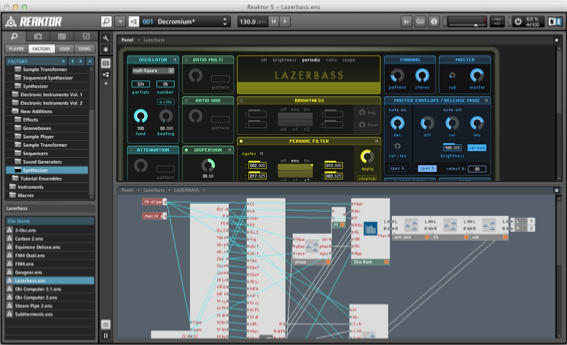
REAKTOR offers two places of work, the Structure and the Panel.
To access the Structure window you will need to make sure that the StructureEdit button is on.
![]()
The Structure Window
REAKTOR’s might is based upon the possibility wire smaller parts together to form a greater whole. The wiring is done in the Structure window. The level for wiring Instruments is the Ensemble level. In the Ensemble level only Instruments can be patched together.

In deeper structure levels Macros as well as Modules are wired together. We’ll be looking at this in detail next week.

The Panel Window
The actual knobs, faders and other controls of an Ensemble or Instrument are adjustable in the Panel view.

Saving your presets (Snapshots)
If you play around with parameters in Reaktor and come up with something sounding cool you will no doubt want to save it. Reaktor has an interesting solution to saving parameters and settings and where in the past you might have heard of patches or presets here we have something called ‘Snapshots’ Now this can potentially get confusing as in the case of some Ensembles that contain several Instruments each Instrument will have its own set of snapshots.
- Open the Snapshots tab in the Side panel.

- The Snapshots window is used for managing (saving, renaming, deleting, etc.) snapshots, which are like the “patches”, “presets” or “programs” found in other programmable synthesizers. Make sure you have the Correct Instrument selected in the dropdown.
- Click the Append button twice (the first click lights the button, the second un-lights it) to save your current sound settings to the first empty slot in the snapshots list.
- REAKTOR gives your new snapshot a default name. To rename it, double-click on the current name, type your new name, and press the Enter key.

The Player/Recorder Bar
This holds the File Player and File Recorder, which allow you to playback and record files respectively. You can see the Player to the left and the Recorder to the right. Note the ‘tape’ icon is lit which reveals the bar.
View Menu > Show Player/Recorder Bar (F10) – this shows or hides the Player/Recorder Bar

(The player/recorder bar)
The File Player enables you to route the Audio signal from an audio file (*.wav, *.aif, *.aiff) into your Reaktor Structure. You can load an audio file in the following ways:
- Double-click an audio file open in the browser tab. This will open the bar, load the file and automatically start playback.
- Drag and drop an audio file into the text field of the File player. You also do this from the desktop
- Press the Auto button to activate Auto mode. Single-clicking any audio file in the Browser will load

With the File Recorder you can record the output of any Ensemble to an audio file. Now this is handy for those times when you are experimenting and want to capture the sound that is being created through Reaktor without having to have another program running. The File Recorder creates a single audio file of whatever you create at a chosen location on your Hard Drive.

The controls to the right of the Recorder’s text field are used for file location, creating a new file and various settings as to how the Recorder can be started and stopped (Manual, Clock-sync, Key press)
To the left of the text field are the Recorders transport controls. To record an audio file:
1. Press the Record button; the File Recorder enters ready mode and the text field changes to a timer. Note that the file won’t record until…
2. Press the Play button, file starts recording and the timer increases.
3. To stop the Recorder, press the Stop button.
The great thing about the File Recording is that it won’t stop recording if you change Ensembles; it just keeps working in the background. Be careful though as it’s possible to record a massive amount of audio in a short amount of time if you forget about it!
Now we’ll look at the true power of Reaktor by taking a tour through some of the more interesting Ensembles in the Library and Electronic Instrument Part 2 Add-on packs.
LimeLite (Electronic Instruments Part 2 Library)
This is a wicked little drum machine that offers some great tools for twisting up the beats that you program.
Limelite’s sound shaping possibilities are vast and complex, as reflected by the number of controls on the panel. However, those wishing to start programming beats straight away will need to know a few essentials:
- All samplers and FX units can be quickly enabled or bypassed by clicking on the panel label at the top of each section. When bypassed, the label will appear faded. Click again to enable the section.
- The sequencer section contains 3 windows, the top one simply shows the current beat position – this is your grid. The middle window is for programming the main rhythm, (composed of a kick, snare and hi-hat) – simply click the mouse in this window to toggle hits on or off, and to toggle hit accent, click and hold the mouse button until the hit changes size.
- The lower window is for editing 3 additional sequences – the Pod and Tie samplers, and a multi-purpose, freely-routable modulation sequence (Mod). To select which of the 3 sequences to edit, click the mouse on the appropriate label next to the window
Limelight’s panel can essentially be separated into 4 areas:
- The Sequencer and Remix sections are where the basic drum pattern
is programmed.
- The Out section in the upper right, which allows final adjustment of the overall sound.
- The middle row of the panel, which houses the 5 samplers. Kick, Snare and Hat carry the basic groove, which is then complimented by the two additional samplers – the Tie and Pod.
- The bottom row of the panel, which contains a variety of FX processors.
Sequencer section – main window
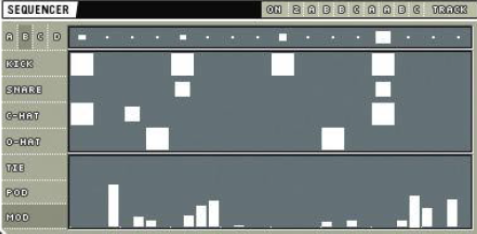
The main window in the sequencer section is where the basic beat is programmed (kick, snare and hat). Click the mouse inside this area to toggle hits on or off. To toggle between normal and accented (i.e. louder) hits, click and hold the mouse button.
Pattern sequencer
- The main sequencer window has 4 patterns – A, B, C and D.
- When Track is enabled, the main window will always follow and display
the current pattern (A, B, C or D) being played.
- To select which to edit, click on the desired pattern in the top-left of the sequencer area.
- Patterns A, B, C and D can be arranged in any order by using the pattern sequencer, (at the top-right of the sequencer section). Enable the pattern sequencer by clicking on the on/off button, and click and drag on the adjacent number to set the sequence length, (2 to 8 bars). Finally, click and drag on the 8 pattern letters to define the pattern arrangement.
- The Copy and Paste buttons allow any of the 4 patterns to be copied and pasted, either within or between snapshots. To clear the current pattern, click Paste while simultaneously holding a MIDI note.
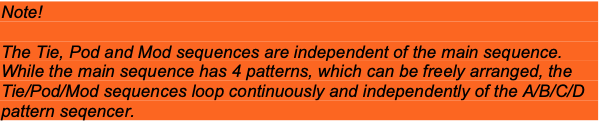
Tie, Pod and Mod
- The Tie, Pod and Mod sequences can be edited in the lower window. To select which of the 3 sequences to edit, click on the label to the left of the window. To reset a sequence, click on the label while simultaneously pressing any MIDI note.
- Note that unlike the Tie and Mod sequences, the Pod sequence is bi- polar. Both negative and positive values can be entered, for +/- pitch transposition for example. When editing the pod sequence, double- clicking the mouse results in a centre (zero) value. This will trigger the sample but yield no velocity modulation.
Remix section – length controls
- This remix section contains a variety of patterns for defining and rearranging the main and Tie/Pod/Mod sequencers.
- The length of the main pattern, and the Tie/Pod/Mod patterns can be set using the controls at the bottom of the section (labelled Len,
- Tie, Pod and Mod). The start position can be edited with the value beneath the Len knob.
- The 3 buttons beneath the Tie, Pod and Mod length knobs stretch the Tie/Pod/Mod sequences to fit the length of the main sequence. So for example, if the main sequence is 16 steps long, and the Pod sequence is 32 steps with stretch is enabled, the Pod sequence will run twice as fast as the main sequence. Similarly, if Pod length is 8, it would run at half the speed of the main sequence.
Pattern remixing
- Typically drummers repeat a basic sequence with a variation on the 4th or 8th bar, for example. The remix sections allow this style of play to be emulated without the need for manually programming the variation pattern.
- The Remix knob selects a pattern from the 127 pre-programmed variations. The rate of the variation pattern (i.e. every other bar, every 4th bar, every 8th bar etc) can then be set with the remix frequency knob (top-right)
- When the Now! button is enabled, the remix frequency knob is overridden, and the remixed pattern will play continuously. This is especially useful for when browsing through the 127 patterns with the Remix knob.
- <Shift> varies the remix pattern in one of two ways. Positive values shift the output position of the remix patterns, whereas negative values shift the start position of the remix patterns. Thus, bearing in mind that all remix patterns are 16 steps in length, consider the example of pattern one (1,2,3,4,5,6,7,8,9,10,1,2,3,4,5,6). A shift value of 1 will increment all steps (resulting in 2,3,4,5,6,7,8,9,10,11,2,3,4,5,6,7). A shift value of -1 will rotate all steps, so that step 16 is rotated back to the first step, (resulting in 6,1,2,3,4,5,6,7,8,9,10,1,2,3,4,5).
Remix – Swing, 1⁄2 tempo and accent controls
- Swing determines the extent to which a humanizing, shuffling algorithm is imposed onto the beat. The algorithm effectively swings time forwards and back again on alternating steps.
- The 1 / 2 button halves the tempo (e.g. 120 becomes 60).
Out
- The controls in this section influence the overall master output of Limelite. Gain controls master volume, and Pitch defines global tuning (+/- 12 semitones).
- Dirt controls a distortion algorithm, while Norm enables a volume maximising algorithm. For the volume maximiser, Amp defines the maximum amount of volume maximisation, Rel determines the release time of a peak detector and Sm determines the amount of slew (the speed) of shifts in gain. Loud, but harsh sounds will be obtained with high gain (full-right) and fast Rel and Sm settings (hard-left). Better results will usually be obtained with more modest settings
Ext and FX buttons
- Ext allows external input to be fed into the Pulp unit and FX processors. (Note that external input is always routed to Pulp if Pulp input is set to Ext, regardless of the global Ext button).
- The FX switch disables the samplers, so that Limelite can be used solely as an FX unit, with lower CPU demand. (Note that the FX switch overrides the Ext switch setting – in that external input will always be enabled).
The Samplers
Several controls are common to all samplers:
- Gain and Pan determine mix volume and panning respectively.
- Acc determines the range between lo and hi accented hits. Higher values result in greater differentiation.
- While the Solo buttons deactivates other samplers for solo auditioning, each sampler can also be muted individually by clicking on the section label.
- Wav selects the sample (each sampler has 128 samples) and Tune defines pitch transposition.
- Cut and Res define filter cutoff and resonance respectively. Select the filter type with the LP / BP / HP knobs (for low-pass, band-pass and high-pass respectively).
Kick and Snare
The Kick and Snare share identical controls, with the exception of the filters. The kick has a lowpass filter and an optional low cut button to remove low frequencies. The Snare features a filter which can operate in either lowpass, bandpass or highpass mode (the knob next to cut selects which mode).
- St defines sample start position; H and D determine the hold and release time of the envelope respectively.
- Sat determines the amount of saturation distortion, and the Shp knob controls a sound shaper that can either ‘thin’ (left) or ‘fatten’ (right) samples. Sm controls the amount of smoothing (effectively the attack and release time of gain changes). High settings produce less undesirable artefacts at the expense of decreased sound shaping.
- Mod routes the mod sequence to one of several parameters in the section – Wav (wav selection), P (pitch), D (decay time), or Cut (filter cutoff). The Snare mod menu also includes an entry for Flam time.
Hat
The Hat unit contains 2 samplers, one for open and one for closed hat samples. Thus, there are 2 decay times – CD (closed decay) and OD (open decay).
- When Link is enabled, the 2 samplers operate monophonically, in that triggering one will terminate the other – thus emulating a real hi-hat on an acoustic drum kit.
- The Mod menu is the same as with Kick and Snare.
Tie
- Port determines portamento speed, and A defines envelope attack time. FM sets frequency modulation depth, and MP defines the pitch of the FM modulator oscillator. The sample can be mixed with white noise using the Noise knob.
- The Vel (velocity) menu selects the modulation destination for velocity. Velocity can be routed to amplitude by adjusting the V>A knob (hard- left modulation, hard-right for full modulation).
- Zap controls FM depth, but unlike the Tie, the FM source is not an oscillator but a decay envelope.
Pulp and FX
- Pulp is a signal generator that transforms the input signal (selectable by the central knob) into a percussive-type output. First the pitch and amplitude of the incoming signal are detected. The pitch range is clipped with the Lo and Hi knobs, transposed by Tune and slewed by Port. Amplitude is detected by a peak detector, controllable by the D (decay) knob.
- The detected pitch is then routed to a sine oscillator and the filter cutoff of a noise generator. The Osc knob fades between the sine oscillator (hard-left), the input signal (centre) and the noise generator (hard- right).
- Finally, the output is fed into a comb filter. FB determines the amount of feedback, Freq determines the delay time, FM the delay time modulation amount (signal amplitude being the modulation source), and Cut defines the lowpass cutoff of the comb filter. Comb cross- fades between oscillator output (hard-left) and the comb filter output (hard-right).
XFX overview
The XFX section contains a bank of 22 effects, and a recordable XY pad with which to automate the 2 parameters of each effect. Some of the 22 effects also have a non-automatable 3rd parameter, which can be set using the slider bar beneath the XY panel. Press Play to enable automation playback, and while Rec is enabled, hold the mouse button and move the mouse to write to the automation sequence. The XY automation is stored in 2 x 64 data points, and Sm toggles between stepped or smoothed interpolation between each point. Spd determines automation speed and Len automation length. When Spd is centred and Len is set to hardright, the automation length will last for exactly 4 times the kick/snare/hat sequence length.
- Dly defines the input signal into the XFX section. At hard-left, the input signal comes direct from the Samplers + Pulp unit. At hardright, the input signal is the Delay unit output. When Dly is centred, the XFX input is a 50/50 mix of the two. Correspondingly, the Dly knob also determines the amount to which the delay section output is sent to the Mix (fx mixer) section. At hard-left, both xfx and delay output are sent to the fx mixer, but at hard-right, only the xfx output is sent to the mix. Thus, in other words, the Dly knob also cross-fades between xfx+delay parallel mixing and dly>xfx serial mixing.
- Lo and hi can be used to attenuate low and hi frequency elements of the xfx output. Set both to hard-right for no attenuation.
- Gain determines the overall output level.
Delay
- The delay section is a stereo tempo-synced delay unit, with independent delay times for the left and right channels. One and Two set the time (in 16th ticks) for the two channels, FB determines the amount of feedback, and Gain the overall output level.
- LFO controls the speed of a beat-synced LFO, set to hard-left for a cycle time of 4 bars, and hard-right for a cycle time of a 16th tick. FM determines the amount of cutoff modulation via the LFO, whereas DM the amount of delay time modulation.
- Width controls the amount of stereo separation.
- Cut and Res define the cutoff frequency and resonance of a postdelay
LP filter. Lo enables damping of pre-delay low frequencies.
Mix
- FX Mix cross-fades between the dry signal (pre XFX and delay) and the wet signal (post XFX and delay).
- When the Input button is enabled, the mod sequence determines the input level to the XFX and delay. Clicking on the meter below the input button toggles between proportional or binary (i.e. on/off) modulation.
- When Mix is enabled, mod is routed to the fx mix cross-fade position (as a proportion of the current fx mix knob position, i.e. if mod = 1 then fx mix will equal the actual fx mix knob position). Clicking on the meter below the input button toggles between proportional or binary (i.e. on/off) modulation.
EQ
- The Eq unit allows for boosting/attention of HI, Mid and Lo frequencies. Set each knob to centre for no charge. The >_< knob shifts the frequency of the 3 bands
- Amp determines the amount of drive into a saturator distortion unit.
Filter
- Cut defines the cutoff frequency of a 12db lowpass filter.
- Trk determines the amount to which an envelope follower modulates the cutoff frequency, and Sm determines the smoothness of the envelope follower. The mod sequence can be routed to cutoff via the Mod knob.
Magic
- Magic features a notch filter and a granular-pitch shifter. ::: defines the notch filter cutoff, and the large slider at the bottom of the section controls the amount of pitch shifting (centre for no shifting). Gr sets the pitch-shifter grain size. Mod and Rmx define the amount to which the mod sequence and the pattern remix position modulate the pitch shifter respectively. Mix cross-fades between the dry and wet signals.
LimeLite MIDI / English Qwerty keyboard shortcuts

3. Junatik (Classic Library)
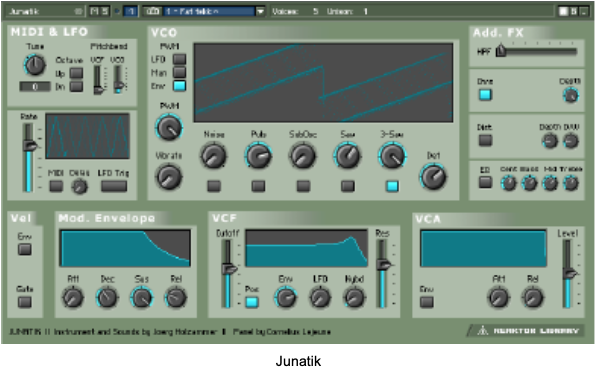
This Reaktor Ensemble is loosely based on the Roland Juno synths of old. The Juno synth was used by many people to create the ‘Hoover’ sound popular in everything from Hard Dance to Drum and Bass. Head on over to the Snapshot called ‘Big Tune’ and Rotate the Env button fully left to turn the filter envelope off, right click on Filter Cutoff > Midi Learn and rotate a controller and you’re a few stops away from a monster bassline. This sound was possible because of the ability of the Juno to create 3 Sawtooth waves that could each be detuned slightly out of pitch – you’ll find that feature handily on the Junatik.
From the previous lessons on subtractive synthesis this synth shouldn’t be too difficult to work out but spend some time familiarising yourself with it. We’ll be looking at building a more simplified 3-oscillator synth next week when we look at creating our own custom instruments in Reaktor so you’ll get another chance to understand synthesis further. Remember that Synthesis as a discipline needs time and effort to understand, the theory alone is not enough so make sure you put plenty of practice in.
4. Random Step Shifter (New Additions Library)
If you’ve ever fancied doing some of those rapid chops and edits to a break without having to spend hours on the job then this is a fantastically quick and inspiring Ensemble to use to spice up your beats.

Random step shifter uses intelligent pseudo-random principles to cut-up and rearrange sample loops, on-beat, in real-time. There’s an intuitive three-part sequencer that triggers sample playback. It can also switch the loops you want to play from a list, move the positional offset, and modulate playback pitch. In addition, these modulations can be mangled by various pseudo- random sequences. You can load in any loop, just keep in mind that you need to cut the loops accurately so that they play correctly when they are looped over their entire length.
SQ2

The Random step shifter contains a simple step-sequencer. It consists of three separate parts, the [Select], [Offset], and [Pitch] sequencers. Each of the parts has two tracks – the trigger track at the bottom of the sequencer, and the modulation track above. The trigger tracks can be used independently from the modulation tracks but you can’t modulate without a trigger. In other words, you can trigger the envelope without sending any modulations, but not vice- versa. In the [Envelope] section you can choose which of the three trigger tracks is used for starting the envelope.
The trigger events of the [Offset] track can also be used to reset sample offset. The modulation tracks can be used to modulate the sample player’s main parameters. These are the [Select] parameter for sample selection, the [Offset] parameter for controlling the start position in the currently selected sample, and the [Pitch] parameter controlling pitch of sample playback.
Loop bar: The bar above the sequencer grid represents the sequencer’s loop region. Right-click (ctrl-click for Mac users) to set length. Left-click and drag to move.
Modulation tracks: Click on the grid to create modulation events. Drag the mouse up or down to set the level. These events are wired to the [Sample select], [Sample offset], and [Pitch] modules, respectively. They can be used to modulate the parameters of the respective modules in a controlled or randomly varied way. These parameters are sample selection, sample offset, and pitch of playback. Right-click (ctrl-click if you’re on a Mac) to delete the event, along with its trigger event. You will automatically create [Trigger] steps associated with the modulation events. See [Trigger tracks] for more information. Drag the modulation bar completely down to have a trigger event without modulation output. The three tracks can be selected with three buttons below the sequencer ([Select], [Offset], and [Pitch]).
Trigger track: Click to create events that trigger the [Envelope]. Drag down the corresponding modulation event to zero if you want a sole trigger without modulation. All three trigger tracks can be used to start the envelope. Use the respective buttons in the [Envelope] section to choose which track will do it. Furthermore, the [Offset] trigger track can reset the sample offset if the [Seq] button in the [Sample offset] section is active.
Select/Offset/Pitch: These buttons switch the view to show the three tracks of the sequencer. The modulation part of the [Select] track is wired to the [Sample Select] module, the modulation part of the [Offset] track is wired to the [Sample Offset] module and the modulation parts of the [Pitch] track is wired to the [Pitch] module.
Copy: Copies the current loop region into the clipboard.
Paste: Pastes the pattern clipboard into the current pattern.
Rand: Randomizes the current loop region.
Clear: Randomizes the current loop region.
Zoom Level (16 st, 32 st, 64 st) : Click and drag mouse up or down to zoom in and out of the currently displayed pattern.
Clock divider (1/6, 1/8, 1/12, 1/16, 1/24, 1/32): Choose between different clock divisions. This speeds up or slows down the pattern but retains a metric relationship to the original speed. You get original speed with the 1/16 setting.
Run: Starts and stops the sequencer.
Sampler

At the heart of the Randomstepshifter lies the sample player. All you need is a cleanly edited 1, 2, 3 or 4 bar loop – just load it into the sample map and the patch will rearrange them. You are free to use the modulation events from the three [Sequencer] tracks to control the parameters for [Sample select], [Sample offset] and [Pitch], or to let these three parameters be randomly varied. Activate random mode (the [Rnd] buttons) and adjust the three [RAND] knobs to get different pseudo-random results. Try moving the [QNTZ] knob in the [Sample offset] module while the sequencer runs for interesting dynamic sample cut-up in real-time. Please make sure that all samples in the sample map have a transposition value of 0.
Sample Select
Rand: This knob selects one of the pseudo-random sequences. Each incoming value from the modulation track is transformed in a pseudo-random way.
Seq / Rnd / Off: These three buttons switch the modulation modes for the [Select] parameter. Choose between direct modulation by the modulation track, random variation based on the modulation track, and no modulation.
Select: Sets the base for sample selection via the modulation track. This is the sample that gets played when [MOD] is inactive.
First: Defines the start point of the range for sample selection in the sample map.
Sets the end point of the range for sample selection in the sample map.
Last: This knob selects one of the pseudo-random sequences. Each incoming value from the modulation track is transformed in pseudo-random way.
Sample Offset
Rand: These three buttons switch the modulation modes for the [Offset]] parameter. Choose between direct modulation by the modulation track, random variation based on the modulation track, and no modulation.
Seq/ Rnd/ Off: Switches the modulation input from the sequencer on for the [Sample offset] module.
Offset
MOD: Sets the base offset in the sample. This is the offset that is applied when [MOD] is inactive.
5. Fast FX (Electronic Instruments Part 2 Library)

Fast FX is a set of 6 different effects: Freeze, zZZzZ, Slicemanipulator, Gate, Delay and Filter. These effects can be chained in a variety of ways offering a large range of sound design possibilities. However, Fast FX’s speciality is live performance. Not only are all controls designed to be tweaked in real-time, but Fast FX features a special custom ‘live’ snapshot system – enabling any of the 256 states to be instantly recalled via simple keyboard strokes. This ability to instantly switch between sets is what really brings Fast FX to life.
The most important thing to note is that Fast FX does not use the standard Reaktor snapshot system. Instead it uses a special 256-slot system operated by the panel and computer / MIDI keystrokes. The 256 snapshots are made up of 32 x 8 slot banks. Select bank by the using the 32-step Program Selector slider at the bottom of the panel, and select the slot by using the QWERTUI Selector above.
When Flow is enabled, selecting a new bank or slot automatically loads the preset. Press Write to save the current ensemble state to the selected bank/slot. Fast FX is supplied with a Loop-player for a useful sound source in Reaktor standalone mode, but it can also process live input (e.g. when used as a plug-in in a host sequencer.) The Loopplayer input is selected by default, but to enable the Live input press the In 1/2 button in the Input section. Fast FX will now process the audio input from Reaktor audio-in channels 1and 2.
Global controls
- Input Fast FX has two pairs of stereo inputs. The first pair of inputs are connected to the Loop player instrument, whereas the second pair are connected to Reaktor’s audio-in ports. Enable the 1/2 button to select the second pair (i.e. for use with live audio input, or when using Fast FX as a plug-in inside a host application).
- Level and Mute control the input level.
- Junction: This section allows configuration of the signal flow order between the 6 effects. Eight possibilities are available in the drop-down menu.
- Output: Level and Mute control the output level. All effects can be bypassed simultaneously with the Bypass button.
- Mix: The mix section controls the overall mix between the dry input signal and the wet, post FX signal. The mix is defined separately for low and high frequencies with the Low and High knobs. Link synchronises the two knobs
Freeze
 The Freeze effect makes looping and scratching sounds.
- Loop sets the loop length in musical time, from 1/16th to 4/1 (1 bar = 16/16th’s)
- Spin determines how the loop length changes when the effect is enabled. A setting of 1/32 will result in a loop length that is 32 times shorter, a setting of 32/1 will result in a loop length 32 times longer.
- Spin Time determines the speed of loop length changing, and Jtr sets the delay time jitter – the amount of slow, random variation.
zZzzZZ

This effect slices incoming sound into grains, and then slides the pitch, so that the pitch of each successive grain is either decreasing or falling compared to the previous.
- Slice A and Slice B set the length of first and second slices respectively, in 16th steps.
- Length sets the grain length in milliseconds. Below, the knob labelled Mod sets the amount of grain length modulation. – Slide+ controls pitch slide, and the Mod knob below determines the amount of pitch modulation. For both Length and Pitch modulation, a collection of pseudorandom, MIDI clock synchronised patterns are used as the modulation source. The Rnd XY field is used to select the current pseudo-random pattern (each pixel represents one of the 1920 available patterns).
- Asym sets the grain size asymmetry between the left and right channels.
- Decay controls the dry signal decay time, the envelope is retriggered with each new slice (i.e. at intervals according to the Slice A and Slice B controls).
Slice Manipulator
This effect also slices the incoming sound, and then shifts the position and playback direction of the slices.
 Slice A and Slice B set the length of first and second slices respectively, in 16th steps. The two slicers work on a rotating basis, so therefore the slice lengths alternate between the two settings.
- The SncVar enables a mathematical formula to automatically rearrange and vary the slices in time. Set to zero for no variation.
- Rev A and Rev B enable reverse playback of the first and second slices.
Gate
 This section features a 16-step sequencer that modulates the amplitude of the incoming signal. The horizontal slider above the sequencer display selects one of the 20 available patterns for the sequencer, and the lower horizontal slider sets the sequencer clock speed. The preset sequence can be varied by reducing the loop length with the Length knob, or by varying the playback position with the PosVar knob. This control applies one of 16 variation patterns to the sequence playback order.
- Gate determines the length of the open gate, as a proportion of a sequencer step.
- Release sets the time the gate takes to close.
Delay

The section features a stereo delay line with a modulated filter in the feedback path.
-
- Delay sets the delay time in 16th steps, Fbck sets the feedback amount and Asym sets the delay time asymmetry between the left and right channels.
- Filter sets the centre frequency of the feedback filter. The cutoff is also modulated a beat-synced LFO, controlled by the central XY field and Speed knob. The XY X axis sets the LFO phase; the Y axis sets the modulation depth; and the Speed knob sets the speed cycles per bar).
- Smth controls the speed that delay time changes (from the Delay / Asym knobs) are applied, and also the crossfade speed of enabling/disabling the effect.
Filter
This section features a sequenced filter. The horizontal slider above the sequencer display selects one of the 20 available patterns for the sequencer, and the lower horizontal slider sets the sequencer clock speed. Length sets the loop length of the sequencer. Mod defines how much the extent to which the sequencer modulates the filter cutoff.
- Center and Reso set the filter cutoff and resonance respectively
- Width sets the filter width.
- Smth controls the speed that of changes to the cutoff frequency (from the sequencer or the Center knob).
Snapshot Control

QWERTYUI
In Fast FX, the Reaktor snapshot menu is not used for handling snapshots. Instead, with live performance in mind, the snapshot handling is dealt with on the panel.
- Fast FX has a total of 256 snapshot slots, represented by 32 x 8 slot programs. The 32 programs are selectable by the Program Selector at the bottom of the panel. Either click on the selector itself, use the Prev and Next buttons, or press computer keys ‘L’ or ‘;’
- Within each program, the 8 sub-slots are selectable by the QWERTUI Selector. To select a slot, click on the selector, or press the associated computer keyboard key (i.e. Q,W,E,R,T,Y,U,I) or MIDI note (60,62,64,65,67,69,71,72).
- The total 256 slot data is stored in a large event table inside the structure. If you wish to export snapshot files, simply save the table data by right clicking on the table display either beneath the QWERTYUI selector or the Program Selector.
Bookmark
The bookmark feature enables you to store your favourite presets numbers and quickly access them by using the dropdown menu.
To set a bookmark to the current state, take a look at the POSITION display, then open the Bookmark list properties, and create an entry there with a name of your choice, and the value displayed in the position meter.
Flow and Write
When Flow is enabled, selecting a snapshot position (via either the QWERTUI or Program selector) automatically recalls the data. Disable this if you want to copy the current state to another slot (i.e. disable Flow, select the desired Slot and then press Write) Write writes the ensemble state to the current bank and QWERTUI slot.
Looplayer

This is an additional instrument for playing loops, it uses the Reaktor Beatloop module, and automatically stretches loops to the current tempo.
You can drop samples on the sampler window, or double click on it to open the Reaktor map editor. Transpose should be set to 0 for all samples
Select the desired sample from the map using the Select knob. Loop Lng and Offset and define the loop length, and position offset in 16th steps respectively. Pitch transposes the sample in semitones.
The Loopplayer has 16 different automatic variation patterns; these can be selected with the Pos Variator knob.
- Center and Reso set the filter cutoff and resonance respectively, and Width sets the filter width. The filter can be bypassed by pressing the Bps switch.
- Rnd Mrph determines the amount to which a slow randomiser is applied to the filter cutoff.
- Fit links sample pitch with time stretching, like a conventional sampler (i.e. the slower the tempo, the lower the pitch).
- Smooth controls the sampler grain smoothness, and Gain determines the output level.
Snapshot handling
The Loopplayer state is not saved in the Fast FX snapshot table, but pressing the Write creates a snapshot in the Loopplayer instrument. Programs 1 to 16 are stored in bank 1 and programs 16 to 32 are stored in bank2. These are recalled when recalling snapshots on the Fast FX panel.
