PRO_Ss_13-19/84 Subtractive Synthesis
Before software instruments, a musician would save up a lot of cash to buy a particular synth/sound module (old classics like the Moog, TB303 or more recently Virus, Nord Lead, etc.). This meant that they would spend a lot of time exploring every single fader and function on that particular keyboard, tweaking every single sound on this one unit until it became a very personalized piece of equipment i.e. you designed and created sounds that you like and replaced nearly all the sounds that the manufacturers had given you.
Nowadays the abundance of Virtual Instruments means that a lot of people spend their time collecting synthesiser plug-ins without really knowing what they contain. They end up using a couple of presets and that’s it. Keeping your set up simple at first and knowing how all the individual elements work will lead to you being far more creative.
A basic knowledge of synthesis can really help you shape your own sounds from simply modifying an existing preset to creating your own sounds from scratch. It is an essential tool for making electronic music.
In this lesson we will discuss the concept of subtractive synthesis, which is the most widely used method when producing music. After this lesson you will understand the basic concept of subtractive synthesis including the main three components of and analog’ synth (oscillator, filter, envelope). You will be able to personalise existing sounds to your needs, as well as creating new basic sounds from scratch.
What Is A Synthesiser?
A synthesiser is an electronic musical instrument. We can illustrate the difference between electronic instruments and acoustic instruments with a few examples:
Acoustic instruments are all mechanical – something must be moving or resonating for sounds to be created.
- A snare drum creates a sound when hitting the skin, the drum shell amplifying the sound
- An acoustic guitar makes a sound as the player ‘strums’ or ‘picks’ the strings, the large hollow body resonates the sounds.
Synthesiser as used in music, is a term used to describe a device capable of generating and/or manipulating electronic signals for use in music creation.
Synthesisers as opposed to acoustic instruments don’t create ‘direct’ sounds, but only electric signals. Without speakers or headphones attached to the synthesiser, it will not produce any sound. This is pretty much how your CD or Mp3 player works, they don’t make direct sounds either, only electric signals that are turned into sounds by your speakers or your headphones.
Synthesisers are usually equipped with a piano style keyboard which is by far the most popular input devices, but the user can also choose to use other input devices such as mouthpieces, guitar-like devices, drum pads, and of course, sequencers.
Modern synthesisers are great ‘all round’ instruments as they can be made to imitate any other instrument – from wind instruments to drums.
However, another aspect of the synthesiser that we tend to maybe forget nowadays, is its possibility to create completely new and original sounds, whether you want to create ‘phat’ bass sounds, lead and pads sounds or ‘weird’ abstract noises. But in order to do that, you will need some basic knowledge in audio synthesis.
The complete study of audio synthesis is a science that involves electronic, physics, acoustic knowledge and more. However we will only look at synthesis from the musician point of view. The aim of the next two lessons is to give you a basic knowledge in ‘analog’ synthesis, to help you manipulate and create sounds with some of the virtual sound modules available in Logic
Analog VS Digital
Because of the technology they used to generate sounds (Voltage controlled), one of the characteristics of analog synths was that they were not very reliable as their tuning was quite unstable (especially on earlier model), they often needed a long warm-up period and they could quickly drift slightly out of tune.
As technology advanced into the digital domain, synthesiser manufacturers began to use the new digital technology in their new designs. Pretty soon microprocessor controlled digital circuits replaced the “voltage controlled” analog circuits. The Juno 106 by Roland was an analog synth, but the oscillator was controlled digitally, making the tuning far more stable while retaining the warm sound of analog filters.
The Juno 106 by Roland, one of the last synthesisers to have sliders or knobs on its front panel, it is one of the simplest and intuitive synths to program. It also features a good MIDI implementation.
One of the most popular digital synths of the 80s was the DX7 from Yamaha, released in 1983. It featured a whole new type of synthesis called FM (Frequency Modulation). The DX-7 was entirely digital and was known for generating unique sounds, still popular to this day. The DX7 also came with MIDI, which was brand new at the time. Almost every keyboardist of the 80s bought one, making the DX-7 one of the best selling synths of all time.
Since the late 1980s most new synthesisers have been completely digital, introducing different types of synthesis and designs such as samplers for example. With the integration of MIDI and digital technology, the role of the synthesiser changed, becoming more prominent in the studio and on stage. By the late 80s, it was possible to play a full orchestration using only a few digital synths and a sequencer.
Analog revival
Digital synths offered many advantages over their analog counterparts, more versatile, more stable, instant storage and recall of sounds, size, price, etc. However, in the 90s, musicians started to realize that they were missing some of the features present in the old analog synths.
One of them was that most analog synthesisers usually had all their parameters, instantly accessible from the front panel via good old-fashioned “buttons” and “sliders”. These parameters were mainly designed to program the synthesiser, but this design also allowed the player to tweak the sounds in real time while playing, thus creating special effects and evolving sounds.
If it is true that the first breed of digital synthesisers offered a whole new set of parameters to shape the sounds, thus enabling the user to create original and more complex sounds; it is also true that most early digital synths had a far less intuitive interface than their analog counterparts. The parameters were often only accessible via a menu driven operating system, and programming had to be accomplished by navigating through the various menus via buttons, a data slider and a small LCD screen. This design was not only much less user-friendly, but it also restricted the instrument’s usability in ‘live’ performance situations.
Many musicians also found that they preferred the warm, abstract timbres of the analog synthesisers before the sizzling, ultra precise and realistic instrument sounds of the more modern digital synthesisers. Additionally there was another factor that saw younger generation musicians turning back to analog: cost. In embracing the digital revolution of the 80’s a lot of musicians at the time dumped their old analog gear in favour of the new breed. This meant that old-fashioned analog gear was available at a knock down price and a new generation of musicians (being a skint but resourceful bunch) started buying analog synths from pawnshops and the like.
This generation were integral in creating the electronic sounds that gave birth to House and Techno and by the beginning of the 90’s the popularity of electronic music saw the first analog revival in full effect. Companies like Novation, Access and Nord brought new Synths to market that made use of the increase in computing power to create what became known as ‘Virtual Analog’ synthesisers.
By the Noughties, a lot of these synths started to be superseded by the ultimate in ‘Virtual Analog’ the VST plugin. For the first time you could use a computer to produce entirely in the box creating entire tracks without leaving the computer. The convenience and the lower cost of these plugins, coupled with the exorbitant prices that old analog gear had reached, meant that there was a real danger of analog fading into the background and become nothing more than a rich man’s toy.
And there was an additional problem: VST Synths were often accused of lacking character, of being ‘Soulless’ The joy of creating sounds by tweaking knobs was being lost in a sea of mouse clicks. With the possibility of 1000’s of plugins on a computer the process of making electronic music had the potential to become laborious and preset filled, but then something has happened.
In the last couple of years there has been an explosion of new and affordable analog synthesisers that have come to market. It seems like not a week goes by without a new announcement of a shiny brand new synth. Big players like Korg seem to be driving this new revolution but there many companies including Novation & Arturia piling into the sector.
Not only that, there is a renaissance happening in the modular & DIY synth worlds where boutique companies are bring out an endless wave of the wild and the wacky and you can even by your synth in bits if that’s what you’re after. It truly is a golden age!
The concept of ‘analog’ synthesis
As discussed earlier, synthesis is about the creation of sound, and the way that a sound is put together. Subtractive synthesis is essentially a three-stage process involving the same three properties, which define a ‘sound’: Pitch, Tone (or timbre) and loudness (volume).
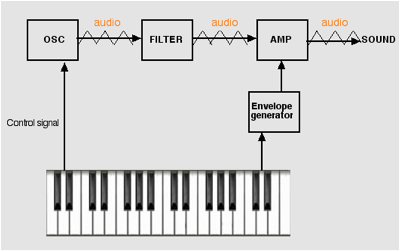
In its most basic form, subtractive synthesis is a very simple process as follows:
Oscillator: Used to generate a basic tone, the pitch (notes) is usually controlled
with a keyboard. The basic tone is fed to a filter.
Filter: is used to shape the tonal ‘colour’ of the sound i.e making the sound brighter or duller. This resultant sound is fed to an amplifier.
Amplifier: Is controlled by an envelope generator (don’t worry this will be explained!) to control the volume of the sound. i.e how quickly the sound starts when a key is pressed, how loud it stays when the key is held down, and how quickly it dies away when the key is released.
This is the essence is subtractive synthesis. You start with a raw sound (oscillator), subtract out the unwanted bits (Tone shaping) and control its loudness over time, hence the name subtractive synthesis.
The reason why Subtractive synthesis is often referred to as analog synthesis is because most analog synthesisers use this method of generating sounds.
Although most new synths and virtual instruments use digital technology, the concept stays the same, which is why we still tend to call it analog synthesis.
The Oscillator Section
What does the oscillator do?
As already mentioned in the previous section, the oscillator is the part of the synth that generates the basic raw sound.
The main oscillator usually refers to a “keyboard-controlled oscillator”, that may sound technical but it basically means is that, when you play a note on the keyboard, the oscillator will generate a cyclic waveform at that intended pitch (for as long as you hold down that note on the keyboard). If you press A3, the waveform will be generated at a rate of 440Hz (440 cycles per second).
In short, the keyboard controls the pitch of the oscillator (hence, keyboard controlled oscillator).
On a synthesiser, the oscillator is often labeled Oscillator or simply ‘OSC’, ‘VCO’, ‘DCO’, ‘Waveform’ or ‘Waveshape’.
Oscillators on early analog synths were controlled by analog voltage – VCO, which tended to make their pitch rather unstable, and sometimes drifting out of tune.
Later, analog and digital synthesisers started to use digital controlled oscillators – DCO, Digital Controlled Oscillator, which are far more stable in pitch.
Waveforms and their Spectrum
The waveform is the ‘shape’ of the output produced by the oscillator. It determines how the oscillator will sound – in particular how ‘bright’ it sounds. The brightness is actually determined by the number and type of harmonics present in the waveform. You can hear the difference between waveforms because they each have a distinct sound, which is determined by their harmonic content.
There are a number of standard waveforms such as SINE, TRIANGLE, SQUARE, SAW TOOTH & NOISE, but computer-based oscillators can generate all sorts of weird and wonderful wave shapes.
Below is a list and description of the most common sound waves found in nearly every ‘analog’ synth:
Sine Wave: A Sine wave is the most basic waveform, it has no harmonics (overtones) at all. It only has the tone of the fundamental frequency and no timbre. The Fundamental frequency is the base or root frequency, which we identify as pitch (eg “A3” would be at 440Hz). The sine wave has a very pure tone, almost flute like, this is often the waveform loaded as default in most synth when you want to create a sound from scratch. This is a great waveform for subbass & low kicks (808 like).
Triangle Wave: Sounds (and looks) a bit like the sine wave but has some hollow-sounding quiet overtones. The filter will have little effect on these waveforms (sine & triangle) as there are no harmonics to be acted upon.
Square or pulse Wave: A Square wave has very sharp corners. It has a hollow sound with quite strong overtones. It is made up of only odd numbered harmonics. On many synths, you can vary the pulse width of the wave, this is the ratio of the on part to the off part. Technically, when the ratio is 50-50, this is a square wave, but if the ratio of on / off differs, this is called a pulse wave, also known as rectangle. However most synths tend to label it either square or pulse. By increasing the pulse width, the sounds becomes brighter and richer; but as the Pulse Width becomes very narrow, it becomes more thin and nasal.
Sawtooth wave: This is a very ‘bright’ ‘fizzy’ sounding waveform (it actually contains all the odd and even harmonics of the original frequency). It is very good for trebly sounds & dramatic filter sweeps (because it is so bright, the filter has something to work on).
Noise Wave: This is isn’t a ‘tone’ at all, but a random mixture of all frequencies. It sounds like the sort of hiss you get on a radio when you’re not tuned into a station. There are two types of noise – white noise, which is truly random and pink noise, in which the lower frequencies get more emphasis (this produces a ‘heavier’ hiss). Noise is good for generating percussive sounds like snares & hi-hats, for simulating wind or sea sounds (when put through a filter modulated by an LFO).
How many oscillators?
Some synths have only one oscillator, but many synths have two or three (some have more). You can generally get a much ‘fatter’ sound with two or more oscillators and create more interesting texture. For example, you can set them an octave apart to thicken the sound, or you can detune them very slightly to produce a chorus effect. Single oscillator synths often use pulse width modulation on the square wave to produce a similar result.
Synths with one only oscillator are usually better suited for bass sounds or lead and riffs, like the classic Roland TB303 for example. For more atmospheric sounds and pads, synths with several oscillators are usually more appropriate for the job. ES 1 is a two-oscillator synth, whereas ES 2 provides three oscillators (in fact it gives you 4, but more on that later!).
Oscillator pitch
We have already discussed how oscillators are controlled by the keyboard, so that when you press the note A3, the oscillator plays an A. However, most oscillators also have a pitch/ range control, which lets you set the basic pitch of the output.
It usually works like an octave up/down control, and can vary from 16-8-4. A range set to 16 will be a lower pitch, while a range set to 4 will create a higher pitched sound. Therefore if you want a sub bass sound set your oscillator to a Sine wave and a range of 16, or for a higher pitched sound, such as a flute type sound, set your oscillator to a Sine wave with range of 4.
ES2 Oscillators
Let’s take a look at the ES2. You’ll find it has a higher quality sound than the ES1, although that doesn’t necessarily mean its always going to be the best synth for the job in hand. You’ll also notice it looks a bit more complicated than the ES1, but over the next couple of weeks you’ll become much more familiar with it and discover its creative potential!
‘Bassy or trebly’- what does it mean?
In order to understand how a filter works, let’s go back to the concept of frequency content.
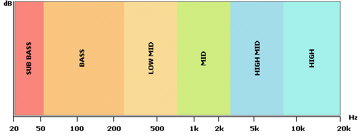
We have learned previously how a human with ‘normal’ hearing capacities can hear sound ranging from 20Hz to 20kHz. The frequency content of a sound is defined by how loud the frequencies are across that range. So a ‘bassy’ sound is a sound that has loud low frequencies, whereas a ‘trebly’ sound is a sound that has loud high frequencies. Frequencies are usually categorised and represented as follow:
To illustrate, let’s take a look at a couple of examples.
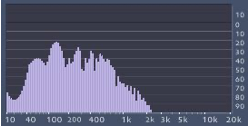
In the picture above, the sound has loud frequencies in the lower range and nothing above 2kHz. This is a ‘bassy’ sound.
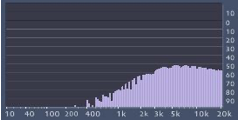
Here frequencies are louder in the higher range and nothing below 400Hz. This is a ‘trebly’ sound.
What does the filter do?
Ok so far we have our basic raw tone, and the ES2 has quite a varied selection. But we often find, we want to be able to shape the sound further, so this is where we often use a filter to change it. We have discussed how the frequency content of a sound tells us whether a sound is high or low, or if it sounds bassy or trebly.
The filter section of a synthesiser usually labelled, VCF (voltage control filter), DCF (Digital control filter) or simply Filter, is used to remove or reduce frequencies from the waveform so as to alter the tone (brighter or duller). A bit like the equalizer on your Hi-fi or TV set and quite a lot more.
The filter is a very important element in the final quality of the sound. Many ‘classic’ synths have achieved their status because of the quality, colour and warmth of their filter(s). The filter is not only a tool to shape the tonal aspect of a sound but also a creative tool for unique effects.
Filter types
There are various types of filters, which will of course alter the sound in different ways. We will look at some of them.
LPF- low pass filter: As its name suggests, this passes the lower frequencies while filtering out the higher ones. The point at which it starts filtering is the cutoff point determined by the cutoff control. Its general result is to reduce the high frequency content, making the sound more ‘bassy’. This is by far the most common type of filter.
HPF- high pass filter: Here again as its name suggests, this passes the higher frequencies while filtering out the lower ones. Its general result is to reduce the low frequency content, making the sound thinner.
BPF – band pass filter: The band pass filter passes a band of central frequencies while filtering/attenuating those above and below the cut off point. This filter is great to isolate a narrower frequency range.
Notch filter: The notch filter works the opposite way as the band-pass filter, it filters out the frequencies in a central band, leaving only those above and below.
Filter parameters
There are two settings, which apply to all types of filters – cut off frequency and resonance.
Cut off: It determines the frequency at which the filter starts to take effect. There is normally a knob on an analogue synthesiser to set the base cut off frequency for the filter. This base frequency can then be changed (i.e. modulated) by various controls (envelope generator, LFO, etc.) to give filter sweep effects. Sweeping the filter cut off frequency can give very dramatic effects (i.e. the constantly changing sound of an acid bassline, with the filter being slowly swept slowly up & down by an LFO).
Resonance, also known as Peak or Q: It is actually the amount of the output of the filter that is fed back into the input. Its effect is to emphasize the frequencies just around the cut off frequency. Increasing the resonance makes the filter effect more ‘dramatic’ – particularly with filter sweeps. On many synths, if you turn the resonance right up it feeds back on itself & turns into another oscillator.
How much filter do you need?
dB/octave: The ‘strength’ of a filter is measured in db/octave, dB being the volume and octave the frequencies. It represents the slope of the filter effect, how steep is the curve. In some synths this is sometimes also expressed using ‘pole’. 1 pole is 6dB reduction by octave, 2 poles 12dB/Oct, etc.
The Volume Envelope
The amplifier is the latest stage in the process and is often labelled, VCA, DCA, AMP, EG, ENV / ENVELOPE or ADSR. The amplifier section controls the volume of the sound, but it is more than just a straight volume control. The Amplifier uses an ‘Envelope Generator’ to control the overall loudness (or amplitude) of the sound over time.
To understand how an envelope works, we need to go back to how we perceive the volume of sound. For example the sound of a piano has a strong emphasis at the start of the sound but then doesn’t sustain for very long, whereas the sound of a car engine passing by will gradually sound louder and louder as the car approaches and then slowly disappear in volume.
A Volume envelope in a synth is designed to help us shape the volume of the sound from the moment you press a key until you release it.
Envelope generators
Envelope generators are used to help the synthesiser produce expressive sounds. A most basic synth has at least one envelope generator that controls the volume of the sound, but envelope generators do not only control the volume, in some devices, they can also control other parameters.
It is quite common to find two envelope generators in many devices, one to control the volume and the other to control the filter cut off for example. Today we will look at how to use the envelope to shape the volume of a sound.
Envelope generators are triggered by the keyboard; when you press a key, it sends a ‘trigger’ message to the envelope generator; it begins the generator’s process of creating an envelope. As long as the key on the keyboard is held down, another message is sent to the envelope generators. The message tells the generators that the note is still being played and the envelope being generated will stay open until this message ceases. When the message stops (you release the key), the envelope will go into its final stage.
ADSR
Nowadays, there are many variations of envelopes available. However, the most common envelope generator has four parameters: Attack time, Decay time, Sustain level, and Release time, usually called ADSR envelope.
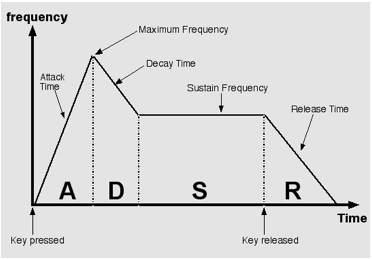
The diagram below shows how an ADSR envelope is used to control the volume of the sound, from when you hit a key until you release it.

ADSR: The four phases of an ADSR envelope. Notice how they relate to a key being pressed.
Attack: This is the length of time required for the sound to reach its initial maximum volume. Obviously it will be very short for a percussive sound.
Decay: This is what happens immediately after a sound hits its maximum volume level in the attack phase. It’s the time taken for the volume to reach a second volume level known as the sustain level.
Sustain: This is not a length of time but a volume level at which the sound sustains after the decay phase. In most sounds is it lower than the attack volume, but it could be the same or even higher. Usually, it’s the volume at which a sound plays while a key is being held down. This phase can, theoretically, last forever, or at least until you get tired of holding down the key.
Release: This is the final phase, again measured in time, and is the time it takes the volume to reach zero after you release the key.
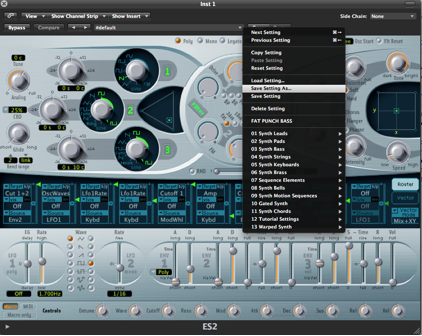
Saving Presets
Don’t forget to save any sounds which you create. Obviously you may have spent a lot of time creating a great bass or synth sound, and ultimately you want now to be able to reload it when you need it. This is part of building your own sound library.
First, click on the settings drop down menu and select Save Settings As;
We saw that some basic knowledge about subtractive synthesis can go a long way in creating the sounds that we hear from our favourite producers and the sounds that we hear in our own minds. The use of a simple envelope (ADSR) to control volume allows the manipulation of amplitude over time, adding expression to sounds created with oscillators and filters. This is known as modulation.
In this lesson we will look at how modulation can be used to massively expand the sonic pallet available when designing sounds. To help us with this we will be using Native Instruments MASSIVE synthesiser, a very powerful and versatile synth with a plethora of modulation possibilities.
Modulation
So far we have looked at the three main sections of an analog synth: OSCILLATOR – FILTER – AMPLIFIER. Using just these three building blocks – oscillator, filter and envelope generator – it’s possible to create a huge range of sounds, both natural sounding and artificial. But a synthesizer can do much more than that. Most synths also contain other blocks or modules (i.e. LFO, envelope generator) that allows us to shape sounds in many different ways.
Remember when we were playing with the filters in real time last week, it was creating interesting sounds, this really is where analog synthesis becomes interesting, and allows to create original and unique sounds.
The very basic idea is that any of the three main modules (osc, filter, amp) can be ‘modulated’ using other modules or parameters. For example, we already discussed last week how an envelope generator is used to shape the volume of a sound. This week we will discuss how an envelope generator for example, can also ‘modulates’ other parameters, such as filter or pitch.
Let’s take a look at this diagram and see how some of these modules or ‘blocks’ can be connected in order to apply modulation.
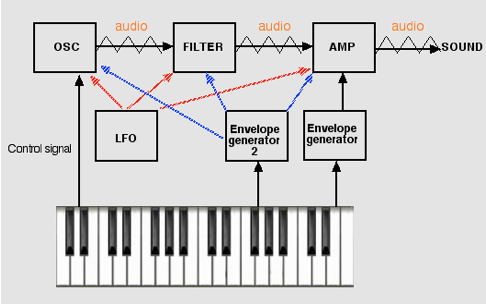
As you can see in the diagram above, the LFO and envelope generator 2 can be connected to the oscillator, filter or amplifier, to create more interesting sounds.
How does it work?
The basic concept of ‘modulating’ a sound, involves three elements:
- Modulation source: this is what will be used to make the changes happen. It can be actions from your MIDI keyboard, such as velocity, mod wheel, pitch bend, etc, or an envelope generator, LFO, or whichever other features the synth provides.
- Modulation destination: this is the part of the sound that you want to change. It usually is the volume (as demonstrated last week), the filter and the oscillator pitch. But some devices like the ES2 can allow you to modulate many more parameters, and it actually refers to this as the Target
- Amount: It defines how much the source will affect the destination, the greater the amount, the greater the change.
Hardwired vs Modular
In many synths, the modules (blocks) are already connected (or hardwired, to use the correct terminology), which means you only have to fiddle with the modules parameters in order to create sounds.
In modular synths, they’re not, which means they have to be connected using patch chords before you get any sound at all. Obviously, synths of the hardwired variety are generally easier to use, but modular synths are more flexible, since you can freely choose how to connect all these modules.
With the arrival of software synths, ‘hardwired’ synths have become far more flexible, as you will find out using the ES1 and ES2 synths in Logic. In addition, some parameters can be modulated using certain functions of your MIDI keyboard, such as velocities, modulation wheel, etc….
As we have already discussed, not every synth offer the same features, some will have one or more oscillators, one or several envelopes, LFO(s), etc… But they will all follow the same basic connections we have mentioned before. In this lesson we will discuss some of the most useful techniques that will help you create better sounds for your productions.
Velocity Control
Setting how the Velocity controls Volume
Most old analog synths were not velocity sensitive, nowadays all modern synths will respond to velocity. The most common use for that is to control the volume, so that basically the harder you press a key, the louder it sounds, and vice versa.
You have already noticed that most of the sounds you have used in the ES 1 already respond to velocity, but when you create a sound from scratch you will need to set it up.
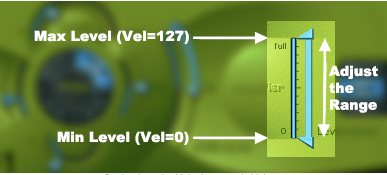
Velocity response is set up using the vertical slider (as seen above) With the uppermost selector you can choose the loudest volume you want when you hit the keys the hardest (vel 127) and with the lowermost selector, the level you want the volume to be when you hit the keys the softest (vel 1)

Setting how the Velocity controls the Filter Cutoff Frequency
Velocity can often be used to control other parameters other than volume. You can also use velocity to control the Filter Cutoff Frequency for example.
Many real instruments will sound less bright if played at a low volume and become brighter when played loudly, so by applying velocity to both the volume and the filter will help you to emulate this effect. Here’s how to set it up:
- Choose a Cutoff Frequency – something low is typical – say three notches up (that’s about 140Hz)
- Adjust the lowermost selector to choose what frequency the cutoff will be when you play the keys the softest. This is relative to the Cutoff Frequency set so if your Cutoff is at the 3rd notch from the left and your lowest freq selector is at the bottom the Cutoff Frequency will be still the 3rd notch from the left. However, if you set the lowermost selector 2 notches up, the cutoff frequency will be increased by a notch when you play the keys the softest.Adjust the uppermost selector to choose the frequency cutoff value when you play keys the hardest. Higher values create a brighter tone.
- Adjust the uppermost selector to choose the frequency cutoff value when you play keys the hardest. Higher values create a brighter tone.
If you want to turn off velocity responsiveness click 0 in the middle.
Envelope Generators
As we have already mentioned earlier, the envelope generator output does not have to be applied to the amplifier section only. It can also be applied to other parts of the synth.
It is normal to allow the filter to be modulated by the main envelope generator (or to have a separate envelope generator dedicated to the filter). This allows you to make tonal changes to the note while it plays.
Some synths have only one envelope generator that controls the amp and filter simultaneously, but many devices have at least a second envelope generator that you can assign to the filter or sometimes other parameters.
A great example is the ‘squelchy’ bass sounds used for most electronic dance music. By having a zero attack, short decay and zero sustain level, on the filter envelope generator, you get a sound that starts with the filter wide open, and quickly sweeps down to fully closed. Add some resonance for a more dramatic sound.
We have already discussed last week how an ADSR envelope shapes a sound in time. When used to modulate another part of the synth such as the filter for example, the envelope will work exactly the same way, but will affect the frequency cutoff instead of the volume.
Also note that some also allow you to apply an envelope to other section of the synth, such as the pitch of the Oscillator for example, as we will also demonstrate next. The ES 1 has a dedicated Mod Envelope for this job, and with the ES 2 you can use whichever envelope you want!
You might also want to try other possibilities, like applying the Mod Envelope to the pitch of the oscillator for example, so that when you press a note, the sound will go up and down in pitch according to the shape of the envelope. Great for sound FXs.
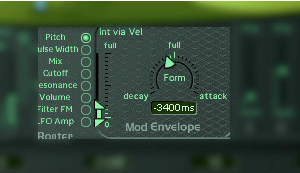
The Mod Envelope and routing matrix (set to Pitch)
LFO
When you apply periodic changes to the pitch of a sustaining sound, you obtain what is known as a vibrato. If the periodic changes affect the loudness of the sound instead, it is called a tremolo. Vibrato and tremolo are often an important part of the sound of acoustic instruments. For instance, a sustained violin sound without vibrato will sound surprisingly raw and unmusical.
Most synthesizers can simulate these effects by applying a slight, periodic change to the pitch of the oscillator (vibrato) or the amplifier (tremolo). Vibrato and tremolo effects require a rather slow wave that will modulate either the pitch or the volume of a sound. To create this modulation wave, synths use a module called LFO.
LFO stands for ‘Low Frequency Oscillator’. As its name suggests, it’s an oscillator that vibrates at a frequency way below our range of hearing. The LFO is not used to generate a signal that you can hear, but is used to modulate the other sections of the synth, to generate effects.
The LFO produces an output frequency, as does the oscillator. However, while the Osc produces an audible frequency (from, say, 20 Hz up to 20 Kilohertz), the LFO produces a signal with a relatively low frequency, it may range from 1Hz to 10Hz.
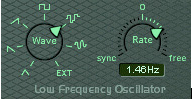
The two main parameters to control LFOs are:
- Waveform: Because a LFO is primarily an oscillator, it is not really a surprise that it generally uses the same waveforms as found in the oscillator section; such as sine, triangle, sawtooth, pulse, and random. Some devices offer other possibilities.
- Rate: Speed of the LFO defines how fast is the cycle of the waveform. Most new hardware or plug-ins synths also have a sync button so you can sync the effect to the tempo of the project loaded to rhythmical values such as 1/8, 1/16, etc.
Using a sine wave, for example, the pitch will rise and fall regularly up and down. With a frequency setting of around seven cycles per second, the result will be a musical vibrato. Crank the depth up, however, and it will turn into a siren! If a square wave is used instead of a sine wave, the pitch will oscillate between two pitches, rather like a trill. Select a noise waveform and pitches will be generated at random.
We have already discussed how some synths are completely modular, where you can select any modulation source (envelope, LFO, etc.) to modify any parameters (osc pitch filter cutoff, etc…). But not all synths offer this flexibility, and sometimes a modulation source will be automatically assigned to only one parameter. With that type of synth, LFOs are most often applied to the oscillator to modulate the pitch.
However many synths have the option to assign the LFO to many parameters.
The most common use is to assign the LFO to the volume envelope, to create a tremolo effect or to the filter, so the filter opens up and closes down following the LFO settings, when pushed to extreme, you get that bubbly effect, almost helicopter like…
How To Control The LFO
Ok, LFOs offer great modulation effects, but quite often we will want to be able to control when it starts affecting the sound.
Natural vibrato and tremolo effects tend to increase in strength as a note is sustained. For example, a flute sound might have a tremolo effect, which begins at some point after the note has sounded, and the tremolo effect gradually increases to a maximum level, where it remains until the note stops sounding.
There are several techniques you can use to produce this effect, often depending on the features of the synth you use. In the ES1 you can control the depth of the LFO (to make life easier you can think of depth as strength of the ‘wobble’) Not all synthesizers allow this kind of precise control over the LFO, and quite often we can only set a delay time before the modulation begins.
Another characteristic about both these methods, is that even though they allow to offset the start of the LFO, so that it gradually builds up in time, once the LFO is ON, it’s there all the time, which might be what you want for some sounds, but sometimes you might want to have a bit more control over when the LFO is heard.
In many synths, the amount of LFO can often be controlled by different parameters, for instance in the ES 1, you can control how much LFO will be applied using the Router
A common method is to control the amount of LFO using the Mod Wheel of your MIDI keyboard, so that you can change the amount of LFO applied in real time, which gives you far more control.
Furthermore, with midi synths & plug-ins, you can record theses changes in your sequencer on a MIDI track and edit them.
Portamento
Portamento from the Italian word for travel, this is when a note rises or falls from one pitch to another. Portamento is often labelled ‘Glide’ in many devices (ES 1 & 2 included).
The effect of portamento is a continuous “slide” up or down from one note to another, rather than a sudden change from one note to the next. This is most commonly encountered on string instruments, when a guitar, bass or string player slides on the neck of the instruments from one note to another for example. Trombone player can also create a portamento effect, using the slide on the instruments.
Many synths feature a portamento or glide function to emulate this effect. The portamento effect is a great function to add expression to a musical phrase, especially with monophonic lines, such as bass lines and lead type synths.
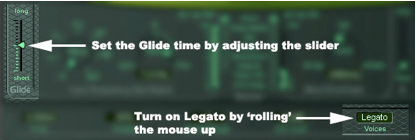
You’ll find a controller that adjusts the time it takes for the notes to bend. Lower positions are faster whilst higher positions are slower.
Legato is a mode that is great for synth solos or basslines. To enable it, roll the mouse up over the ‘Voices’ section. When this is on, the Envelope is not re-triggered from the beginning if you already have a key held down – the pitch just moves up or down. A good example of this is that if you have your filter envelope set with a low sustain level and a decay of about half a second you can have a bright attack on the first note and then if the original key is still held down and you play another the new note will be warmer in tone. This allows for a more expressive performance and is the classic ‘old school’ analog synth mode.
An Introduction to Massive
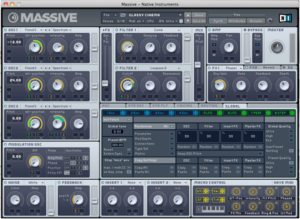
Native Instrument’s Massive synthesiser is a monster of a synth that has gained popularity in a variety of different musical genres for its sound, versatility and programmability. It is a 3 oscillator (plus noise) dual filter semi modular synthesizers that has 8 main modulators, additional modulation sources and effects. Each oscillator has over 28 different waveforms that can be selected.
The Oscillator Section
There are 3 oscillators for sound generation in Massive plus a fourth that is used purely for modulation. These wavetable oscillators are much more sophisticated than the standard waveform generators you would find in a normal analogue subtractive synthesiser.
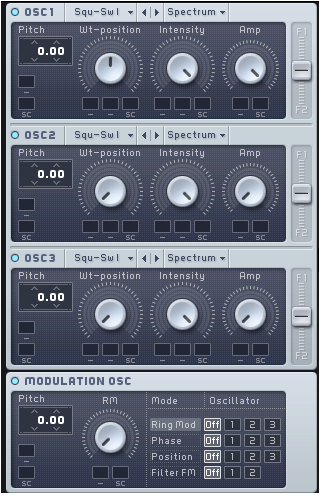
As well as the standard sine, saw, square & triangle waveforms, each oscillator can access a wide range of digital waveforms (selected from the drop down menu to the right of the OSC on/ off switch) that enable you to create a fantastically wide range of sounds. Not only that but each oscillator has two waveforms at once that are morphable using the WT-position control (Fully left is one waveform, fully right is the other).
It’s worth spending time learning how the individual waveforms sound as this is the key to effective sound creation.
The fourth oscillator (Modulation Osc) is used as a modulation source for the other three oscillators. The different modes enable you to create extremely aggressive sounds and are a great source of experimentation.
The Center Window
The center window gives you access to 6 pages of global settings. Clicking on the relevant tab can access each page. The 6 pages are as follows:
OSC: This is the global page for Oscillator settings such as glide, vibrato and pitch bend. One cool thing is an internal envelope that can be used to modulate any of the parameters found here.

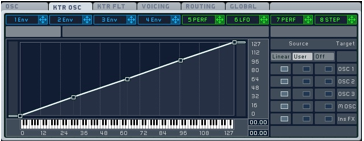
KTR OSC: This page is concerned with how the pitch tracks across the keyboard. For our purposes this is best left as it is.
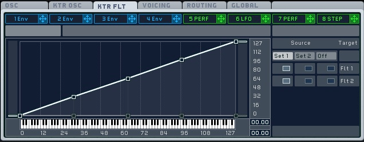
KTR FILT: This page is concerned with how the filter tracks across the keyboard. If you had a low pass filter setup then the cutoff increases, as you play higher up the keyboard. This can be used to ‘brighten’ up a sound for soloing for example.
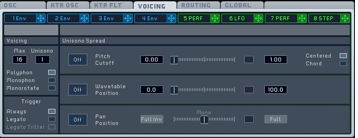
VOICING: This page is concerned with the general polyphony of the sound. The maximum number of voices the patch can play and whether the sound is triggered monophonically (useful for bass sounds) or polyphonically can be set here. Unisono sets the number of voices that are ‘stacked’ with this set high it is possible to create very large sounds but at the expense of polyphony.
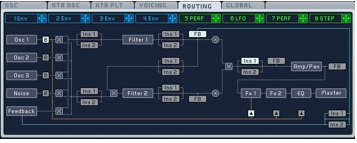
ROUTING: Massive has a semi modular design that allows you to route the signal in a variety of ways. On the left hand side, to the right of each oscillator is a small ‘B” that can be clicked. This routes the signal to the bypass section towards the end of the signal chain. This can be very useful if, for example, you want to create sub bass with one oscillator that you want to mix cleanly without processing. Other things to note are that the insert effects and feedback can be placed in several different locations, which can drastically alter the sound.
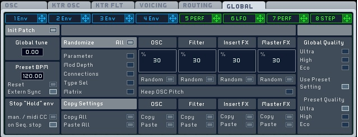
GLOBAL: On this page you will find parameters for global tuning, BPM and the like. You can also randomise the patch here.
Modulation Control
Massive follows the same convention of modulation that you find in most synthesisers, that of source to target modulation. What makes it interesting is the way that it achieves that. Anything that can be used as a modulation source has a small cross symbol by it and anything that can be modulated has at least one clear box underneath it.
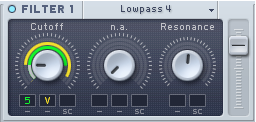
In the example above, you can see that the cutoff of filter 1 is being modulated by modulator 5 (An LFO) and by velocity. The green and yellow lines around the control are the amount of each modulation.
To assign a modulator: Click on the cross next to the source you want to use & drag it to an empty box under the parameter you wish to modulate.
To set the modulation amount click and hold on the modulator number and drag the mouse up and down.
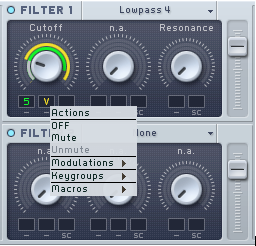
Right clicking on the modulated parameter brings up a pop up menu where you can delete the assignation amongst other options
The Modulators
As mentioned before Massive has 8 dedicated modulators (4 envelopes and 4 LFOs) and these can be accessed via the tab header at the top of the centre section. The cross to the right of each box is the modulation handle and this is used to assign the particular modulator to parameters elsewhere in the synth.
Envelopes
There are four envelopes (1-4) that can be used for modulation. Each can be freely assigned but envelope 4 is assigned to the Amp by default.

The envelope modulation page
The envelope appears to be of an ADSR type design, but it has far more versatility then it would first appear.
The top bar of the envelope modulation page deals with preset selection, saving, loading, deleting and general behaviour.
- Trg Zero Reset: If selected this option retriggers the envelope from the beginning every time a MIDI note is pressed.
- Linear transition switch: Switches the Decay shape from logarithmic to linear. The Attack shape is set to linear and the Decay and Release shapes are logarithmic by default.
- Gate / One Shot / Hold: These govern how the envelope will be triggered when a MIDI note is received. Gate the envelope will play for as long as a key is pressed. When the key is releases the envelope will stop. One Shot The envelope will play to the end even if the key is releases. Any sustain loops that are set will be played too. Hold. The envelope is played until the sustain end point (including sustain loops) and it stays there even if the key is released. The release stage of the envelope is only triggered when a second key is pressed (or the same key is pressed again). If a second key is pressed whilst the first is still held down then the notes are stacked building a chord. When all the keys are released and an additional key pressed all notes jump to the release stage.
The two faders on the left hand side of the envelope control the sensitivity to velocity and keyboard tracking respectively.
The attack and decay stages each have two controls that set the time and level respectively and release has one control that adjusts the time to fade to zero.

The sustain section has extra functionality that elevates it from the norm. It has a loop section that enables you to repeatedly play this part of the envelope, from no loop to infinitely looping. It can be thought of as a mini LFO that is part of the envelope.
The controls in this section are as follows.
- S Loop: Adjusts the time between the sustain start and end points. As the control increases the sustain duration increases which slows the speed of the envelope at this stage.
- Level: Sets the amplitude of the sustain end point.
- Morph: Adjusts the sustain shape between the two reference shapes (see diagram below). Basically this allows you to ‘blend’ the two shapes together
- Sustain morph pop menus 1 & 2: These each contain 22 pre-defined reference sustain shapes. Menu 1 sets the first boundary and Menu 2 the second.
- Loop: Sets the number of times the sustain stage will loop from 0 (sustain stage is ignored) to inf.
- Delay: sets a delay time before the envelope kicks in.
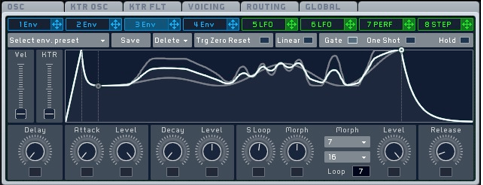
Sustain morphing in action. The white line represents the average of the two morph envelopes 7 & 16
Assignable Pages
This is the name that Massive gives to the final four available modulators (5-8 in green). Four different modulation sources are available that can be chosen from three different modes: LFO, Stepper and Performer.
There are several controls that are shared between the different modes so I want to take a look at these first.
As with the envelopes, LFO presets can be selected and user presets can be saved, loaded and deleted.
The mono switch forces the modulator to output a monophonic signal. Basically this applies the same modulation no matter how many voices are played, effectively synchronising it.
The mode pops up menu (set to LFO above) switches between the LFO, Stepper & Performer modes.
The two rotary dials on the far left are also shared between the 3 modes.
- Rate controls the speed of the oscillation of the modulator that can be synced to an external tempo with the Sync button.
- Restart: With this selected the modulator is re-triggered every time a key is pressed.
- Amp: Sets the modulation amplitude amount. With the rotary set full left this control has no effect.
Now we have looked at the global settings for the assignable pages, let’s look at the 3 different modes in more detail.
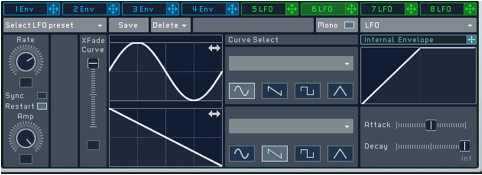
The LFO in Massive is actually two LFOs that can be blended together in a similar way that the sustain morph we saw earlier works. The XFade Curve fader sets the amount of morphing between these two LFOs.
The two waveform displays shown above represent the two different LFOs and it is possible to left click in the window and drag the waveform from left to right to change the start point.
To the right of the displays is the Curve selector where you can choose from classic waveforms (sine, saw, square and triangle) or more wild and wacky ones from the drop down list. There really is something for everyone here!
Finally, on the right hand side we have an extra internal envelope that can be used for modulating any of the LFO parameters. For example, if we wanted to simulate vibrato and have the LFO come in after a certain time we could apply the internal envelope to the Amp and set a longer attack time.
Stepper
The stepper is a basic step sequencer that can be used to modulate sources in a defined rhythmical pattern. Between 1 and 16 steps can be programmed to set up a looped sequence that can be used as a modulation source.
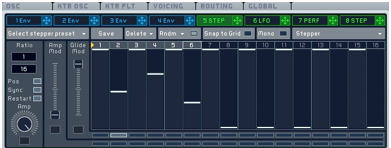
The main part of the window is taken up with 16 bars that can be adjusted up and down by dragging with the mouse (shift click for finer adjustments). Underneath each bar are two buttons that are used to select glide modulation (top button) and amplitude modulation (bottom button)
The small yellow arrow can be moved left to right to select which bar the loop will start on.
The loop length is shown as highlighted numbers above the bar display, for example the loop length above is 6. To change the loop length click the rightmost highlighted number and drag left or right.
The two vertical faders to the left of the display control the amount of glide and amplitude applied to each bar. Both of these can be modulated which increases the versatility of this modulator.
Performer
Welcome to the sound of dubstep! The performance modulator has been a staple part of that genre for as long as Massive has been around it is an incredibly expressive and versatile modulator that can be used in a multitude of ways.
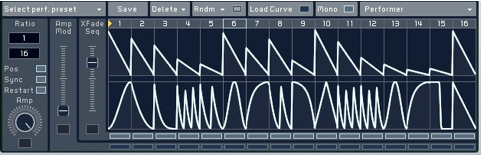
The performer is basically a step sequencer that uses waveform to generate each step in the sequence rather than the bars used in the Stepper. In fact, the performer is TWO step sequencers that you can morph between as with the LFO and the sustain loop. The XFade seq fader to the left of the main display controls the amount of morphing.
To program the sequence select Load Curve which brings up a palette of waveforms (see below). Click a curve shape and you can ‘paint’ that shape into the main display by clicking and dragging left to right. Dragging up and down controls the amplitude of each step.
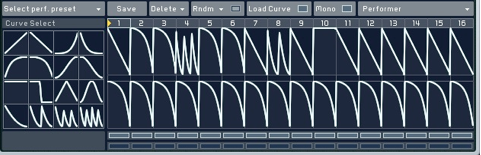
The two sequences can be individually randomised by selecting the Rndm drop down menu, very useful if inspiration is not quite there!